How to Apply Thermal Paste for Generic Not specified
Duration: 45 minutes
Steps: 7 Steps
Hey there, repair rockstar! Just a quick heads-up: if you’re feeling a bit lost or need an extra set of hands, don’t hesitate to schedule a repair. We’re here to help you shine!
Applying thermal paste is super important to keep your processor chill and running smoothly. Follow this handy guide to reapply thermal paste after you’ve removed a heat sink or CPU during your repair adventure. For some more detailed instructions tailored to your specific CPU, check out Arctic Silver’s application methods. And if you’re working on a phone, we’ve got you covered with this guide!
Step 1

Thermal paste plays a crucial role in helping your processor stay cool by transferring heat to the heat sink. Forgetting to apply thermal paste when putting your computer back together? That’s a surefire way to make your processor overheat and potentially cause some serious damage. Let’s keep that tech running smoothly!
Before slapping on that fresh layer of thermal paste, make sure to wipe away any remnants of the old stuff from both the processor and the heat sink. A clean surface is key to keeping things cool and running smoothly!
Step 2


– Grab that trusty spudger and get ready for some fun! Gently use the flat end to scrape away the stubborn, solidified thermal paste from the copper core(s) of your heat sink. The goal is to make it shine again, so scrape away with care!
Tools Used

Step 3

Once you’ve scraped away the stubborn thermal paste, you might still notice some residue hanging out on the copper core(s).
Step 4


– Grab a coffee filter or a lint-free cloth, and add a splash of isopropyl alcohol (that’s IPA, 90% concentration or higher) to wipe away that pesky thermal paste residue from your heat sink’s contact surface.
– Once you’re done with the first round, switch to a fresh coffee filter or cloth and a bit more IPA to banish any lingering oils and get that surface ready for action.
– Keep those fingers off the chip and heatsink! Any dust or debris could really mess with thermal transfer, and even a little fingerprint can be a big deal.
– Let those heat sinks dry completely before moving on!
Tools Used

Step 5
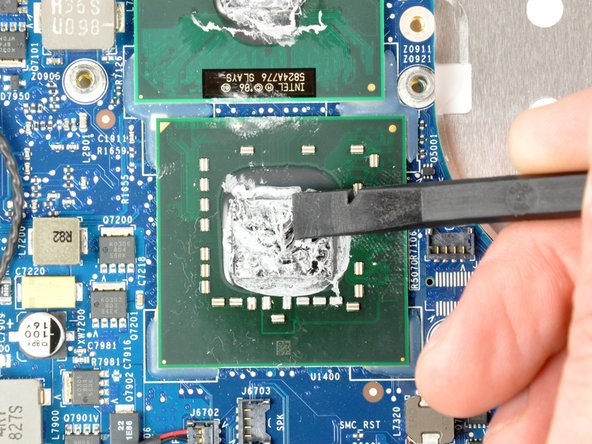
Steer clear of any metal objects during this process! Take care not to damage any components on the processor’s surface, and keep that thermal compound in check—loose conductive pastes can lead to some serious trouble!
– Grab that trusty spudger+Device+model&crid=1TJIMMAJSUJUZ&sprefix=repair+tools%2Caps%2C165&linkCode=ll2&tag=salvationrepa-20&linkId=c486487cf454ce8edd6f5beefab4110f&language=en_US&ref_=as_li_ss_tl’>plastic spudger and gently coax away any stubborn thermal paste that’s clung to the surface of your processor(s). You’ve got this!
Tools Used
Step 6


– Alright, grab a coffee filter or a lint-free cloth and a splash of IPA or ArctiClean Thermal Material Remover to wipe away that pesky thermal paste residue from the processor surface.
– Next up, use a clean coffee filter or cloth along with some IPA to banish any lingering oils and get that surface prepped and ready.
– Now, give those processors some time to dry off completely!
Step 7

No worries if a little thermal paste accidentally finds its way onto the green surface of the processor – it won’t cause any trouble at all!
While you don’t need to slather thermal paste on the heat sink(s), if you’re curious, Arctic Silver has some nifty tips on ‘tinting’ the heat sink to help the thermal compound settle in faster.
– When it’s time to put on some fresh thermal paste, go with the application technique that suits your processor best—whether that’s a vertical line, horizontal line, a dot in the middle, or spreading it out smoothly. Just a heads-up: spreading it out can sometimes trap air bubbles, so be careful!
– Now, if you’re opting for the surface spread method:
– Your processor is all set and ready to welcome its heat sink!