How to Disassemble HP Compaq NC6120 – Step-by-Step Guide
Duration: 45 minutes
Steps: 11 Steps
Before you dive into replacing key components of your HP Compaq NC6120, you’ll need to pop it open. Just gather your patience, remove those key screws, and gently lift up a panel. You’ve got this!
Step 1

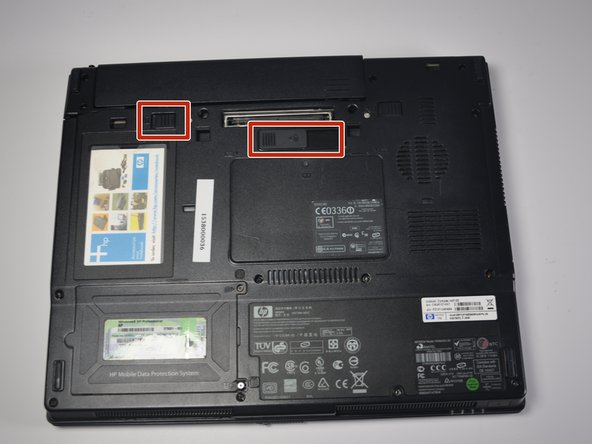

– Time to get started! Flip your laptop over so the backside is facing up – don’t worry, it’s easier than it sounds.
– Now, locate the two plastic switches at the top of the backside of your computer and gently pull them outwards. This will release the battery, so carefully remove it to begin your repair journey!
Step 2


All screws are 9.8mm 3.0 flatheads, except for the two sneaky ones under the battery—they’re T9 torx.
– Let’s get started by taking out all 13 screws from the back panel of your computer. This includes the two sneaky torx screws hiding under the battery and the two that are tucked away under the RAM memory panel.
– Next up, remove the four screws at the hinge of the computer. These little guys are also holding the back panel in place, so make sure to give them some love!
Step 3


– Flip open your laptop, screen facing you. Lay the monitor back till it’s lying flat, all buddy-buddy with the keyboard.
Step 4


– Grab your trusty iFixit opening tool and gently pry off the plastic panel nestled between the keyboard and monitor. It should pop off like a champ with the spudger, allowing you to pull it away with ease.
Tools Used

Step 5


– Time to get that cable out! Gently remove the white cable that’s attached to the plastic panel you just took out from the motherboard. This is a crucial step, so take your time and make sure it’s completely disconnected.
Step 6


– Gently flip the keyboard away from the monitor, giving it a little twist so the keys are resting face down on the mousepad. Now, go ahead and unplug the black cord at the bottom of the keyboard that connects it to the motherboard. Voilà! The keyboard is now free and ready to be lifted away.
Step 7


– Take out the two 9.8mm 3.0 flathead screws—one on each hinge. Keep it chill, you’ve got this!
Step 8


– Gently unplug the black cable with the rectangular white plastic head from the motherboard. You’ll find it chilling at the top left corner of the motherboard, just under the left hinge. Take your time—no rush!
Step 9


– Lift the monitor straight up from its resting place. The two metal hinges should glide out of their slots effortlessly, disconnecting the monitor from the motherboard.
Step 10


– Grab your iFixit opening tool and gently pop off the black plastic panel (with mousepad) from the motherboard.
Tools Used
Step 11


– To reassemble your device, follow these instructions in reverse order.
– 8 other people completed this guide.
Success!