How to get (almost) of your data with just movable.sed & Nintendo 3DS Folder!
Duration: 45 minutes
Steps: 6 Steps
Hey there! Having trouble with a lost or corrupted nand? Don’t worry, we’ve got you covered! Today, we’ll walk you through a step-by-step process to recover most of your data from just two files. Let’s dive in and get started with this easy repair guide from Salvation Repair.
Step 1

– Go ahead and turn off your modded 3DS/2DS completely.
Step 2

– Pop out your 3DS SD card. Download the movableover script onto your computer (just click ‘save as’). Then head over to your SD card’s folder, find ‘gm9’, and go to the ‘scripts’ folder. Drop the file there. If the script isn’t called MovableMoveover.gm9, simply rename it to that.
Step 3
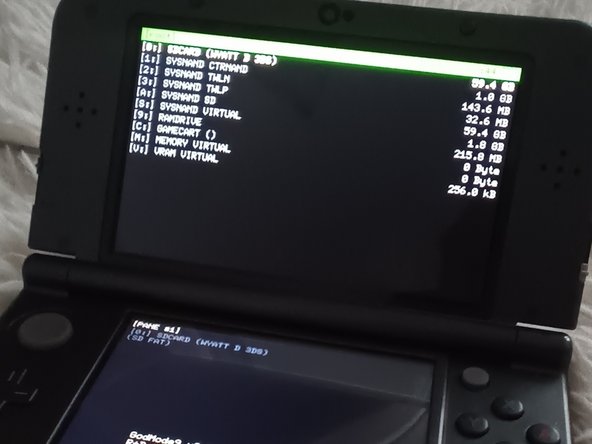
– Reinsert your SD card into your 3DS, then power it on to boot into GodMode9 (press start+power during startup). Once it’s up, you’ll see all your drives listed with a green bar on top—meaning you’re successfully booted into the right mode. If it asks you to set the RTC time, just set it to the current time and you’re good to go. Need extra help? You can always schedule a repair.
Step 4
Heads up! This step has the potential to turn your device into a paperweight if you’re not careful. Proceed with caution!
– Head over to your drive—it’s the second one below your SD card drive. You’re looking for the SysNand CTRNAND. Hit A to select it. Next, open up the private folder (that’s the fourth one down). Spot the file labeled ‘movable’? That’s the one you want! Select it with A, scroll all the way down, and pick ‘copy to 0:/gm9/out’. Hit A to copy it over.
– Now, remember the movable file? Not for this system, but for the other 3DS (the one with all your data to recover)? Drop that file right at the root of your SD card.
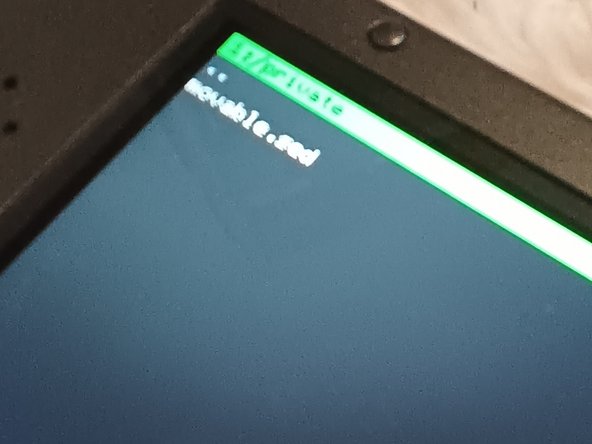
– Jump into CTRNAND, then into the PRIVATE folder. Highlight that file and press R+X together to rename it to ‘movable.sed’. After you’ve renamed it, follow the on-screen input codes. When that’s done, back out by pressing B twice. Hit the home menu button—you’ll see six options. Head to the scripts section, then pick the movable script, and run it.
Step 5
– Time to reboot your console! If you did everything right, it’ll feel fresh and brand new. Go through the setup steps to get to the home menu. You might see some of your system data pop up, but the menu will look just like it did before. Next up: let’s get your NNID linked again.
– Open System Settings, then find Nintendo Network ID Services (the name might be a little different). Enter the email, password, and network ID for your account. If you get an error saying it’s linked on another system, don’t stress.
– Head over to this website: https://en-americas-support.nintendo.com. It might take a day or two for things to sort out, but linking your NNID will help you get your main Mii back, plus access to your old apps in the eShop so you can redownload them and restore your stuff. (You’ll see more on this in the next step!)
Step 6
– Awesome! If you’ve linked your Nintendo ID, you’re in luck! Just hop onto the eShop, head to settings, then redownloaded software, and get ALL of your apps back! After that, swing by the home menu, click that home menu icon in the upper left corner, and choose the layout you had before.
– Heads up! You might not get back every single thing from your save data apps, but at least the important ones should be waiting for you.
– Next up, launch FBI and navigate to your external save data. You’ll see all your apps there! Click on the one you need and check out that save data folder—it’s where your save data lives! 😀 If it’s empty, no stress! Your 3DS just might be a little confused about its location.
– If you do find files, go ahead and copy them all! Then, return to the FBI menu, select apps, and paste those files into the corresponding save data app. If you try to access the save data on the new app you redownloaded and it says it can’t, just open that app, then hop back into FBI—it should recognize the new app now.
– Once those files are in the new app, just exit FBI and dive into that app! If your data shows up, yay! Now you can repeat this for your other apps too! If your save data files are missing, well, I can’t say for sure, but it seems like they’re still around somewhere! And yes, you might have to restart a lot of your system data, but hang in there—updates are coming soon!
Success!