
How to repair a broken flex cable (Sony Xperia Z1 microphone flex)
Duration: 45 minutes
Steps: 14 Steps
Looks like your Sony Xperia Z1’s microphone decided to take an early retirement—don’t worry, it’s a pretty common issue! Microphone problems can range from minor hiccups to full-on silent treatment, and this guide is here to walk you through each scenario step by step. Before we dive in, keep in mind: you’ll need some experience with surface-mount soldering, and you should already be comfortable disassembling and reassembling the device. The goal here is to show you how to make a jumper, share some advanced tips for repairing flex cables (yeah, flex cable repairs can seem like a wild idea, but hey, it’s doable!), and bring together all the scattered information about Z1 microphone issues into one handy place. Just a heads-up—this guide is based on personal experience and bits of info from around the web. Let’s get started!
Step 1

– Alright, let’s get down to business! To figure out what’s up with your microphone, head over to Settings -> About Phone -> Diagnostics -> Tests and give that mic a workout. Alternatively, if you’re feeling fancy, punch in *#*#7378423#*#* to access the service menu and run the mic test there.
– The test results are the key to cracking this case—muffled audio, total radio silence, or just weird buzzing? Each one tells a different story and points you in the right direction for fixing your device.
– Don’t forget about the secondary microphone! It’s the secret hero behind video recordings and other tasks. Give it a test too—you’ll thank yourself later when it turns out to be crucial in diagnosing the problem.
Step 2

Heads up—diving into repairs without the right skills, focus, or patience could cause bigger headaches for your device. Before you go all in, rule out the easy stuff like minor glitches and software hiccups. Start small, think smart!
Let’s get down to business! Depending on the device you’re working with, you might find some extra bits and bobs like washers, grounding pieces, or plastic covers hiding above or between parts. Make sure to give them a once-over (and a twice-over, just to be sure!) if you’ve already replaced something inside. If that’s not the case, swapping out a part – like the microphone, for instance – might just do the trick. Remember, it’s all about attention to detail!
– Before diving into full-blown troubleshooting mode, take a second to rule out the obvious—because sometimes the simplest fixes save the most hassle. Pocket lint and dust love to settle into the tiny microphone holes at the bottom of your phone, interfering with sound pickup.
– So, give those holes a quick inspection. A tiny blockage could be the only thing standing between you and crystal-clear audio. I’ve seen this trick work before, and if it saves you time, fantastic! If not—well, at least you eliminated one possibility with minimal effort. Onward to the next step!
Step 3

– Don’t worry, you’ve got this! If your device is acting up, you can try a hard reset or update its operating system to get it back on track. If that doesn’t work, you might need to roll back to a previous version that was working smoothly. For software-related issues, it’s best to consult the experts – head over to sites like xda developers for some top-notch guidance.
– Let’s face it, if you’ve tinkered with your device’s software and now it’s not cooperating, the solution usually lies in fixing the software. So, take a deep breath and dive back into the world of coding and updates to get your device up and running again. If you need help, you can always schedule a repair with Salvation Repair.
Step 4

– If your sound seems muffled, don’t worry! It’s probably not an issue with the flex cables. The culprit might just be dirt hanging out where it shouldn’t, or your mic settings might need a quick tweak.
– No sound at all? That could mean your mic is on the fritz or your flex cables got damaged. But hey, if the device hasn’t been opened before, odds are, your flex cables are fine—they don’t just quit on their own!
– A buzzing noise? Uh-oh. That might be a mic damaged by water or moisture, or funny mic settings are playing tricks on you. For some folks, turning off mic noise suppression and the equalizer has done the trick. Worth a shot!
Step 5

Other options to consider include
– If your mic was working perfectly fine before you opened up the device for any operation, but now it’s acting up, something likely went wrong during the process.
– For Xperia Z series devices, it’s pretty common for the microphone to go silent after a screen replacement. The usual suspect? The flex cable. It’s super easy to accidentally damage it during the repair, even for seasoned pros, so no shame if it happens.
– A component mounted on the surface might have been knocked off the board or the flex cable.
– There could also be dirt or a poor connection either between the flex and the motherboard or between the part and the flex.
Step 6


Take note that the tear is hiding underneath the black rubber, which you’ll need to peel back to reveal the damaged trace. It can sometimes be a bit tricky to spot where the issue lies, so don’t worry if it’s not immediately obvious!
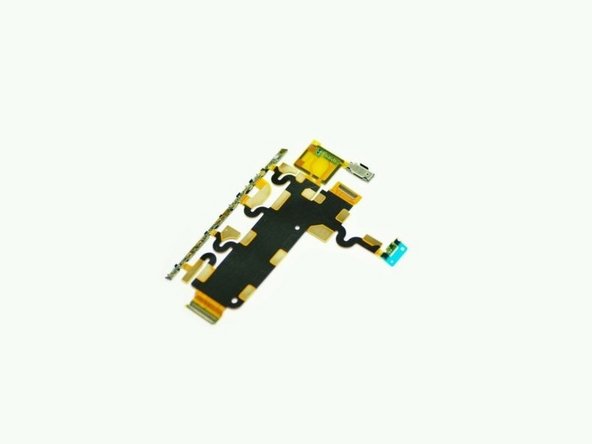
– To track down a busted flex cable, zone in on the flex cables and the areas you tinkered with during the last repair. If you’re fixing up an Xperia Z1, the big culprit is usually the large flex cable that connects the motherboard to all the buttons and the screen.
– Bring your eagle eye—or at least a sharp one—to the task of spotting a damaged flex cable. If your vision could use a boost, grab some magnification—it’ll be your best friend here.
– Flex cables tend to rip near bends or in narrower spots. Check out the pictures of two broken mic flex cables for the Z1: the first one is the original flex I accidentally tore, and the second is a replacement that came already broken. Not trusting the replacement to hold up, I decided to fix the original instead. If this feels overwhelming, remember you can always schedule a repair.
Step 7
Before snagging that new part, take a moment to double-check the model numbers and pictures—compatibility is key, and a perfect match makes everything smoother!
– Spotting the damaged flex cable is usually the conclusion of the diagnostics process, and the replacement parts are often quite affordable.
– For those tackling an iPhone 6 home button flex cable issue (Error 53) or those who don’t have the time to wait for a new part, here are some options shared more as an intriguing possibility rather than a standard recommendation. Unless you have a compelling reason—or genuinely enjoy the challenge—it’s often not worth repairing a broken flex cable. It’s rarely worth the effort.
Step 8

Steer clear of hot air – it can burn and distort the flex! For this, you’ll want to rely on some good ol’ hand soldering with an iron. Having experience with surface-mount technology (SMT) and a microscope is a must to get this right. Take your time, stay steady, and you’ll be golden!
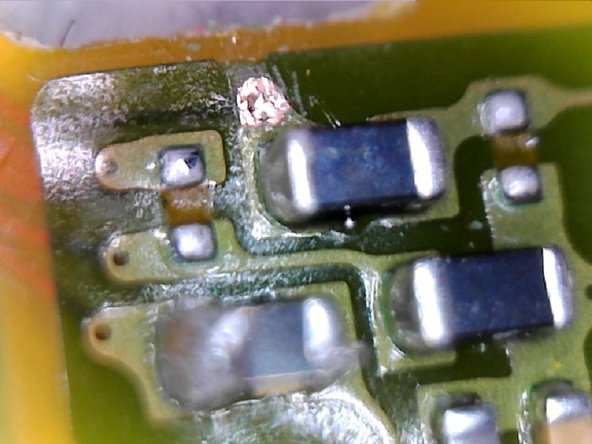
Find the biggest open spaces you can for those jumper points—this helps avoid accidental tangles with tiny SMD components or mishaps with the soldering iron. Nobody wants to scorch or unstick something important, so aim for those clean, empty pads when placing jumpers.
Think about where the flex cable will snake its way through the device. You don’t want to drop solder or place jumpers in spots where there’s no wiggle room for them!
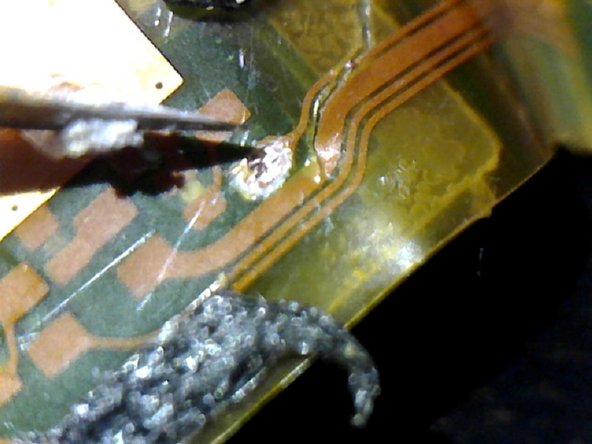
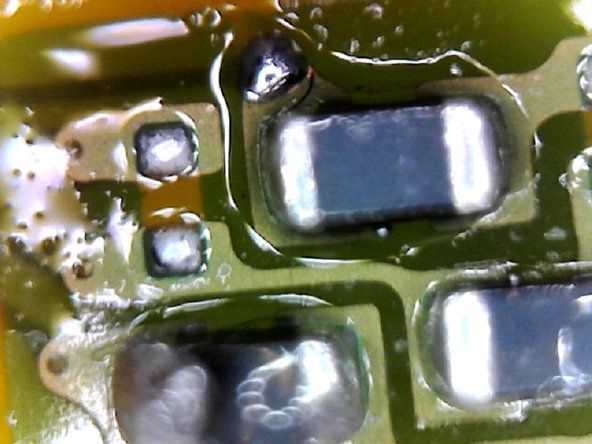
– Alright, if you’re diving into flex cable repair, you’ll want a solid game plan for those jumpers—where to place them and where they’ll end up. Great jumper points? Think the sides of SMD components or broader trace areas. Check out the picture where I’ve highlighted a few possible spots for different traces to give you the idea.
– Jumpers are all about precision. To make one successfully, you need to understand how they work. And insulation is key—skip it, and you’ll have weird connections and potential damage. I personally go for enameled copper wire most of the time, but if you’re feeling adventurous, scrap flex cable works too (though it’s trickier).
– Before cutting your jumper wire, take a peek at the next steps in the guide to get a feel for the kind of jumper you need to make. Trust me, a little planning goes a long way!
Tools Used

Step 9

Handle that knife like you’re carving a pumpkin—gently and with care! No need to go Hulk here; just a light touch will do. If it takes about 30 seconds of soft scratching to reveal the copper, that’s totally fine. Pro tip: grab an old flex cable to practice these moves like a pro before diving into the real deal.
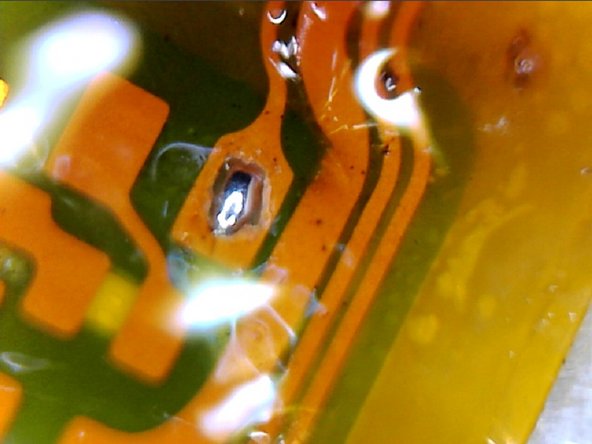
– Once you’ve spotted a promising pad, gently scratch away at it with the tip of an exacto knife until you unveil the shiny copper underneath.
– Next, treat the pad to a little spa time—clean it with some rubbing alcohol (make sure you’re the sober one here) and a trusty Q-tip.
– Repeat this whole process on the next jumper point. You’ve got this!
Step 10
– Time to get your hands a little dirty! Start by spreading some flux onto those pads. Then, grab your soldering iron and gently touch the pads with the tip, adding a dab of solder to tin them up nicely. Check out the pictures for a visual guide and maybe practice a bit beforehand. In the second pic, you’ll notice that the pad got a bit of a light touch-up because it wasn’t cleaned well enough. Aim for those larger solder pads if you’ve got the room to play with!
– Don’t forget to tin the ends of your jumper too! To get rid of that pesky enamel, just use a file or a knife. Once that’s done, load it up with some flux and add a little solder (not too much!) to the end of the jumper. You want it to look a little shiny—just enough to make it sparkle! But remember, a big blob of solder is a no-go.
Tools Used
Step 11
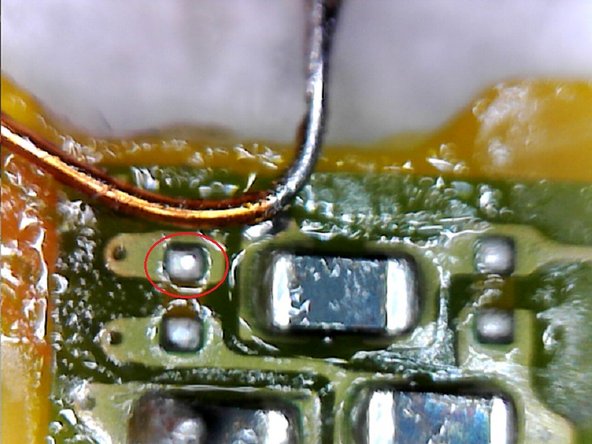
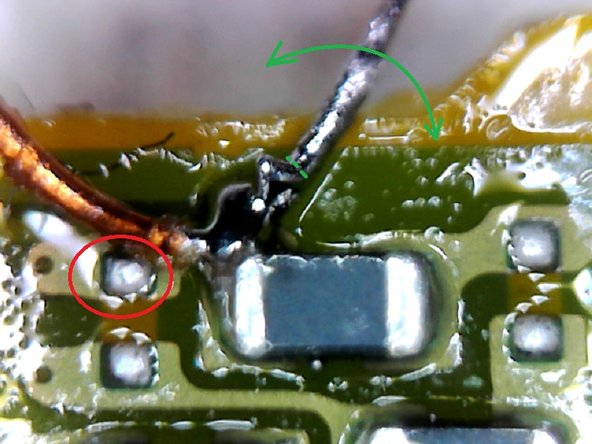
Make sure there’s no exposed wire hanging out after soldering—loose wires can cause major issues by touching other components and messing things up. Check out the first picture: I’m trimming off any extra tinned wire for a clean fit. There’s an empty pad nearby that’s a little too close for comfort (circled in red), so precision is key here!
– Add a little more flux—you’ve got this!
– Gently solder the jumper into place while holding it steady with tweezers. No need to sweat the jumper’s length just yet.
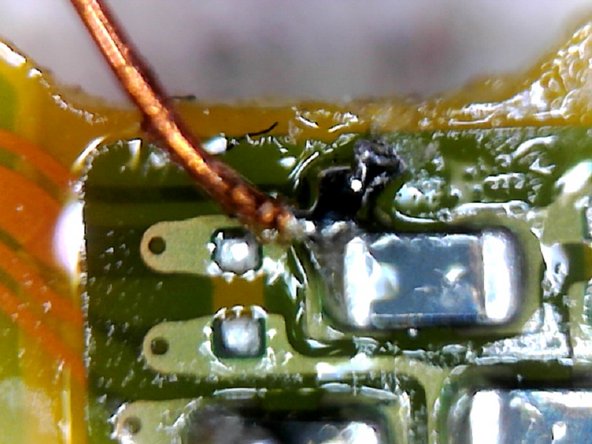
– In the second image, there’s a solder bridge caused by excess solder. Honestly, it’s a perfect ‘what-not-to-do’ example for when soldering goes sideways. But here, the bridging didn’t impact anything (see the first pic for clarity), so I just let it slide.
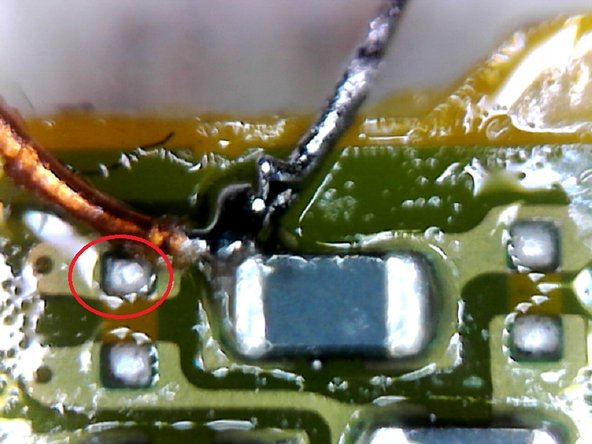
– The pad that was already cutting it close ended up way too close. To fix it up, I slipped a piece of tape as insulation between the jumper wire and the pad after giving the area a good flux clean.

Step 12

– Cut the wire to stretch nicely to the pad you’re connecting. Route it smoothly along the flex, keeping it as flat as possible. If the flex needs to bend along the route, go ahead and make the wire a bit longer to avoid strain. And let’s keep it light here—don’t use copper wire in flexes that need to move. That wire? It’ll snap faster than a cheap rubber band.
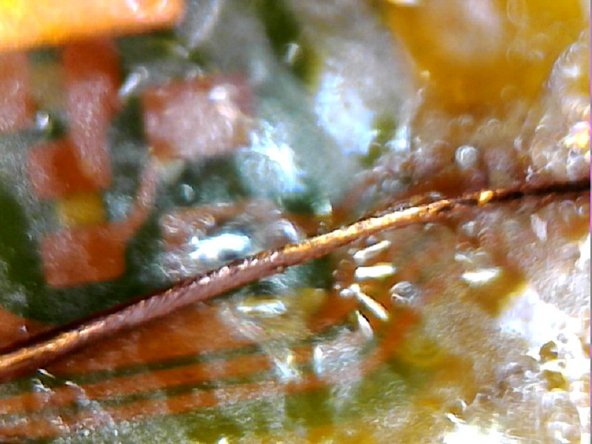
– Grab your file and give the wire a little scuff to expose some snazzy copper if the tinning didn’t hit the mark earlier. Scrape just enough to give it a solder-friendly touch, then tin it again like a pro.
– Flux is your friend! Go ahead and add a bit more for some extra smooth soldering vibes.
– Solder it down! Pardon the hot mess in the pic quality—sometimes soldering is better shown than glamorized. And once the soldering’s tight, snip off the extra wire for that clean, finished look.
Tools Used
Step 13

– Grab that extra wire with your tweezers, and with a little rock-and-roll action, bend it back and forth until it pops off. Same vibe, same method for the other end—you’re doing great!
– If your solder joint breaks when you’re wiggling the leftover wire back and forth, no worries—that joint was on the shaky side anyway. Keep it steady and give it another go!
Tools Used
Step 14

– Grab a Q-tip and some IPA (that’s Isopropyl Alcohol, not your favorite hoppy beverage) and gently wipe off all the flux. But listen, don’t go spraying IPA directly on the mic or anywhere near the screen—it could mess up the mic’s sound later or cause weird colors to appear between the LCD layers. Keep it clean and classy!
– Got a torn flex cable? No worries! Tape it up or use some gentle adhesive to keep it from ripping more. A quick tip: skip the super glue and go with epoxy or something similar. Personally, I dabbed a touch of epoxy and neatly wrapped it with tape to protect the flex cable from further drama.
– And hey, if you’ve got a jumper wire, sometimes you’ve gotta make room. I cut a small hole in the mic enclosure to let the wire fit snugly over the flex, keeping things tidy and functional.
Tools Used
Success!