How to Replace and Repair Samsung Galaxy Note10+ 5G – Step-by-Step Guide
Duration: 45 minutes
Steps: 18 Steps
Samsung has officially waved goodbye to the headphone jack with the launch of its powerhouse Galaxy Note10+ 5G. What’s packed inside this sleek slab of tech? In this teardown, we break through waterproof barriers, dive deep for those elusive 5G components, and stumble upon a few unexpected hardware gems. Ready to see what makes this device tick? Let’s get started!
Step 1

– Before diving into the repair, let’s get acquainted with some key specs of this 5G superstar: a stunning 6.8-inch AMOLED Infinity-O display with a crisp 3040 × 1440 resolution (that’s 498 pixels per inch), HDR10+ certified for vibrant visuals. Powered by a Qualcomm Snapdragon 855 paired with 12 GB of RAM and 256 GB of internal storage, it packs a punch. The battery is a hefty 4,300 mAh for all-day juice. Capture moments with four rear cameras — a 16 MP ultra-wide, a 12 MP wide-angle with OIS, a 12 MP telephoto with OIS, and a VGA DepthVision camera — plus a 10 MP selfie cam for those perfect shots. Unlock your device with an ultrasonic in-screen fingerprint sensor. The S Pen stylus adds Bluetooth connectivity and a 6-axis sensor for extra flair. And don’t worry about dust and water — it’s rated IP68. Keep these specs in mind as you proceed, and if you need help along the way, you can always schedule a repair.
Step 2


It looks like Samsung, once a close ally of the Rebels, has now decided to join the dark side. Don’t worry—this is just part of the repair journey, and help is always available. If you need assistance at any point, you can always schedule a repair to get things sorted out.
– Let’s compare last year’s Note9 with the latest Note10+ and Note10+ 5G—lying side by side from left to right to spot what’s different. Samsung shuffled things around this year, lining up the cameras vertically and moving the fingerprint sensor under the display—no more rear-mounted sensor. Sadly, the headphone jack has disappeared—consider it a tradeoff for a bigger battery and better haptic feedback. Before diving in deeper, Creative Electron gives us a sneak peek at some intriguing internal components—looks like there’s some fun exploration ahead. If you need help along the way, you can always schedule a repair.
Step 3


– Time to meet the headliner: the shiny, upgraded S Pen. It’s ready for its close-up.
– On all the latest Notes, the cameras hang out in a vertical line—but the 10+ brings an extra trick to the camera party with a special new sensor alongside the stack.
With gesture control now at your fingertips, you can easily navigate your Note10 in a fun, wireless way. Plus, the Note10’s exclusive DepthVision time-of-flight sensor uses an infrared illuminator and VGA camera to quickly and precisely measure distances. This clever sensor powers up a bunch of features like Live Focus, AR effects, and 3D object scanning, making your device more interactive and cool to use. If you need help, you can always schedule a repair.
Step 4
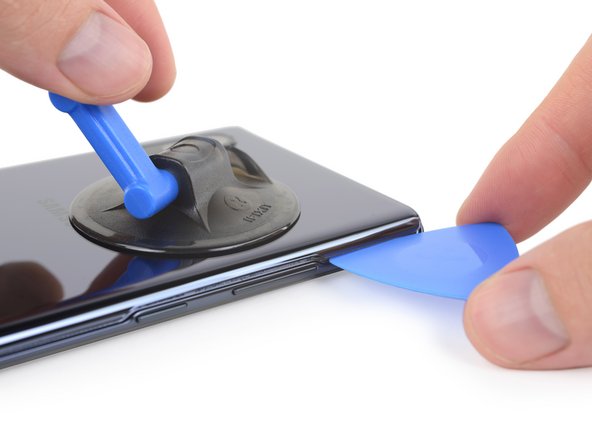


– Alright, let’s get started! Heat and Pick are here to gently lift the back cover—no sweat required (though they might make it look easy). It’s almost like they’ve done this a thousand times before.
– As we carefully peel away the adhesive, we notice that this year’s cover is molded around the volume and Bixby power buttons—so the opening isn’t quite as straightforward as in previous models, but don’t worry, we’ll get through it.
Getting into modern smartphones can be a bit of a sticky situation, thanks to all those tiny glue spots. It’s pretty common these days, but don’t worry — with patience and the right technique, you’ll have that device opened up in no time. If you need help along the way, you can always schedule a repair.
Step 5


– A handful of Phillips screws keep the midframe assembly in place—nothing our tried-and-true Mako 64-bit kit can’t handle! Once you lift off the midframe, you’ll notice a pretty major change: the motherboard is now perched at the top of the device, Pixel-style. Luckily, the cables are also up top, instead of hidden under a battery and ready to be pried apart. Apple’s clever interlocking ‘L’ shapes seem to make the best use of space we’ve seen so far. If you need assistance during this process, you can always schedule a repair.
While this gives you room for a larger battery, it also makes connecting the motherboard and daughterboard a bit more challenging. This setup requires some extra interconnect cables that can get in the way of accessing the battery. Stay patient and careful, and if you need a hand, you can always schedule a repair.
Step 6


– Our trusty iSclack works so well on heavily-glued displays that we decide to give it a shot on this stubbornly glued-down battery. The iSclack provides solid leverage on the battery, but you’ll still need plenty of isopropyl alcohol—and a good dose of patience—before the adhesive gives way (watch out for those display cables!). If you find yourself facing a really tough battery, and the task gets tricky, you can always schedule a repair for expert help.
Tools Used

Step 7
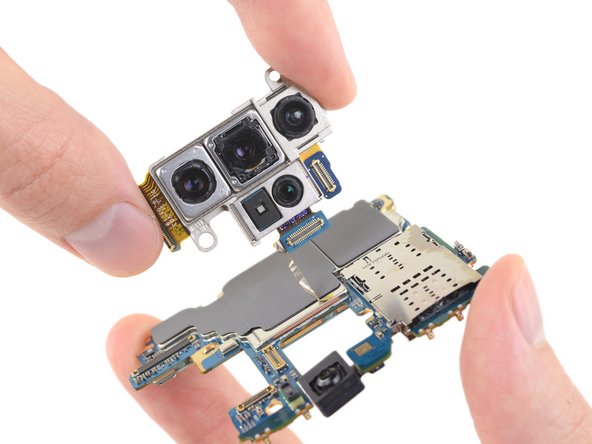

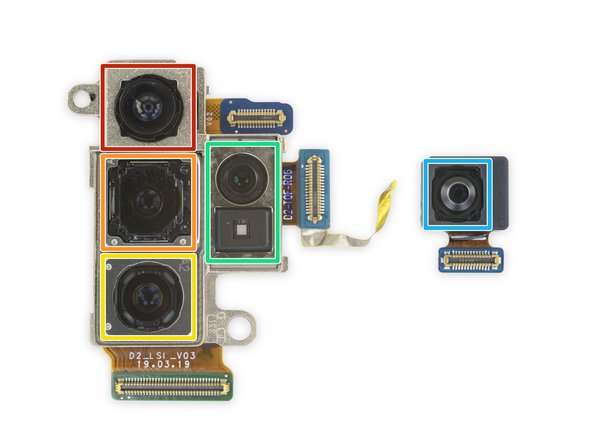
– We start by removing the SIM and microSD tray—a choice that the smaller 6.3″ Note10 skips—and then carefully lift out the motherboard. While you’re at it, take note of this Note’s impressive five-camera setup: a 16 MP ultra-wide lens with a 123° field of view, a 12 MP wide-angle with dual aperture (ƒ/1.5-ƒ/2.4), a 12 MP telephoto with 2x optical zoom, a DepthVision time-of-flight infrared sensor, and a 10 MP selfie camera. Need a hand? You can always schedule a repair if things get tricky.
Step 8


“Millimeter wave” refers to radio frequencies with wavelengths measured in millimeters (ranging from 24 GHz to 100 GHz). It delivers blazing fast download speeds, but it has some limitations—like struggling to travel long distances or penetrate walls easily. TL;DR: Results may vary, depending on your location and environment.
– Even without its usual array of cameras, this board still feels a bit hefty—like it’s carrying around some extra weight.
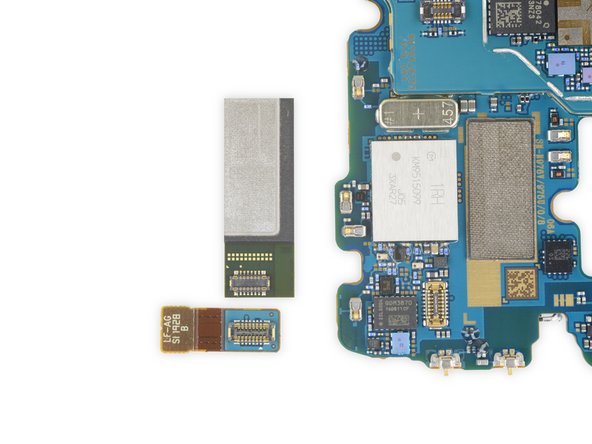
– Gently pry off this mysterious green rectangle—spoiler: it’s a Qualcomm QTM052 mmWave antenna module.
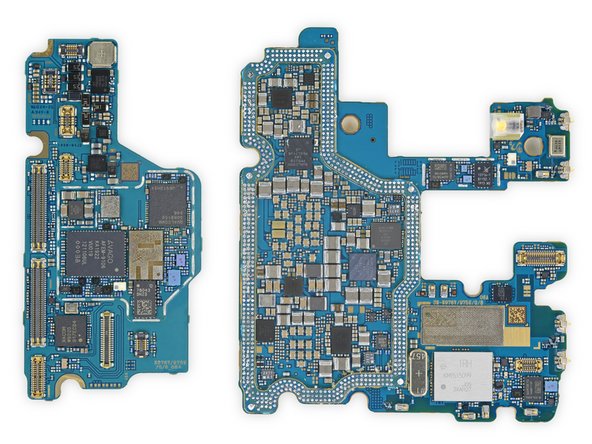
– And check this out: more board! Looks like Samsung took a page from Apple’s playbook and stacked their motherboard to save some space.
– We’ve tackled this kind of job before—using a hot air station, we carefully melt the solder, work through the vias, and separate the boards with precision.
Step 9


– Time to crack open this silicon club sandwich and check out the goodies inside:
– 12 GB Samsung K3UHAHADAM-AGCL LPDDR4X RAM stacked right on top of the Qualcomm Snapdragon 855 SoC
– 256 GB Samsung KLUEG8UHDB-C2D1 eUFS 3.0 flash storage
– Qualcomm SDX50M 5G modem
– NXP PN80T NFC controller with Secure Element
– ON Semiconductor NCP59744 voltage regulator
– Cirrus Logic CS35L40 audio amplifiers
– Maxim MAX77705C PMIC
Step 10

– Crack open the silicon party:
– Check out the Avago AFEM-9106 front end module—handling those signals like a champ.
– Spot the Skyworks SKY78160-51 low noise amplifier, quietly doing its thing.
– Meet the Qualcomm SDR8150 LTE RF transceiver, keeping your LTE on point.
– Likely hiding in plain sight: WACOM W9020 digitizer controller.
– Say hello to the IDT P9320S wireless power receiver, catching those wireless vibes.
– Qualcomm QET5100 envelope tracker is in the mix, managing power like a pro.
– Last but not least, the Skyworks SKY77365-11 power amplifier module, making sure your signal gets out strong.
Step 11


– Here’s some extra info on the components involved: we’ve got the Murata KM9515099 Wi-Fi and Bluetooth module, the Qualcomm QDM3870 LTE RF front-end, the Skyworks SKY13716-11 front-end module, the Qualcomm WCD9341 Aqstic audio codec, the Qualcomm PMX50 PMIC for the X50 modem, the Qualcomm PM8150, PM8150C, and PM8005 (probably PMICs), plus the Samsung S2DOS05 display power management. When working through your repair, remember to handle each part carefully and stay organized. If you hit a tricky spot or need a pro touch, you can always schedule a repair with Salvation Repair to get expert assistance.
Step 12


– Let’s ID some chips! Here are the major players under the hood:
– Cirrus Logic CS40L25—handles the haptic feedback magic.
– STMicroelectronics STM32G071EB—your 32-bit ARM Cortex-M0 microcontroller with a solid 128 Kb of flash memory.
– Samsung S2MIS0A—manages MST (Magnetic Secure Transmission) duties.
– Qorvo QM78042—this one’s your power amplifier module.
– Samsung S2MPB02—keeps your camera powered and ready.
– Vishay DG2730—2-port USB 2.0 analog switch, making connections happen.
– NXP Semiconductor BGU8103—boosts navigation with GPS/GLONASS/Galileo/COMPASS low noise amplification.
Step 13


– Meet your sensors squad:
– STMicroelectronics LSM6DSO—handles movement with its 3-axis accelerometer and gyroscope skills.
– STMicroelectronics LPS22HD—your tiny but mighty pressure sensor.
– AKM Semiconductor AK0991x—magnetic moves from this electronic compass.
– AMS proximity sensor—keeps tabs on how close you get.
Step 14


Soldered-on isn’t our top pick for a USB-C port, but since there’s not much on this board, replacements should be pretty straightforward and won’t break the bank. Stay positive—you’re on the right track! If you need help, you can always schedule a repair.
– The daughterboard lifts out smoothly, taking the USB-C port (which is soldered on) and the lower microphone along for the ride.
– A quick check around the phone’s edges reveals two more mmWave antenna modules! Since 5G mmWave signals can be a bit picky, having these extra, directional antennas on each side (plus one facing the screen) gives the Note10+ the best shot at staying connected.
– The earpiece speaker looks pretty standard—except it’s completely stuck behind the screen. How does the sound escape? We’ll cover that little mystery soon…
Step 15


Looks like Samsung’s finally giving haptic feedback the attention it deserves with this bigger, beefier motor. Your fingertips are in for a treat!
– A few key components stand between this phone and the abyss of emptiness:
– Next, out comes the new vapor chamber—definitely the result of a ton of engineering work, since this phone doubles as a space heater with a battery. 5G and reverse-wireless charging aren’t exactly known for being cool, literally or figuratively.
– Here’s the first surprise: a square-ish vibration motor! Samsung has been sticking with that classic circular LRA motor for years, so this change is definitely worth noting.
– Or maybe they just needed to fill up the space where the headphone jack used to be. We’ll let you decide!
Step 16


This Note rocks the biggest, brightest, and most color-popping screen ever seen on a Note—seriously, your eyeballs might throw a party. Still, we’re scratching our heads about why Samsung didn’t bump it up to a 90 Hz refresh rate, like the OnePlus 7 Pro.
– After a bit of careful warming and prying, we finally get to check out the back of Samsung’s impressive 6.8” Dynamic AMOLED Infinity-O display.
– The ultrasonic fingerprint sensor is still hanging tight on the back of this giant screen—just like it did on the S10. While we’re here, let’s meet some more chips:
– Now that the display’s off, you’ll notice the earpiece speaker shoots sound into a small metal chamber, then out through the tiny top grille.
– Qualcomm QBT2000 in-screen fingerprint sensor controller
– Samsung S6SY771X touchscreen controller
– Winbond W25Q80EWUXIE 8 Mb serial flash memory
– Having trouble reading those tiny markings? Yeah, us too. Time for a little zoom-and-enhance action.
Step 17


– Our eyes turn toward the S Pen, with its smooth design making us hesitate to pry it open. But we get a little creative and bring in some electrons, thanks to Creative Electron.
– The S Pen’s internals are surrounded by a tough layer of plastic and epoxy. After carefully chipping those away, here’s what we find:
– Hold up… this pen’s got some new features, doesn’t it? It’s probably a whole new design inside compared to last year’s model. Well, we couldn’t resist taking a look—hello ultrasonic cutter, meet S Pen!
– We spot a mysterious chip labeled SP912, which is probably that 6-axis sensor Samsung teased during their Unpacked event. Looks like something’s making those wand waves work.
– Dialog DA14585 Bluetooth 5 SoC
– Nichicon 2.4v SLB lithium-ion battery
Time to get your hands on the STMicroelectronics Accelerometer! It’s a nifty little sensor that helps track motion and orientation. If you need to replace or repair it, just follow the steps carefully, and you’ll be on your way. If you’re feeling a bit unsure along the way, no worries! You can always schedule a repair.
Tools Used

Step 18

– Well, we learned a lot from these steps—hope you were paying attention!
– We’re calling this teardown a success, though we’re not totally sold on this Note. The repairability score might not be as high as we’d like…
– This is the first time we got to see a 5G millimeter wave antenna up close.
– We took apart Samsung’s first ‘iPhone X’ style board and dug deep.
– Finally solved the mystery behind the missing earpiece speaker grille.
– And yes, we even managed to remove that stubborn battery without damaging the display.
Success!
