How to Replace Custom Cut Adhesive for Samsung Galaxy S One
Duration: 45 minutes
Steps: 15 Steps
The side without color is your guide for deciding which surface to stick that strip on first. Let’s make it stick like it means business!
Feeling puzzled about those adhesive strips in your fix kit? No worries, you’ve landed in the right spot! This guide will walk you through using the adhesives from your kit for Samsung phones with glass backs (S7 and newer). Plus, we’ll cover how to transfer and install various back cover components like the rear bezel and fingerprint sensor. Don’t worry if you don’t need to use every adhesive strip in the kit. If you’re switching out the fingerprint sensor, grab some double-sided tape, like Tesa tape, just in case! For a handy list of adhesive strips for the Galaxy S phone, check out schedule a repair. Now, when it comes to applying those adhesive strips, here are some quick tips: Generally, the strips come with a colorful side and a non-colored side (that’s usually paper or clear plastic). The non-colored side is your guide for where to stick it first. To make your life easier, align an unexposed strip where it needs to go on the phone and tape down one edge to keep it steady. This way, you can peel off the plastic liners and reveal the sticky goodness without losing your perfect alignment!
Step 1

Depending on your phone model, some sections of this guide might not apply to you. Take a peek at your adhesive kit to see what’s on your to-do list:
Step 2


Ready to tackle that fingerprint sensor? These three steps will guide you through the process of removing and transferring the fingerprint sensor along with its trusty gasket.
If your phone’s fingerprint sensor and camera are cozy together on the same rear bezel (like on the S9), you can simply swap out that bezel without the hassle of detaching each part individually.
– Warm up that iOpener and give the fingerprint sensor a cozy minute of heat. It’s like a spa day for your device!
– Grab your trusty opening tool and gently nudge the fingerprint sensor at the lower seam, where it meets the back cover. It’s all about that gentle touch!
Tools Used

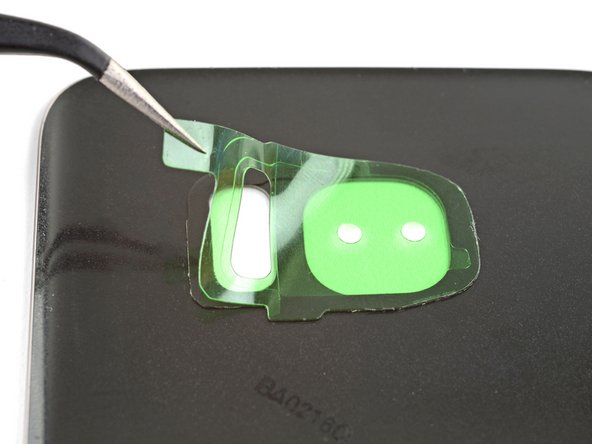
Step 3


If you’re just swapping out the fingerprint sensor and leaving the gasket as is, feel free to breeze right past this step!
– Grab your trusty opening tool and gently work it to free the fingerprint sensor from the gasket.
– Peel off the colorful plastic liner from your new gasket to reveal the sticky goodness underneath.
– Carefully position the fingerprint sensor onto the adhesive side of the gasket, making sure it’s just right.
– Once everything’s lined up, give it a good press with your finger to secure that bond. You’re doing great!
Step 4

– Let’s get that fingerprint sensor snugly attached to your new back cover! Grab some custom cut adhesive or simply line the edges of the sensor with some trusty double-sided tape like Tesa tape.
– Now, place the fingerprint sensor right in the back cover cutout and give it a firm press with your finger to make that adhesive stick. You’ve got this!
Step 5


Ready to dive in? These next four steps will guide you through the process of removing and relocating the rear bezel. This little gem holds the rear cameras, flash, and in some models, the fingerprint sensor. Let’s get started!
– Warm up that iOpener and give it a cozy hug on the rear bezel for about a minute.
– Now, let’s kick things off from the outside edge of the back cover. Use your finger to gently nudge the bezel inward, loosening it from its snug little home.
Tools Used
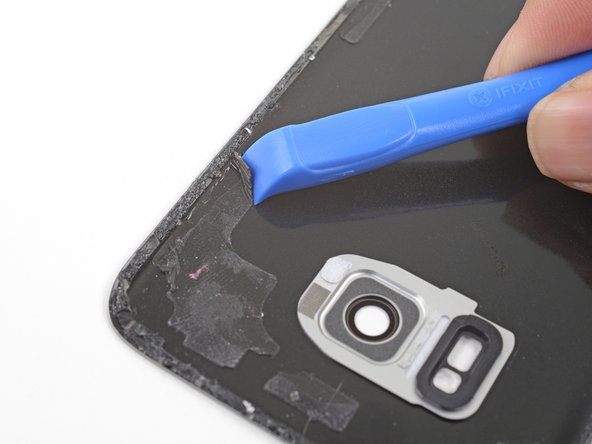
Step 6


– Time to say goodbye to that bezel! Carefully remove it with a gentle touch.
– Grab your trusty opening tool and some high-concentration isopropyl alcohol. Use them to wipe away any stubborn adhesive residue left on the bezel. You’ve got this!
Tools Used

Step 7


– Start by gently peeling off the clear plastic liner from the bezel adhesive strip to reveal the sticky goodness underneath.
– Next, carefully line up the adhesive with the cutout on the back cover. Precision is key here!
– Once everything is nicely aligned, give the adhesive a firm press with your finger to secure it in place.
– Finally, peel away the colored plastic liner from the adhesive to unveil its sticky surface, ready for action!


Step 9


Get ready to tackle the installation of those back cover support adhesives with these four simple steps! Trust us, you’ve got this!
If you’re swapping out the fingerprint sensor or the rear bezel, make sure to finish those tasks first before diving into this one.
– Take a moment to check how the support strip lines up with the surfaces by aligning the adhesive strip’s shapes with the leftover adhesive marks and the phone frame.
– Grab an opening tool and some high-concentration isopropyl alcohol to wipe away all that pesky adhesive residue from the phone frame.
– If you’re planning to reuse the back cover, make sure to clear off all the adhesive residue from it too.
Tools Used
Step 10


– Time to get sticky! Start by peeling away the clear liner from the support adhesive strip to reveal the sticky goodness underneath.
– Gently place the strip sticky side up on the phone frame, and try your best not to give that sticky surface a hug!
– Now, let’s get that adhesive strip perfectly aligned with the phone frame so that those contours match up like old friends.
– If you’ve got two small support strips, just rinse and repeat the process for both. You’ve got this!
Step 11


– Gently place the back cover onto the visible support strips. This way, the adhesive will make its way onto the back cover just where it needs to be.
Step 12


– Start by gently removing the back cover. It’s like peeling a banana, but without the delicious fruit inside!
– Next, use your fingers to press the support adhesive onto the back cover with a firm touch. Think of it as giving your device a little hug.
– Now, peel away the colorful liner to reveal the adhesive underneath. It’s like unwrapping a present, but the gift is a well-stuck back cover!
Step 13


The following steps will guide you through the process of applying the back cover perimeter adhesive like a pro.
– Grab your trusty opening tool and some high-concentration isopropyl alcohol to wipe away all that pesky adhesive residue from the phone frame. It’s like giving your phone a little spa day!
– If you’re planning to reuse the back cover, make sure to clean off any leftover adhesive residue there too. A tidy cover makes for a happy phone!
Tools Used
Step 14


The adhesive is super sticky—so make sure you get it right the first time! Handle it with care to avoid any sticky situations.
Now that the back cover is all set for sealing, take a moment to check if your phone is working like a charm before you seal it up.
– Start by peeling off the clear liner from the edge of the adhesive strip to reveal the sticky goodness underneath.
– Grab the strip by its tabs and carefully align one long edge of the adhesive with the edge of the back cover.
– Press that adhesive onto the back cover using your fingers; give it a little love!
– Now, peel off the colored liner from the edge of the adhesive strip to show off the adhesive underneath.
Step 15


– To wrap things up, gently position the back cover onto the phone frame, making sure everything lines up just right.
– Use your fingers to give the edges a little love and apply some pressure all around the perimeter.
– For an extra boost, place a few books on top of the back cover and let them hang out there for about half an hour. This will help the adhesive really stick!
