How to Replace Dual Hard Drive in MacBook Pro 15
Duration: 45 minutes
Steps: 23 Steps
Hey there! Just a friendly reminder to take your time and follow each step carefully. If you hit a snag or need a hand, don’t hesitate to schedule a repair. We’re here to help you get your device back in action!
Adding a second hard drive to your laptop can bring a ton of perks, like faster speeds, more storage, and a whole lot less stress when it comes to installing new software. Follow this guide to easily set one up using our optical bay hard drive enclosure!
Step 1

– Take out the ten screws holding the lower case and upper case together:
Step 2


– Hey there! Grab the lower case with both hands and gently lift it near the vent. You’ll hear a satisfying pop as it releases from the two clips holding it to the upper case.
– Now, carefully remove the lower case and set it aside. You’re doing great!
Step 3

You don’t have to stress about steps 3-6 to remove the battery if you’re just swapping out the hard drive. But it’s smart to cut the power to all electronics before you start. If you need help, you can always schedule a repair
– Get ready to tackle this task! First up, grab your trusty screwdriver and remove the two 5-Point Pentalobe screws located at the top edge of the battery. You’re doing great!


Step 5


Hold off on yanking that battery out just yet.
– Gently tug the battery’s plastic tab and glide it away from the long edge of the upper case. If you need help, you can always schedule a repair.
Step 6

– Tip the battery back just enough to get to that battery cable connector.
– Gently pull the battery cable connector away from its socket on the logic board and lift the battery out of the upper case.
Step 7
Apple cleverly uses a tiny strip of clear plastic with adhesive on one side to secure the logic board behind the camera cable connector. Keep it easy breezy and be careful not to knock off any components from the logic board. If you need help, you can always schedule a repair.
– Gently press down on one end of the cable retainer with a finger while you take your trusty spudger and carefully lift the other end, giving it a little twist away from the camera cable connector. You’re doing great!
Tools Used
Step 8

Gently pull the connector out parallel to the logic board’s face, not straight up. Need a hand? You can always schedule a repair!
– Gently pull the male end of the camera cable straight out from its socket. You’ve got this!
Step 9

– Gently remove the camera cable from the adhesive that’s holding it snug with the optical drive.
Step 10


Gently wiggle the connector in a sideways motion along the logic board, not straight up.
– Gently pull the male end of the Bluetooth cable straight out from its snug little home in the socket. It’s like giving it a little hug goodbye!
– Grab your trusty spudger and use its flat end to carefully pop the Bluetooth antenna cable out of its cozy spot on the board. It’s all about that gentle nudge!
Tools Used
Step 11


Only tackle this step if your display has that nifty anti-glare feature.
Watch out! One of the screws might be playing hide and seek in the Bluetooth/camera cable ground loop. If you’re swapping out the display, make sure to pass this little guy over to the new one!
– Unscrew those two 8 mm Phillips screws that are holding down the Bluetooth/camera cable retainer to the upper case. You’ve got this!
– Gently lift out the Bluetooth board/cable retainer assembly from the upper case. Easy peasy!
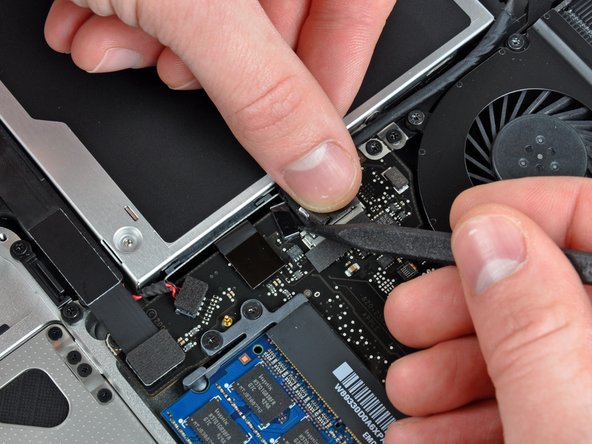
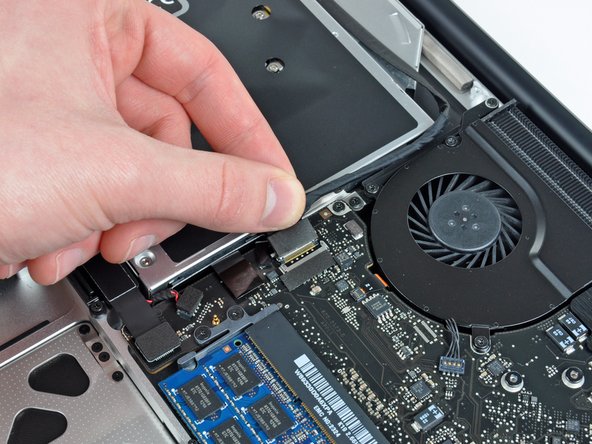
Step 12

– Grab your trusty spudger and gently lift the optical drive connector straight up from the logic board. You’ve got this!
Tools Used
Step 13

– Take out the lone 3.5 mm Phillips screw that’s holding the inner side of the optical drive to the upper case. You’ve got this!
Step 14

– Unscrew those two 3.5 mm Phillips screws holding the optical drive snugly to the upper case. You’ve got this!
Step 15

– Give the optical drive a little lift from its left edge, then gently slide it out of the upper case. If you need help, you can always schedule a repair
Step 16

Got a CD or some other sneaky object stuck in your optical drive? No worries! Check out our handy optical drive repair guide for a smooth fix.
– To disconnect the optical drive cable, gently pull it directly out from the optical drive.
Step 17

– Unscrew the two black Phillips #0 screws that are holding down the little metal mounting bracket. Go ahead and move this bracket over to your shiny new optical drive or hard drive enclosure.
Step 18


– Pop out the plastic spacer from the optical bay hard drive enclosure by squeezing one of the clips on either side and lifting it right out of there!
Step 19


– Before placing the hard drive into the enclosure, make sure those connectors are facing down.
– Carefully slide the hard drive into the slot in the enclosure.
– Hold the enclosure steady with one hand, and with the other, press the hard drive into the connectors.
Step 20


– Now that the hard drive is cozy in its spot, gently pop the plastic spacer back in while keeping the hard drive snug against the bottom of the enclosure. You’ve got this!
Step 21


– Grab your trusty Phillips #1 screwdriver and fasten the drive to its cozy home inside the enclosure with two screws. You’ve got this!
Step 22

– Get ready to attach the optical drive bracket to the new enclosure using two Phillips #0 screws – nice and secure!
– Now, have some fun reconnecting any cables you’ve unplugged from the original optical drive to the optical bay enclosure.
Step 23


Don’t toss that drive just yet! You can keep using your optical drive on the go with our handy SATA Optical Drive USB Cable.
– Line up the SATA connector with the drive’s port and plug it in snugly.
– Connect the USB cable to your laptop and your optical drive is good to go.


