How To Replace Front Camera on Surface Tablets: Step-by-Step Guide
Duration: 45 minutes
Steps: 36 Steps
Heads up: the display panel is pretty delicate and doesn’t have much reinforcement, so there’s a real chance it could crack during this part of the process. Take it slow and easy!
Ready to swap out the front camera on your Microsoft Surface Pro 7? Just a heads-up, this process can be a bit tricky! The display panel is delicate and might break if you’re not careful. Make sure to heat up the adhesive properly and take it slow while slicing through. Oh, and don’t forget those safety glasses in case the glass decides to shatter!
Step 1


Pop on some safety glasses to keep your eyes safe, and take it easy around that LCD to avoid any accidental cracks.
Taping the glass keeps all those little shards in place and makes it way easier to pry up the display without things getting all wild.
– Got a cracked screen? Let’s stop it from getting worse! Put some tape on it to keep the shards from flying and keep yourself safe while you get to work.
– Grab some clear packing tape and cover the screen with overlapping strips until it’s fully taped up. This will help prevent more glass from falling apart.
– Try to follow the rest of the steps as best as you can. But heads up: once the glass starts cracking, it’s probably going to keep going. Don’t be surprised if you need a metal prying tool to scoop out the glass pieces.
Step 2

– Warm up your iOpener and press it gently against the right edge of the Surface’s screen. Hold it there for a solid two minutes to soften up the adhesive. Patience is key!
Before you start taking apart the Surface, make sure to power it all the way down. If you need a little extra heat to loosen things up, a hair dryer or heat gun can do the trick—just keep an eye on it so you don’t overheat the screen or internal battery. A little patience goes a long way—if things get tricky, you can always schedule a repair.
You might need to warm up and reapply the iOpener a few times to get the tablet nice and toasty. Just follow the iOpener instructions carefully to avoid turning up the heat too much.
Tools Used

Step 3

– Check out how the screen adhesive is set up before you move on:
– These spots are just adhesive—feel free to slice through here.
– Heads up! The display board and flex cables are hanging out close to this edge. Be gentle, and don’t poke your pick in more than 1/8 inch (3 mm).
– Watch out for delicate antenna cables under this part of the screen. Stick to the method in step 13 to keep them safe. Also, the adhesive is extra stubborn here.
Step 4


Keep the opening pick shallow—just as deep as the black bezel around the screen. Going any deeper could accidentally say hi to the LCD, and trust me, it doesn’t want visitors.
– Slide an opening pick into the speaker slot on the screen, then gently work it between the glass and the speaker grille.
Step 5


– Gently rotate the pick towards the bottom of the Surface, then slide it right under the lower edge of the speaker cutout. Smooth move!
Step 6


If you feel the pick getting stuck or facing resistance, take a breather, reheat the section, and try again. A little too much pressure could cause the glass to crack, and we definitely don’t want that!
– Gently slide the opening pick along the right edge of the Surface to cut through the adhesive holding the screen in place.
– Keep this opening pick in the right edge to stop the adhesive from sealing back up as you work.
Step 7

– Give your iOpener a quick warm-up, then park it on the bottom edge of your Surface’s screen for a couple of minutes to help loosen things up.
A hair dryer or heat gun can give you that extra heat boost, but be gentle—don’t overdo it, since the screen and internal battery are heat-sensitive. Keep the heat moderate to avoid any damage, and if you need a hand, you can always schedule a repair.
You might need to heat things up and reapply the iOpener a few times to get that tablet nice and warm. Just follow the iOpener instructions to keep from overheating—patience is key!
Tools Used
Step 8


Be gentle when inserting the pick—stop right at the black bezel on the side of the screen. Pushing too far could give the LCD a little unwanted love tap. Take it slow and steady, and if you need a hand, you can always schedule a repair.
– Gently insert a plastic opening pick into the bottom right corner of the device and glide it around the corner toward the bottom edge to loosen the adhesive.
– Slide the pick along the bottom edge of the Surface to carefully cut through the screen adhesive, making sure not to damage any internal components.
– Leave this pick in the bottom edge to keep the adhesive from resealing as you work on the screen.
Step 9

A hair dryer or heat gun can give you that extra bit of heat you need, but remember: the Surface is sensitive to heat. Too much of it, and you could damage the screen or the battery. Keep things cool, literally!
You might have to give the iOpener a few rounds in the microwave to get things toasty enough. Stick to the iOpener’s instructions, though—nobody likes a scorched tablet!
– Warm up your iOpener until it’s nice and pliable, then gently place it along the left edge of the Surface’s screen. Hold it there for about two minutes to loosen things up. Need a hand? You can always schedule a repair if things get tricky.
Tools Used
Step 10


Take it easy when working under the lower 2.5 inches (65 mm) of the left edge. Don’t go deeper than 1/8 inch (3 mm) with the opening pick here—there are delicate display cables hiding nearby, and they’re easy to damage. Once you’ve passed the display cable zone, keep the pick snug to the bezel. No need to go past it!
– Pop a new opening pick into the bottom left corner and cruise it around the bend toward the left edge.
– Glide your pick along the left edge to slice through that stubborn screen adhesive.
– Keep this pick chilling on the left edge to stop the sticky stuff from sealing back up.
Step 11

– Heat up your iOpener and gently press it against the left edge of your Surface’s screen for about two minutes.
A hair dryer or heat gun can work wonders for adding a little extra heat, but remember, too much heat can be a bad thing! The screen and internal battery are pretty sensitive, so keep it cool and take it slow. If you’re unsure or run into trouble, you can always schedule a repair.
The glue is thickest right along this edge, so you might need to reheat and reapply the iOpener a few times to keep things warm enough. Just follow the iOpener instructions carefully to avoid getting it too hot. Stay patient, and if you need a hand, you can always schedule a repair.
Tools Used
Step 12


Heads up! The next 6 inches (15 cm) along the top edge of the case are covered by the left and right antennas. These antennas are tucked between the case and the screen bezel. Be extra careful with the next steps to make sure you don’t accidentally damage them.
– Swing your opening pick around that left corner and cruise along the top edge of your Surface. Pause when your pick is about 2.75 inches (70 mm) away from the left side—nice and precise!
Step 13


Watch out! The antenna cables are hiding just below the top edge of the screen. Take your time and handle with care to avoid any damage. Slow and steady wins the race!
– Slide the tip of your pick just under the display where you last finished slicing. Keep it shallow—no deeper than the bezel’s edge.
– Gently roll the pick to the right, letting the long side slice through the adhesive underneath the bezel. Work your way across, but don’t drag the pick along the Surface’s edge.
– Keep up this insert-and-roll move along the top edge, bit by bit, until you’re about 2.5 inches (64 mm) from the Surface’s right corner.
Step 14


– Once you’ve sliced through the adhesive over the antennas—about 8.5 inches (or 22 cm) from the left edge—slide your pick along the top edge of the surface. Then, carefully round the top right corner to cut through any stubborn remaining adhesive. Take your time and keep it smooth; you’ve got this! If you need help, you can always schedule a repair.
Step 15


Hold up! The screen’s still attached by two cables, so don’t try to take it off just yet.
– Gently pry the screen assembly away from the Surface case, taking your time. If you hit any resistance, pause and double-check that all the adhesive has been loosened. Patience is key!
– Use an opening pick to carefully slice through any leftover adhesive, making the separation smoother and safer.
– Watch out for the flash lens—it might fall out when you lift the surface. Keep hold of it and make sure to put it back into its slot during reassembly. If you need a hand, you can always schedule a repair.
Step 16


– Gently lift the top of the screen assembly away from the case, sliding the bottom closer to the motherboard’s display connectors as you go. Keep one hand steady to hold the screen in place while you work.
Handle display ribbon cables gently—no tugging or pulling! Treat them with care to keep everything working smoothly.
Keep your tweezers and spudger handy and ready to go. Having these tools within arm’s reach keeps your repair smooth and hassle-free. If you need a hand along the way, you can always schedule a repair.


Step 17


– Grab a spudger and gently use its pointed tip to nudge each side of the battery connector.
– Now, take it slow and alternate sides, carefully ‘walking’ the connector out of its socket, one gentle step at a time.
Tools Used
Step 18


Hold tight on the tape covering the ribbon cable — no need to peel it off just yet. Keep that tape in place and proceed carefully to avoid any mishaps. If you need help, you can always schedule a repair.
– Grab a pair of tweezers and gently peel back the silver tape that’s guarding the left display cable connector.
– Now, take the flat end of a spudger and carefully slide it underneath the tape. Give the connector a little nudge to disconnect it from the motherboard.
Step 19


Hold tight and resist the urge to peel off that tape from the ribbon cable—it’s best left untouched to keep everything working smoothly. If you need help, you can always schedule a repair.
– Grab a pair of tweezers and gently peel back the silver tape holding down the right display cable on the motherboard.
– Use the flat end of a spudger to carefully lift the right display cable straight up and disconnect it from the motherboard.
Step 20

– Pop off the screen with care—steady hands win the day.
– When putting things back together, check out the screen adhesive replacement guide to finish up the job right.
Step 21

– Grab a T3 Torx screwdriver and use it to unscrew the four 2.4mm screws that are holding down the EMI shield. Don’t stress, it’s just a quick twist to get it loose!
Tools Used

Step 22


You can leave these tape pieces on the motherboard EMI shield—there’s no need to peel them all off. Keep it simple and avoid unnecessary fuss!
– Grab some tweezers and gently lift those three silver tape strips holding the motherboard EMI shield onto the copper heatsink—easy does it!
Tools Used
Step 23

– Take a look at the tiny arrows circling the motherboard EMI shield—that’s where the clips are holding the shield in place.
– When you’re putting things back together, press down on each of those arrows to snap the clips securely into position.
Step 24


Be extra careful not to poke or squish the battery with your tool – we don’t want any accidents here!
Try to keep the EMI shield as intact as possible. It’s going to be reinstalled, so handle it with care.
– Starting with the clips adjacent to the battery, use an opening tool to carefully pry the motherboard EMI shield straight up from underneath each arrow to disconnect the clips.
Step 25


Take care to deform the EMI shield as little as possible. It will need to be reused.
– Continue using your opening tool to disconnect the clips around the entire perimeter of the motherboard EMI shield.
Step 26

– Remove the motherboard EMI shield.
Step 27

– Use a T5 Torx screwdriver to remove the following four screws from the antenna bracket:
– Three 4.5 mm screws
– One 6 mm screw
Tools Used

Step 28


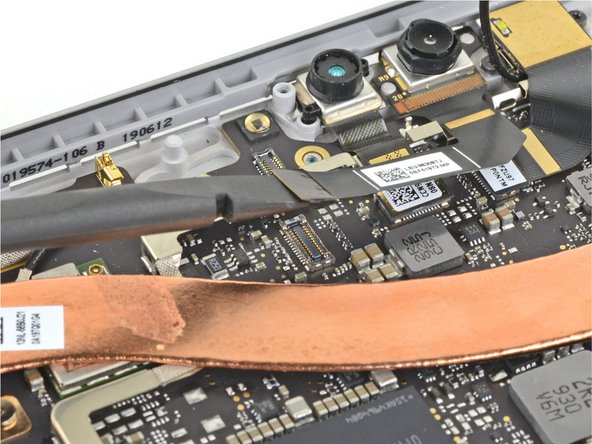
– Use the pointed end of a spudger to pry up the connector next to the rear-facing camera and disconnect it.
Tools Used
Step 29


– Use the pointed end of a spudger to pry up the connector next to the front-facing camera and disconnect it.
Tools Used
Step 30


– Remove the antenna bracket.
– Remove the remaining unsecured clear plastic light guide and set it aside.
Step 31

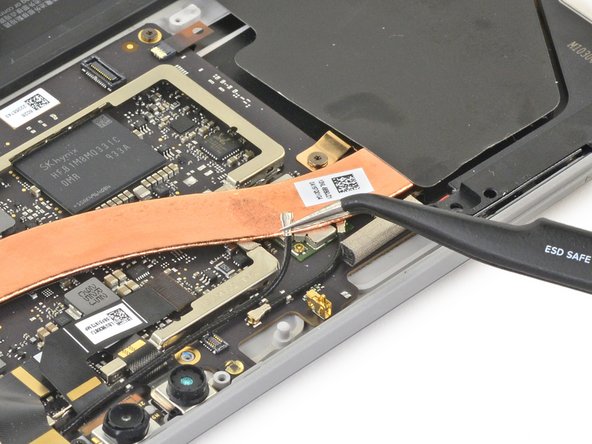

– Use a pair of tweezers to disconnect the antenna cable covering the camera ribbon cables.
– Move the antenna cable out of the way of the camera ribbon cables.
Tools Used
Step 32

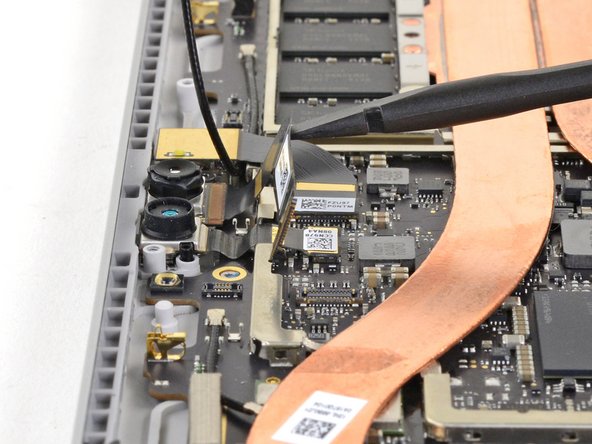
– Use the flat end of a spudger to pry up the Hello face camera connector and disconnect it from the motherboard.
Tools Used
Step 33

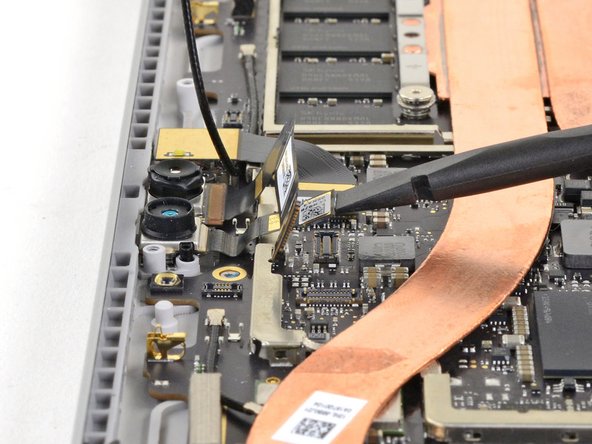
Do not fold the cable.
– Use the flat end of a spudger to lift the front camera ribbon cable off of the front camera connector.
Tools Used
Step 34

– Use the flat end of a spudger to pry up the front-facing camera connector and disconnect it from the motherboard.
Tools Used
Step 35
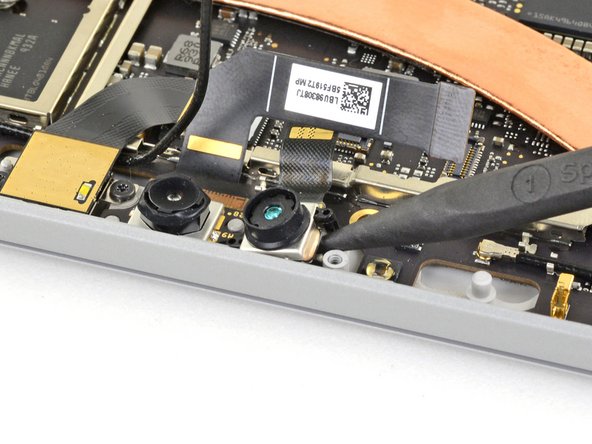

The front camera is held in place by light adhesive.
– Use the pointed end of a spudger to gently pry the front camera out from the case.
Tools Used
Step 36
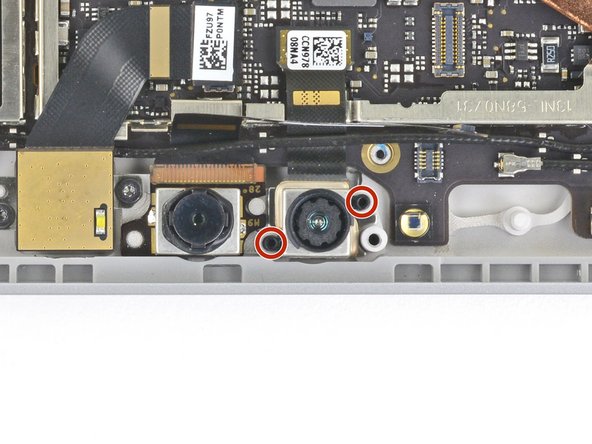


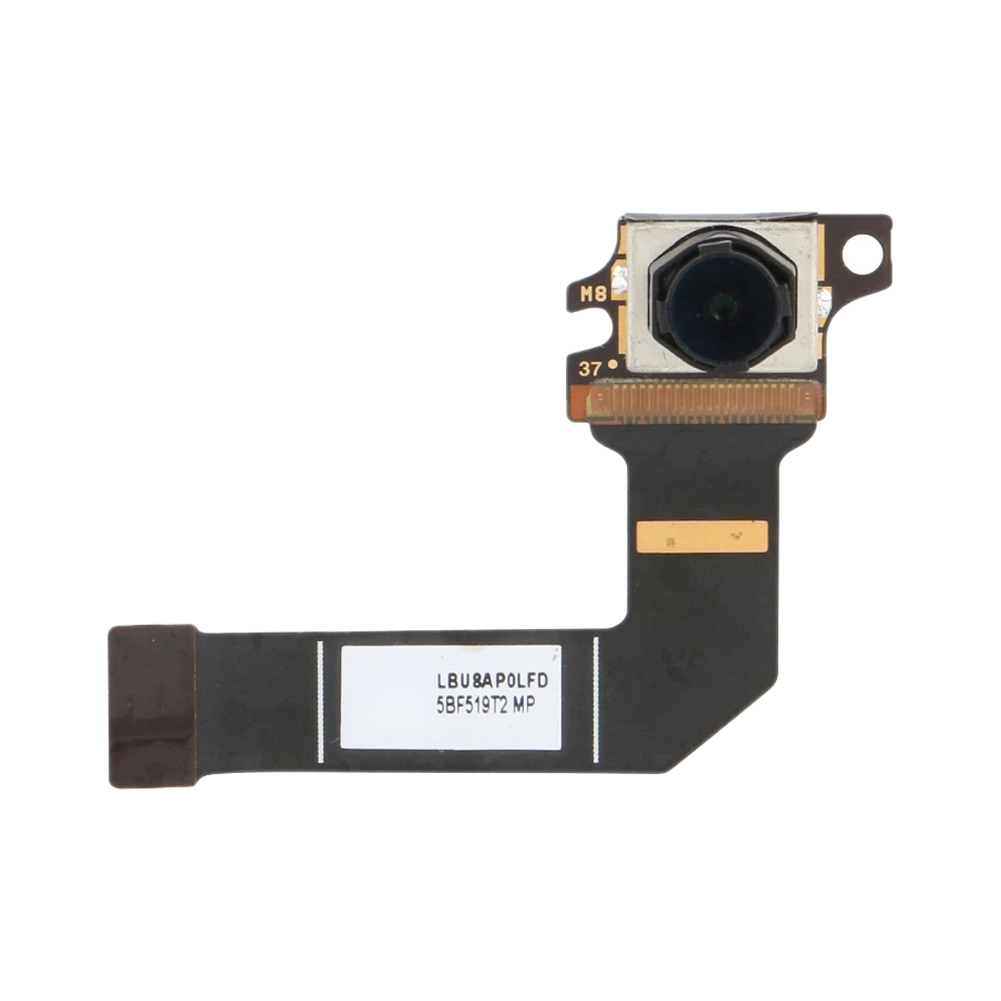
– Remove the front camera.
– When installing the new camera, start by placing the posts on the bottom of the camera (marked in red) into the holes in the case to ensure proper alignment. Use a generic adhesive to secure the new camera in place.
Success!