How to Replace Google Pixel 7 Pro Motherboard: Step-by-Step Guide
Duration: 45 minutes
Steps: 56 Steps
Hey there, tech enthusiasts! Remember to safely discharge that battery below 25% before starting your repair, just to be on the safe side, and check out our awesome repair guides for more helpful hints along the way!
Hey there! Ready to tackle the motherboard replacement for your Pixel 7 Pro? This guide is your trusty companion for the journey ahead. We’re using the GE2AE model, which comes equipped with a 5G mmWave antenna. If you’ve got a non-mmWave model, no worries—just skip those mmWave steps and keep going! Safety first: make sure to discharge your battery below 25% before you dive in. This helps keep things cool if the battery gets a little too adventurous during the repair. If your battery looks like it’s been through a workout and is swollen, handle it with care! Replacing the motherboard means you’ll need to remove the battery, so don’t even think about reusing a damaged one—swap it out for a fresh one instead. A quick heads up: the Pixel 7 Pro has class 1 lasers, which means disassembling it could expose you to some invisible infrared laser fun. After you’ve done the repair, keeping your device water-resistant will depend on how well you reapply the adhesive. Just remember, your device will lose its IP (Ingress Protection) rating. Don’t forget to grab some replacement adhesive to make this repair a success! If you need help, you can always schedule a repair.

Step 2


Just a heads-up! Don’t go crazy with the pick! Keep it to a chill 3.5mm or less so you don’t mess up the guts of your device and avoid messing with those little plastic clips. You got this!
– Alright, let’s get this screen out! Make sure you’re putting your opening picks in the right spots to avoid accidentally separating the screen from its protective frame.
– You’ll see a seam that runs around the screen. This is where the screen meets the rest of the phone. Don’t try to pry at this seam.
– The seam around the bezel is where the plastic frame that protects your screen meets the phone. It’s held in place by little plastic clips, so that’s the perfect spot to start prying.
– There are a bunch of these little plastic clips holding the screen in place. If your opening pick gets stuck while you’re removing the screen, it means you’ve inserted it too far underneath the screen. Just be careful and you’ll be golden!
Step 3


Get ready for some hands-on fun! The next three steps will show you how to use the Anti-Clamp, our specially designed gadget that makes opening up your device a breeze. If you’re not rolling with the Anti-Clamp, no worries! Just hop ahead three steps for a different approach.
Cracked screen? No problem! Just slap a layer of clear packing tape over it to give that suction cup something to grab onto.
Want to master the Anti-Clamp? You can find all the juicy details in our handy guide.
If your phone’s surface feels a bit too slick for the Anti-Clamp to grip, grab some tape and make it a little cozier for that tool!
– Give that blue handle a gentle tug backwards to unlock those Anti-Clamp arms and get things rolling.
– Slide those arms right over the left or right edge of your phone like a pro.
– Place the suction cups snugly near the phone’s bottom edge—one on the front and one on the back, just like your phone deserves.
– Squeeze those cups together to make a friendly little suction seal.
Step 4


– Get ready to unlock those arms – just pull the blue handle forward and you’re all set!
– Now it’s time to get those cups stretching. Turn the handle clockwise for a full 360 degrees, or until you see the cups start to stretch out.
– Keep those suction cups in line! If they start to slip out of alignment, don’t worry – just loosen them a bit and realign the arms. Easy peasy!
Step 5


Take it easy! Just give it a gentle half turn at a time and chill for a minute in between. Let the Anti-Clamp and a little patience do their magic for you.
Feel free to grab a hair dryer or heat gun, but remember, too much heat can be a bummer for your display and internal battery, so take it easy!
If the Anti-Clamp isn’t making enough space, just add a bit more heat to the spot and give that handle a half turn clockwise.
– Warm up your iOpener and slip it between the arms of the Anti-Clamp.
– Fold the iOpener so it’s resting on the bottom edge of your phone.
– Let it hang out for a minute—that’ll give the glue a chance to chill and loosen up.
– Slide an opening pick under the screen frame once the Anti-Clamp creates a nice gap.
– Skip the next two steps. You’re a rockstar!


Step 6

Feel free to grab a hair dryer, heat gun, or hot plate to help out, but watch out for overheating! The edge should be warm to the touch but not too hot, just like a cozy cup of coffee.
Step 7


Got a badly cracked display? Don’t worry, we’ve got a trick for you! Try covering it with clear packing tape to help the suction cup stick. If that doesn’t work, super strong tape or even a bit of superglue can save the day.
Having trouble with this step? It’s not you, it’s probably just the age of your phone. Apply some extra heat to the bottom edge and try again. If it’s still being stubborn, remember that you’re doing great and it’s almost time to enjoy your newly repaired device! If you need help, you can always schedule a repair
– When the screen feels toasty, like a pizza fresh from the oven, it’s time to use the magic suction handle on the screen’s bottom edge. Now make friends with your screen by lifting it, safety frame and all, with that awesome suction handle. Welcome to the opening party! Your trusty opening pick should join the celebration as you insert it into the newly formed party space. Lifting the spirits in smartphone surgery, we are!
Tools Used

Step 8


Whoa there, partner! Keep the clawing to a minimum to avoid any trance-like damage to your droid. These here spots might be tricky, so just go slow and steady. If you need help, you can always schedule a repair!
– The screen cable is located just shy of halfway up the left edge of the phone. Handle with care to keep that cable intact!
– You’ll find a bunch of spring contacts all around the phone’s perimeter. Tread lightly in these areas to avoid bending those little guys.
Step 9


– Gently slide the opening pick down to the bottom right corner of the screen – this will help break the adhesive bond.
– Leave the pick in place for now, so the adhesive doesn’t reseal and make your job harder. You’re making great progress!
Step 10


In the bottom left corner, there’s a sneaky little plastic clip that might get in the way of your opening pick. Just use the very tip of the pick (about 1 mm) to carefully navigate around it.
– Slide a second opening pick into the bottom edge and gently glide it to the bottom left corner of the screen to cut through that pesky adhesive.
– Keep the opening pick in place to stop the adhesive from sticking back together.
Step 11


– Sneak a third opening pick under the bottom left edge of the screen.
– Glide the pick along the left side of the screen to slice through the adhesive and pop those plastic clips.
– Leave the pick in the top left corner to keep the adhesive from resealing.
Step 12


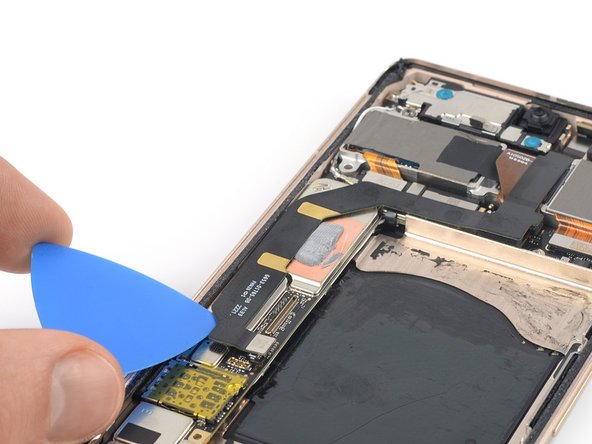
You’re almost there! Just be extra gentle when slicing near the front-facing camera, and only use the tiniest point of your opening pick to avoid any mishaps. If you need a little help, you can always schedule a repair.
Step 13


Hold up, cowboy! Don’t yank that display just yet. It’s still connected to the phone’s guts with a little flex cable.
– Alrighty then, grab another opening pick friend and follow it down the right side of this awesome device. Keep slicing that adhesive and the side clips will let their little plastic buddies go. All this so your phone can strut its stuff, fixed and fancy-free!
Step 14


Give your screen a gentle hug! Avoid twisting it or pulling it too far from the frame, so you don’t give that flex cable a workout it didn’t sign up for.


Step 17


– Grab your trusty spudger and gently pry up the display flex cable connector from its socket. It’s like giving it a little lift-off!
– When it’s time to reattach, align those connectors with precision, and press down gently on one side until you hear that satisfying click! Don’t forget to do the other side too, but steer clear of the middle. If things get misaligned, those tiny pins could bend and that’s a no-go! If you need help, you can always schedule a repair.
Tools Used

Step 18

– Let’s get that screen off the phone assembly, shall we?
– Now, as we put things back together:
– When you power up your device after putting it all back, the screen will need to calibrate. Hands off during this phase! Touching it could lead to some touchy problems later on.
– Give a quick check to ensure all screws are snug and there are no wobbly bits hanging around.
– Reconnect the screen and give your phone a test run to verify it’s all working. Once confirmed, power it down and continue with the reassembly.
– Time to apply some fresh adhesive where needed after cleaning those areas with isopropyl alcohol (>90%).
– If you’re using custom-cut adhesives, follow this guide closely.
– If you’re working with a pre-cut adhesive card, this guide has got you covered!
Step 19


Be super careful not to poke or bend that battery with your tool—doing so might lead to some seriously dangerous leaks or even a fire. Let’s keep it safe and sound! If you need help, you can always schedule a repair.
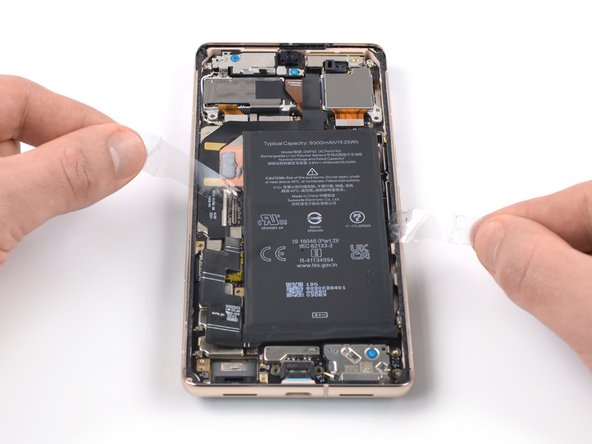
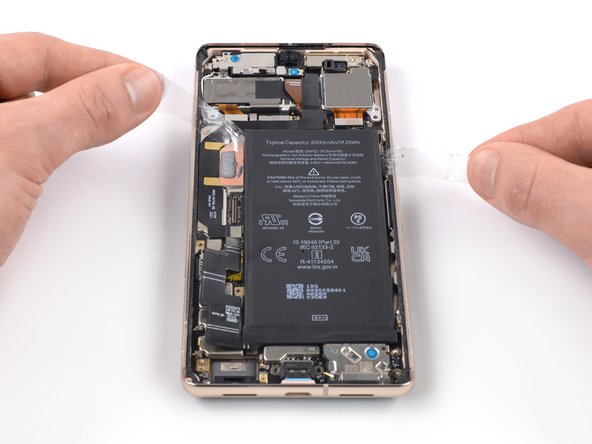
Having trouble getting that foil to budge? Try warming things up with a heated iOpener on the back of your device for a couple of minutes – it’ll help loosen the adhesive and make the process a whole lot easier.
Step 20


– Grab your trusty Torx T3 screwdriver and give those two 5.1mm screws holding the charging port bracket a little spin. Let’s get this party started!
Step 21


– Time to get a little handy! Use a pair of tweezers to carefully remove the charging port bracket.
Tools Used
Step 22


– Grab your trusty Torx T3 screwdriver and let’s get cracking! Carefully unscrew those six 5.1 mm-long screws that are holding the midframe in place. You’ve got this!
Step 23


– Time to get a little handy! Use a pair of tweezers to carefully remove the midframe.
– When you’re putting everything back together, take a moment to check the thermal pad. If it’s looking a bit worse for wear, gently remove it, clean the area with some high-concentration (greater than 90%) isopropyl alcohol and a microfiber or lint-free cloth, and then apply a brand new thermal pad.
Tools Used


Step 25

You can use a hair dryer, a heat gun, or even a hot plate to warm things up, but keep an eye on the temperature! The edge should feel just a tad too hot to touch—like a cozy hug for your device.
– Get that iOpener warmed up and ready to go. We’re going to give the adhesive holding the back panel on a little bit of a heat treatment. Hold the iOpener on the back of the device for at least 3 minutes.


Step 27

Don’t stress if the release strip gets lost or torn – we’ve got a backup plan for removing the battery. Just head to the next step for an alternative method.
Take your time and be gentle, it’s easy to lose your grip and accidentally pull the tab out from under the battery.
Having trouble getting the adhesive to separate? Try applying a bit more heat and waiting for it to loosen up – it should make the process a whole lot easier.
Step 28


Easy does it with the alcohol! Too much, and you might just unstick the NFC antenna and charging coil hiding under the battery. We don’t want that!
Watch out for your battery! Use your tool gently to avoid any pokes or bends—after all, a damaged battery could leak nasty stuff or even spark a little fire. Let’s keep it safe!
Give this step a whirl if the battery isn’t budging with the release strip.
Remember, gentle is the name of the game! Just apply slow and steady pressure to help it pop free from its cozy little home.
– Sprinkle a few drops of high-concentration isopropyl alcohol (90% or higher) right into the little gap at the top edge of the battery.
– Grab your trusty spudger or an opening pick and gently nudge that top edge of the battery upwards until you can give it a little tug with your fingers.
– Now, hang tight for about a minute while the alcohol works its magic to loosen that pesky adhesive.
Tools Used
Step 29


Hey there, safety first! Don’t try to put a busted or bent battery back in. It’s not cool and could be dangerous.
– Time to set that battery free! Tilt it out of the device to break away from the remaining adhesive.
– Next, carefully remove the battery from the device.
– Now it’s time to secure the new battery: apply some pre-cut adhesive or double-sided tape to the battery well where the old adhesive used to be – just be sure not to stick it directly to the battery.
– Let’s get the new battery aligned just right. Temporarily reconnect it to the motherboard, then disconnect it once it’s in place.
– Double-check that the battery is centered in the well with an even gap all around it.
– Give the new battery a firm press to make sure it’s snug in its new home.
Step 30


– Grab your trusty Torx T3 screwdriver and get ready to tackle that 5.1 mm-long screw holding the mmWave antenna bracket in place. You’ve got this!


Step 33


The mmWave antenna cable is held in place by a friendly little dab of glue. If you need help, you can always schedule a repair.
– Let’s carefully slide an opening pick underneath the mmWave antenna cable, starting at its bottom end.
– Now, using the opening pick, gently separate the mmWave antenna cable from the motherboard. You’re doing great!


Step 35


– Grab the flat end of a spudger and gently scrape away that thermal paste from the mmWave antenna. Let’s get it nice and clean!
– Next up, use some isopropyl alcohol along with a coffee filter or a lint-free cloth to wipe off any stubborn leftover thermal paste. You got this!
– Give the same loving treatment to the thermal paste on the mmWave antenna bracket. It deserves a fresh start too!
– As you piece everything back together, make sure to follow this guide for expertly reapplying thermal paste onto the mmWave antenna. You’re doing great!
Tools Used

Step 36


– Let’s get started! Use a Torx T3 screwdriver to carefully remove the two 5.1 mm-long screws that hold the rear camera assembly in place.
Step 37


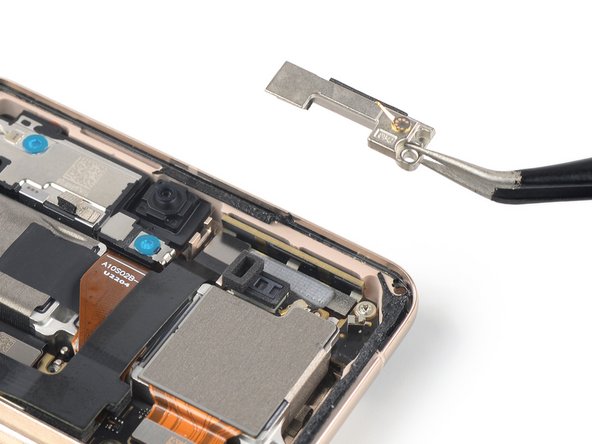
– Grab a trusty pair of tweezers and gently lift out the spring located in the top left corner of the rear camera assembly. You’re doing great!
Tools Used


Step 39


Be gentle with that cable! Avoid sharp folds and bends to prevent damage, and you’ll be golden.
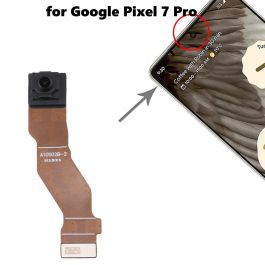
– Use a spudger to gently lift the front facing camera cable connector straight up from its socket. Think of it like giving the connector a little high five!
– Now, carefully fold the cable upwards to release the rear camera assembly. You’re almost there!
Tools Used
Step 40


– Time to get those camera cables disconnected! Use a spudger to carefully pry the connectors for the wide and ultrawide camera cables straight up from their sockets.
Tools Used


Step 42


– Grab your trusty Torx T3 screwdriver and gently unscrew the 3.1 mm-long screw that’s keeping the earpiece speaker in place. You’ve got this!
Step 43

– Time to warm things up! Get your iOpener nice and toasty and apply it to the camera glass. This will help loosen the adhesive under the earpiece speaker. Give it at least a minute to do its magic.
Tools Used
Step 44


– Gently slide the pointed end of a spudger into the top left corner between the earpiece speaker and the frame.
– Carefully pry upwards to free the earpiece speaker.
Tools Used
Step 45


– Time to get a little handy! Use a pair of tweezers to carefully remove the earpiece speaker.
Tools Used


Step 47


Hold onto the cable as close to the connector as you can to keep that connector safe and sound!
– Grab those tweezers and gently hold onto the white antenna cable connector located at the top left corner of the motherboard.
– Now, give that coaxial connector a little lift straight up to disconnect the white antenna cable.
– With your trusty tweezers, carefully ease the cable out from the retaining clips. You’ve got this!
Tools Used
Step 48


– Gently slide your trusty tweezers under the black antenna cable at the left antenna board until they snugly meet the metal connector.
– Now, lift that coaxial connector straight up – it’s time to disconnect the black antenna cable!
– With careful finesse, use your tweezers to loosen the cable from its retaining clips. You’re doing great!
Tools Used


Step 51


– Slide those trusty tweezers under the black antenna cable at the right antenna board until they’re snug with the connector.
– Lift the connector straight up to disconnect the black antenna cable. Easy breezy!
– Use your tweezers to gently work the cable out of the retaining clips. Steady hands win the day!
Tools Used
Step 52


– Time to get started! Insert a SIM eject tool, a trusty paper clip, or a bit into the SIM card tray hole – it’s like a little key to unlock your SIM card.
– Gently press the SIM eject tool into the hole until the SIM card tray pops out. Easy does it!
Step 53


– Pop out the SIM card tray like a pro!
Step 54


– Let’s get started by removing the four 3.1 mm-long screws that hold the motherboard in place. Grab your trusty Torx T3 screwdriver and get to work!
Step 55


Ensure that the motherboard is free from any pesky cables that might be blocking or tangling during this step.
– Let’s put on our superhero spudger gloves and pry that motherboard champ free with a gentle nudge! Once it’s loose, give it a high-five with your fingers and it’s all yours!
Tools Used
Step 56


– Take a moment to compare your shiny new replacement part with the original—don’t forget to transfer any leftover components or peel off those pesky adhesive backings before you dive into the installation!
– When it’s time to put everything back together, just follow these steps in reverse. Easy peasy!
– Want to run a quick diagnostics check? Use the built-in Pixel Diagnostic tool—just click here.
– Got some e-waste? Make sure to drop it off at an R2 or e-Stewards certified recycler. Let’s keep our planet happy!
– If things didn’t go quite as planned, no worries! Try some basic troubleshooting, or feel free to reach out to our community for a helping hand.
– Oops! I didn’t finish this guide.
– Remember, if you hit a snag, you can always schedule a repair.
Success!