How to Replace Google Pixel Battery: Step-by-Step Guide
Duration: 45 minutes
Steps: 20 Steps
This repair guide comes straight from the talented folks at Salvation Repair, and while we love it, it hasn’t received the official thumbs-up from Google.
Heads up! The display is held on tight with some super strong adhesive, and there’s not much room for your tools. Plus, it gets pretty toasty during this process. So, there’s a good chance you might accidentally give your display a little love tap. Handle with care!
Before you dive in and start disassembling your phone, make sure to drain that battery down to below 25%. Safety first!
Hey there! This repair guide was put together by the awesome team at Salvation Repair. Just a heads up, it hasn’t been given the thumbs up from Google. Ready to roll? Use this guide to swap out the battery in your Google Pixel! On average, a battery holds up pretty well for about 18-24 months, but if you find yourself charging it all the time or it just shuts down on you unexpectedly, it might be time for a replacement. Just a friendly warning: the display is stuck on there pretty well, and the tools have a bit of a tight squeeze to get in, plus we’re bringing the heat! So, there’s a chance you might accidentally give your display a little love tap during this process. If you’re not planning to replace that display too, take it slow and steady, and be ready to swap it out if it decides to play hard to get after you put everything back together. Follow the steps with care and keep an eye on those warnings to boost your chances of success! Before you dive in, remember to drain your battery below 25%. A charged lithium-ion battery can be a bit of a firecracker if it gets punctured accidentally. And if your battery is looking a little puffy, make sure to take the right precautions. The battery is glued in there pretty firmly, so you might need some high concentration (over 90%) isopropyl alcohol to help loosen it up. Let’s get to it!
Step 1

– First things first, power down that device and give it a little break!
– Next up, grab your trusty iOpener to warm up those display edges and loosen the adhesive beneath. If you don’t have one, no worries! A heat gun or even a hair dryer will do the trick.
Tools Used

Step 2


Be careful not to poke around more than 1.5 mm on the edges or 9 mm on the top and bottom of your device. Going too deep could cause some serious damage to the display!
Step 3


If your screen is sporting a crack, give it a little TLC by covering it with packing tape. This will help the suction cup stick better and keep those pesky glass shards from escaping. You’re doing great!
– Grab a suction handle and carefully lift the display to create a small gap between the screen and the phone’s body.
– If the display doesn’t budge, give it a little more heat. Patience is key, this can take some time. Once you’ve made some space to slip in your tool, you’re ready to move on to the next step.
Tools Used

Step 4


No need to strong-arm it! Just slide the pick around gently to loosen the adhesive. If you need help, you can always schedule a repair.
The display panel is super delicate! If you’re thinking about reusing your display, be sure to gently slide your tool in just enough to break the adhesive. Pushing it in too far could harm the OLED panel hiding beneath the glass. Remember, a little care goes a long way! If you need help, you can always schedule a repair.
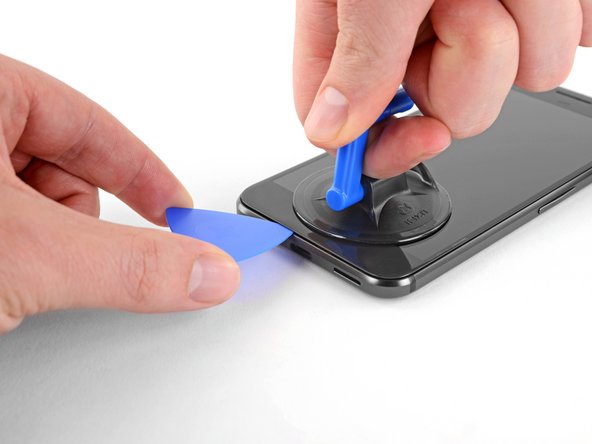
– Grab an opening pick or a trusty playing card and slide it into the little gap between the chassis and the display assembly.
– Now, gently glide that pick around the display’s edge, making sure to slice through the adhesive that’s holding it in place.
Step 5


Hey there! Just a heads-up: there’s a mesh covering the earpiece speaker at the top edge of the screen. If you don’t have a replacement mesh handy, be sure to handle this little guy with care – we wouldn’t want to see it get damaged or lost!
Also, watch out for the side bezels! They’re only 1.5 mm deep, so be gentle and take your time.
– Gently keep peeling away that adhesive around the rest of your device. You’re doing great!
Step 6


Hold your horses! Don’t yank the display off just yet; it’s still attached by a delicate ribbon cable. Take it slow and be gentle with the cable while you’re adjusting the display.
Remember, there’s sticky adhesive lurking around, so it’s a smart move to slide an opening pick between the screen and display to keep that goo from spreading!
Step 7

While you’re doing this repair, remember to keep an eye on each screw and make sure it finds its way back home.
– Grab your trusty T5 Torx driver and let’s get to work! Carefully unscrew those two black 3.5 mm T5 screws that are holding down the display cable connector bracket. You’ve got this!


Step 9

Hey there! Just a friendly reminder: when connecting this type of connector, take it easy! You should feel a gentle snap, but if you have to force it, you might end up causing some damage. So, let’s keep things smooth and easy!
– Grab your trusty spudger and carefully lift up the display cable connector to release the display. You’ve got this!
– When putting things back together, be gentle! Snap one side in first, then the other. Easy peasy!
Tools Used

Step 10

– First things first, let’s get that display off! It’s time to say goodbye to the old screen.
– Heads up! Some replacement displays might not come with an earpiece speaker grille. If your new screen is missing this little guy, don’t forget to transfer it from your old display to the new one.
– Before you seal everything up, take a moment to test out your new part. It’s a great time to make sure everything’s working smoothly and to replace that display adhesive.
– As you boot up your device after putting it all back together, your screen will go through a calibration dance. Just a friendly reminder: keep your fingers off the screen during this process to avoid any touch hiccups!
Step 11

– Grab your trusty T5 Torx driver and get ready to tackle those nine 3.5 mm screws holding the midframe in place. You’ve got this!
Step 12

– The midframe is snugly secured by five clips. To set them free, give a gentle push inward with your trusty opening tool, just like the steps illustrate below.
Step 13

– Slide an opening pick into the little notch at the bottom right corner of your phone. You’ve got this!
Step 14


Hold your horses! Don’t try to pry off the midframe just yet! There’s a delicate ribbon cable hiding underneath that connects the earpiece speaker to the motherboard. We wouldn’t want to disturb that, would we?
If the clasps are giving you a hard time, give that edge a gentle nudge inward with your hand, or grab a thicker tool like a spudger to help you out.
Keep in mind that those pesky clips won’t budge just by sliding through; it’s all about the inward pressure your opening pick makes as it slips into the gap around them.
– Gently slide the opening pick into the tiny gap between the midframe and the rear case on both sides of your device. This will help pop those clips loose and set you on the path to success!
Tools Used
Step 15


– Grab your trusty spudger and gently pry the earpiece speaker cable connector straight up. This will disconnect it from the motherboard like a pro!
– Next up, it’s time to remove the mid-frame from your device. Just give it a gentle nudge.
– As you put everything back together, remember to reconnect the earpiece speaker cable first. Then, slide the top side of the midframe in before snapping those clips back into place. You’ve got this!
Tools Used
Step 16

– Grab your trusty spudger and lift the battery ribbon cable, disconnecting it from the motherboard. You got this! If you need help, you can always schedule a repair.
Tools Used
Step 17


– Grab those tweezers and carefully peel back the silver tape hiding the cable that connects the motherboard to the daughterboard. Just peel back enough to expose the connector underneath.
– Take your trusty spudger and gently pry the connector straight up to disconnect it from the motherboard.
Step 18


– Gently peel back the sticker that’s hiding the interconnect cable on the daughterboard side. It’s like unwrapping a little surprise!
– Grab your trusty spudger and carefully disconnect the cable from the daughterboard. You’re doing great!
– Now, go ahead and remove the cable from the device. You’re one step closer!
– When it’s time to put everything back together, just make sure this interconnect cable is in the right spot. If it’s upside down, your phone might just decide to take a nap instead of booting up. Keep up the awesome work!
Tools Used
Step 19


Hey there! Just a friendly reminder to handle that battery with care. Soft-shell lithium-ion batteries are a bit temperamental and can leak some nasty stuff, catch fire, or even go boom if mishandled. So, let’s keep it gentle and avoid using metal tools to pry it out.
– Your battery has a nifty jacket that acts like a battery removal tab—just give it a gentle tug to pop that battery out! If it’s feeling stubborn, don’t worry, we’ve got more tricks up our sleeve.
– Next up, grab an opening pick and carefully slide it under the battery to break the adhesive. Take your time; we’re in no rush here!
– If the battery is still holding on for dear life, no need to force it! Instead, apply some cozy heat to the back of your device using an iOpener or a heat gun. This will help loosen the adhesive and make things easier.
Tools Used
Step 20

– First things first, let’s get that battery out of there!
– Ready to pop in a new battery? Here’s how:
– Make sure to clear away any old adhesive sticking to the phone. A little isopropyl alcohol and a lint-free cloth will do the trick to make those glued areas shine.
– Now it’s time to secure your new battery! Use some pre-cut adhesive or double-sided tape, but remember: the adhesive goes on the phone, not the battery itself!
– Once that’s done, give the new battery a good press down for about 5-10 seconds to make sure it’s snug as a bug!
Tools Used


