How to Replace Google Pixel XL Rear Camera: Step-by-Step Guide
Duration: 45 minutes
Steps: 31 Steps
This repair guide comes straight from the awesome team at Salvation Repair, and while it’s packed with handy tips, it’s not officially endorsed by Google.
Just a heads up, the Pixel XL’s screen is a bit of a delicate flower, so handle it with care!
Hey there! This guide comes straight from the awesome folks at Salvation Repair, and while Google hasn’t given us a thumbs up, we’ve got your back! In this guide, we’ll walk you through replacing the rear-facing camera on your Google Pixel XL. The steps are designed to be straightforward, so you’ll be a camera-replacing pro in no time! Just a heads-up: the Pixel XL has a delicate display that’s glued to the frame pretty tight, so handle it with care. There’s a good chance of breaking it, especially if it’s got some tiny cracks already. Make sure to use plenty of heat and take your time when prying things apart. The rear-facing camera is nestled right on the motherboard, so let’s get started! If you need help, you can always schedule a repair.
Step 1


– Grab a SIM eject tool, a handy SIM eject bit, or even a trusty paperclip and insert it into the tiny hole located on the left edge of your phone, right near the top.
– Give it a gentle press to pop that tray right out!
Step 2


You can also try using a hair dryer, heat gun, or hot plate to help out, but watch out for the heat! Your phone’s display and internal battery can get a little too toasty and might not appreciate it. Keep it cool while you work your magic!
– Warm up an iOpener and let it hang out on the top edge of your display for about two minutes.
– Before you dive into prying, keep these areas in mind:
– There’s a thin layer of adhesive hugging the display panel.
– Watch out for the thick adhesive lurking around.
– Be cautious with the OLED display panel—it’s a bit delicate and can easily get hurt.
– The display cable is also in the danger zone during prying, so handle it with care.
Tools Used

Step 3


Be careful not to insert the pick more than 13 mm (0.5 inches) – going too far can damage the display assembly. If you’re unsure, don’t hesitate to schedule a repair
Why not give a playing card a shot? It can come in handy when you’re trying to slide that opening pick in there. Just like how we used to slide those cards under the door to say ‘hello’! For extra help, feel free to schedule a repair!
– Once the edge is feeling a bit cozy, grab your trusty suction cup and place it near the edge.
– Give that suction cup a gentle lift, then slide an opening pick into the little gap you’ve created.
– If that gap is being a bit stubborn, no worries! Just warm up the edge again and give it another go.
Step 4


Remember, don’t go deeper than 13 mm (0.5 inches) or you might just give your display a bad day!
There’s a nifty mesh covering the earpiece speaker at the top edge of the screen. If you don’t have a spare mesh handy, just be careful not to damage or misplace this little guy!
– Gently slide the opening clip across the top edge to cut through that stubborn adhesive.
– Pop an opening pick into the gap to keep that adhesive from sticking back together.
Step 5


Keep that pick to just 1 mm (1/32″) along the edge—going deeper could spell trouble for your display assembly!
– Warm up your iOpener and give the right edge of your phone a cozy two-minute hug.
– Gently slide an opening pick near the top edge of the phone, right where you’ve sliced that pesky adhesive.
– Take it slow and guide the pick around the right corner with care.
– Now, slide that pick down the right edge of the phone, slicing through the adhesive like a pro.
– Don’t forget to repeat this step on the left edge of your phone!
Tools Used
Step 6


Hey there! Just a friendly reminder: don’t go slicing deeper than 8.5 mm (1/3″) or you might accidentally give your display cable a bad day.
– Let’s warm up that bottom edge! Use your iOpener for two minutes. Just like a good friend, it’ll make everything more cooperative.
– Now, take your pick and get cozy near the right edge. You’ve already made some space, so you can just slide right in.
– Carefully guide that pick around the corner. Like a dance move, you’ll be in control.
– Slide the pick along the bottom edge. It’s like a little slice and dice party for that adhesive. Enjoy!
Tools Used
Step 7

Hold up! Don’t get too excited and try to remove the display just yet. It’s still hooked up with a little flex cable, so let’s leave that be for now.
– Now that you’ve made your way around the phone’s perimeter, gently pry the display assembly up from the right corners – you’re making great progress!
– Use an opening pick to carefully cut through any remaining adhesive, and you’ll be one step closer to a fully functional device. If you need help, you can always schedule a repair
Step 8


Just a heads up—make sure to handle that flex cable with care when you’re giving the assembly a little spin!
Step 9


Stay on top of those screws, tech ninja! Make sure they go back to where they belong – it’s like a cosmic dance of fasteners.
Step 10


To reattach those connectors like a pro, gently line them up and give a little press on one side until you hear that satisfying click! Then, do the same on the other side—easy peasy! Just steer clear of pressing down in the middle. If things get a bit wonky and the connector is misaligned, you might bend the pins, and nobody wants that kind of permanent damage. Remember, if you need help, you can always schedule a repair.
– Gently take the spudger and use its tip to carefully lift and disconnect the display cable from its connector. You’ve got this!
Tools Used

Step 11


– Start by removing the display assembly. It’s easier than it sounds! Trust us.
– If you’re looking for a detailed guide on reinstalling the Pixel XL display, just check out this handy reference.
– If your new display didn’t come with a speaker grille, no worries! Use tweezers to gently peel the adhesive grille from your old display and transfer it over. It’s like a little makeover for your phone!
– Before you pop in that new display, make sure to clear away any leftover adhesive from the frame. Grab a spudger or opening tool to scrape it off, and use some high-concentration isopropyl alcohol to wipe away any stubborn residue.
– If you’re putting back the same display assembly, don’t forget to clean off all the adhesive remnants from both the panel and the frame before applying the new stuff.
– Once you’ve got everything set, power on your phone and test your repair before sealing it up with new adhesive. Better safe than sorry!
– During the boot-up after reassembly, your screen will undergo a calibration sequence. Just sit back and resist the urge to poke the screen; tampering could mess with the touch calibration and create some issues down the line.
Tools Used
Step 12

– Let’s get this party started by unscrewing the screws that hold the midframe to the back:
– First up, we have seven sleek black 4 mm T5 screws.
– And don’t forget those two shiny silver 3 mm T5 screws!
Step 13

– The midframe is held tight by some sneaky plastic clips that hug the edge of the back case. You’ll need to give ’em a little nudge to get ’em to let go.
Step 14


– Locate the tiny notch in the bottom left corner of the frame and gently slide in an opening pick.
– Carefully glide the opening pick along the bottom edge of the phone towards the bottom right corner and let it rest there.
Step 15


Getting things apart can be a bit of a workout due to those snug fitments, so you might need to put in some elbow grease! If you’re finding it tricky, why not grab a playing card and give it a gentle slide to help you out?
– Alright, let’s get this phone open! Grab your opening pick and slide it gently into the right edge, near the bottom.
– Now, slowly work that pick up along the seam – you’ll feel a little pop as the first clip releases. You’re a pro at this, keep going!
– Once that clip is free, leave your pick in place. We don’t want that midframe sneaking back in! You’re doing great! If you need help, you can always schedule a repair
Step 16


Be careful not to push the pick in too far – about 2 mm is the limit. If you go all the way, you might accidentally damage those delicate flex cables.
At this point, the right edge of the midframe should be free from the case. If it’s still stuck, try sliding an opening clip up and down along the right edge to loosen it. If you need help, you can always schedule a repair
– Grab an opening pick and gently slide it into the right edge of your phone, then nudge it upwards toward the top right clip like you’re giving it a friendly poke.
– Take your time and glide the pick past that clip to help it disengage from the frame—no rush, you’ve got this!
Step 17


– Alrighty, let’s tackle this midframe removal! Grab hold of those beautiful corners and gently swing that right edge upward like you’re opening a book.
– Now, feel for that sweet liberation of the left edge – once you sense some freedom, stop there and lift up your prized possession.
– Midframe, meet open air! Give it a nice sendoff and let it join your other gadgets in decompression.
– Ready to reunite these two? Stick the midframe back in like a pro. Line up them edges and give a friendly squeeze all around. Watch as it clicks back into place! See? Easy peasy!
Step 18


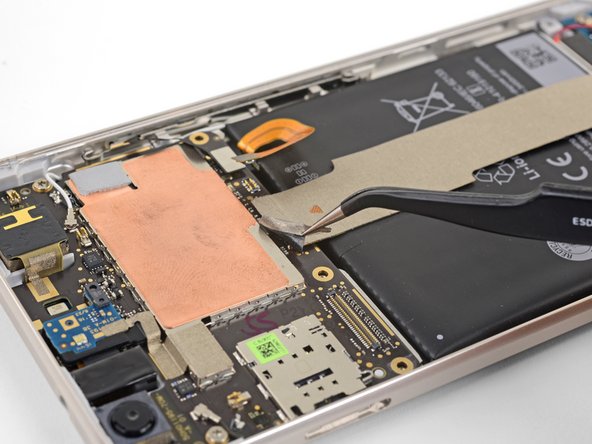
– Grab your trusty spudger and give it a gentle nudge to lift up and disconnect that battery connector. You’ve got this!
– Give the battery flex cable a little bend to keep it away from the motherboard. We want to avoid any unexpected hugs!
Tools Used
Step 19


If the button strip’s metal clip falls out during the repair, don’t worry – just align it properly and gently push it back into place. If you need help, you can always schedule a repair
– Grab the pointy end of that trusty spudger and gently nudge it to lift and disconnect the button strip connector. You’ve got this!
Tools Used
Step 20

– Grab your trusty tweezers and gently lift the tape at the top of the interconnect cable. You’ve got this!
Step 21


– Grab the pointy end of your spudger and gently wiggle it to lift up and disconnect the interconnect cable from the motherboard. You’ve got this!
Tools Used
Step 22


– Gently use the spudger’s tip to detach the black antenna cable from the motherboard, just by the front-facing camera module. You’ve got this!
– Carefully guide the antenna cable out of its clip, making sure it feels free and easy.
Tools Used
Step 23


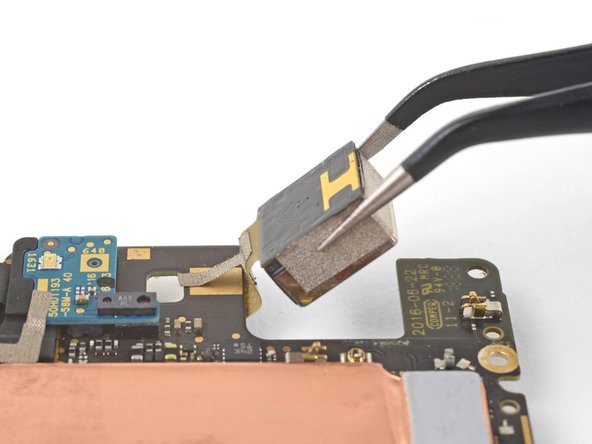
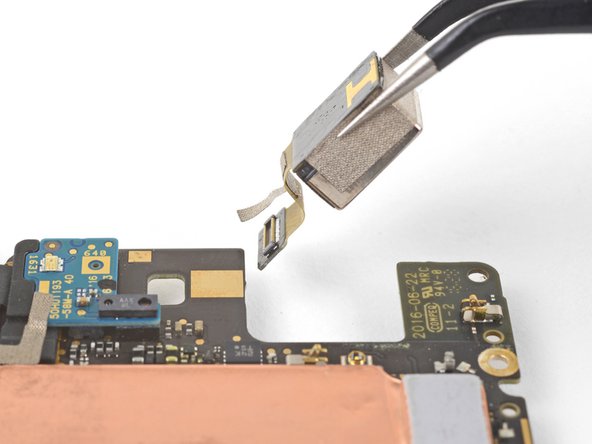
– Grab your trusty spudger and gently pry up that white antenna cable from the motherboard, right by the rear-facing camera module. You’ve got this!
– Now, let’s free that antenna cable from its retaining clip and give it some room to breathe.
Tools Used
Step 24

– Let’s get started by removing the two 3 mm T5 screws that hold the motherboard in place. Take your time and make sure they’re completely out before moving on.
– When you’re putting everything back together, just remember to seat the camera modules and headphone jack module nicely into their sockets before screwing the motherboard back down. If you need help, you can always schedule a repair


Step 26


– Gently slide the tip of a spudger into the headphone jack and give it a little nudge upwards to free the port from its snug home.
Tools Used
Step 27


Hold your horses! The motherboard isn’t ready to come out just yet. It’s still hanging on by a flex cable.
Don’t forget to pop out that SIM card tray before diving into this step!
– Gently use the flat end of a spudger to nudge the bottom edge of the motherboard upwards just a bit, freeing it from its cozy spot.
Tools Used
Step 28


– First things first, find that sneaky fingerprint sensor cable hiding on the underside of the motherboard, right near the bottom edge.
– Now, grab your trusty spudger and gently pry that fingerprint sensor cable out of its cozy socket.
– Once it’s free, carefully peel the cable away from the motherboard like you’re unwrapping a present!
Tools Used
Step 29


Alright, let’s get this sensor out of its little home before we attach it to the motherboard. If you’re feeling a little lost, no worries! Take a deep breath, and check out our guide. It’ll walk you through it step-by-step. And hey, if you need a helping hand, you can always schedule a repair.
– Let’s get that motherboard out – gently grasp it by the corners and carefully lift it out of its recess, keeping an eye on those cables so they don’t get snagged.
– When you’re putting everything back together, make sure to route both antenna cables under the motherboard edges and through the cable notches – it’s an easy step to miss, but crucial for a successful repair.
– Reconnecting the fingerprint sensor connector can be a bit finicky, but don’t worry, you’ve got this!
– To make the connection easier, slightly bend the fingerprint sensor cable so it curves upward near the connector – this will help it fit snugly into place.
– Now, stand the motherboard up and position it so the connector is resting against the socket – you’re almost there!
– Use your finger to carefully align the connector with the socket, and then gently press it into place. Remember, no need to force it – if it’s aligned correctly, the socket should hold the connector securely. If you need help, you can always schedule a repair
Step 30


– Time to get started – flip that motherboard over so the underside is facing up. Let’s get a look at what we’re working with.
– Now, use the point of a spudger to carefully pry up and disconnect the rear facing camera connector from its socket. Take your time and be gentle – we’re making progress. If you need help, you can always schedule a repair
Tools Used
Step 31

– Turn the motherboard over so the back is facing down, ready for action!
– Gently nudge the camera module out of its cozy spot and carefully pull it out, making sure to lift the adhesive tape along the way.
– Say goodbye to the rear camera module as you remove it with care.