How to Replace iPhone 16 Pro Max Charge Port: Step-by-Step Guide
Duration: 45 minutes
Steps: 46 Steps
Hey there! Before you dive into this repair adventure, how about giving that port a little scrub first?
Ready to tackle that pesky USB-C charge port on your iPhone 16 Pro Max? If your port is feeling a tad wobbly or you’re facing charging hiccups, it might be time for a swap! But hold your horses—before diving in, give that port a good clean; it could just be a little gunky, not broken! And don’t forget, you’ll need some replacement back glass adhesive to wrap up this repair like a pro. If you need help, you can always schedule a repair.
Step 1


Let your iPhone’s battery dip below 25%, because a fully charged lithium-ion battery can be a bit of a drama queen when it comes to safety.
– First things first, let’s give your iPhone a little breather. Go ahead and unplug any cables that are still hanging on.
– Now, it’s time for a little power nap! Press and hold the power button along with either volume button, and then slide to power off your iPhone like a pro.
Step 2


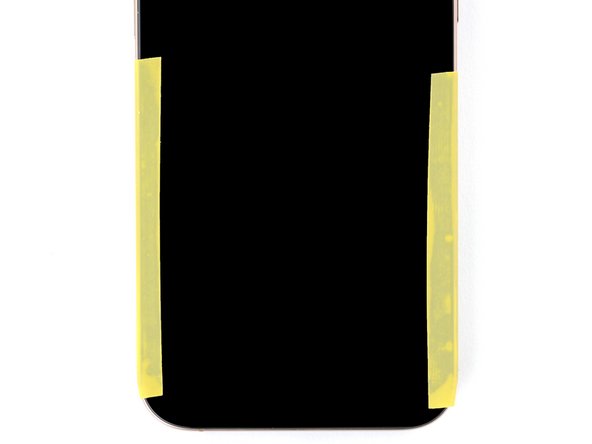
Find a nice, smooth patch near the bottom edge that’s spacious enough for your trusty suction cup to grab on.
– If your screen or back glass is looking a bit worse for wear, grab some packing tape and lay down overlapping strips over the glass. This will keep you safe and make taking things apart a breeze!
Tools Used

Step 3


– Grab your P2 pentalobe driver and unscrew the two 7.4mm screws flanking the charging port. If you need help, you can always schedule a repair.
Step 4


Be careful not to push that opening pick in too deep – it could hurt your device! To keep things safe, let’s mark your pick for some added protection.
Feel free to mark the other corners of the pick with different measurements for extra clarity.
Another fun option? Stick a coin to the pick about 3 mm from the tip with tape. It’s a nifty trick!
– Grab your trusty opening pick and measure out 3 mm from the tip. Give it a little mark with a permanent marker so you know where to go!
Step 5

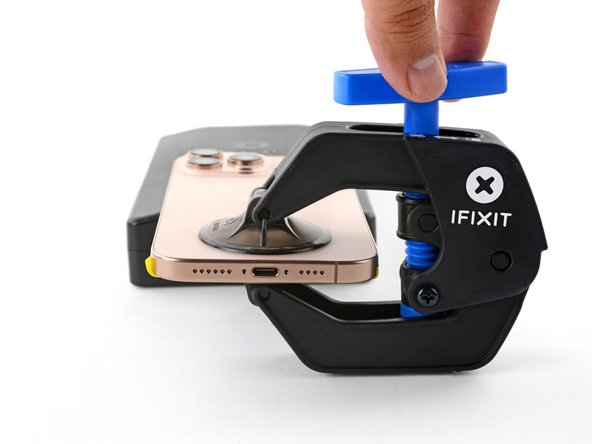
In the next four steps, we’ll show you how to use the Anti-Clamp, our nifty little tool designed to make opening your device a breeze. If you’re not using the Anti-Clamp, feel free to skip down four steps for a different approach.
The Anti-Clamp creates a strong suction on both the screen and the back glass. If you want to open just the back glass, make sure to tape down the screen. For a detailed guide on how to use that tape, check it out!
For all the ins and outs of using the Anti-Clamp, take a peek at this guide.
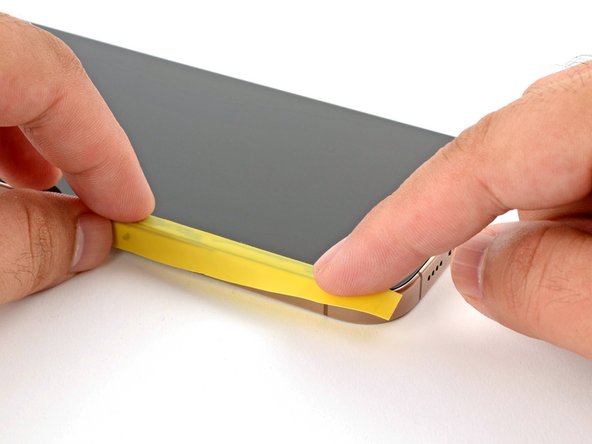
Just a quick reminder: the tape should only be holding the screen in place, not the back glass.
– Snip two strips of tape, then stick them down along the long edges of your iPhone. Give them a little fold over the screen to keep everything nice and snug.
Step 6

If your iPhone’s surface feels a bit too slick for the Anti-Clamp to grip, just grab some tape and give it a little texture. That should do the trick!
– First things first, give that blue handle of the Anti-Clamp a good pull backwards to unlock those arms and get the party started.
– With the back glass facing up, gently slide the arms over the right edge of your iPhone. Make sure one suction cup is sticking to the back glass and the other is hugging the screen. Aim to center those cups near the bottom edge for the best grip.
– Now, keep your iPhone nice and level while it’s nestled between the Anti-Clamp’s arms—using a small box can work wonders here.
– Give those cups a squeeze to create a solid suction. You’ve got this!
Step 7


If you don’t have tape, try warming up the suction cups to make them stick better.
– Give that blue handle a gentle pull forward to lock those arms in place.
– Now, twist the handle all the way around (360 degrees) or until those cups start to stretch out nicely.
– As the cups are stretching, keep an eye on their alignment – they should stay upright and not go rogue. If they start slipping, just take off the Anti-Clamp and slap on some tape to help those cups stick.
Step 8

Just a friendly reminder to keep the heat in check while tinkering with your iPhone—the battery isn’t a fan of getting too toasty!
If after a minute you still don’t see a gap, don’t fret! Just add a bit more heat and give that handle a quarter turn. Let the Anti‑Clamp and some patience work their magic for you.
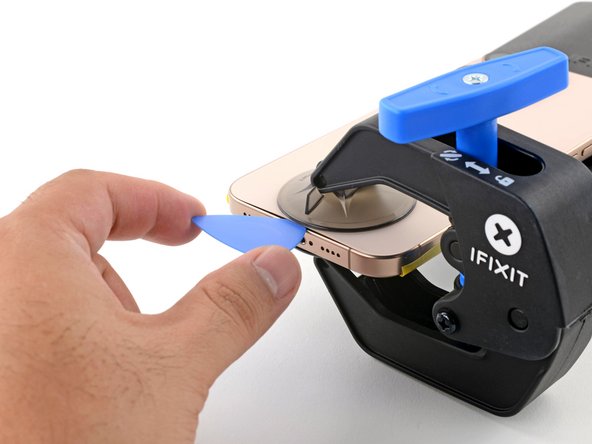
– Grab your trusty hair dryer or heat gun and warm up the bottom edge of that back glass until it feels nice and toasty.
– Take a breather for about a minute while the adhesive gets cozy and a little gap starts to appear between the back glass and the frame.
– Slide an opening pick into that newly formed gap.
– Gently pull off the Anti-Clamp using the handy pull tabs on the suction cups.
– Feel free to skip the next two steps.
Tools Used


Step 9

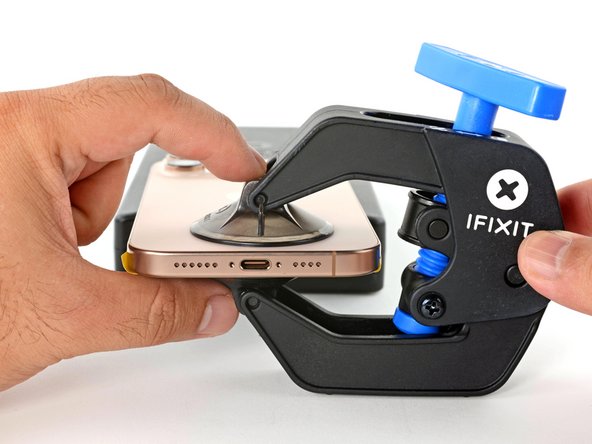
Next up, we’re going to create a little opening using a suction handle—it’s easier than it sounds!
Feeling a bit chilly? Grab an iOpener to warm up that back glass! Just follow the instructions to heat it up and apply it like a pro.
– Warm up the bottom edge of the back glass using a hair dryer or heat gun until it feels nice and toasty.
Tools Used


Step 10


If there’s still a stubborn gap, don’t worry! Just add a bit more heat to the edge and give it another shot.
– Stick a suction handle on the bottom edge of that back glass. You’ve got this!
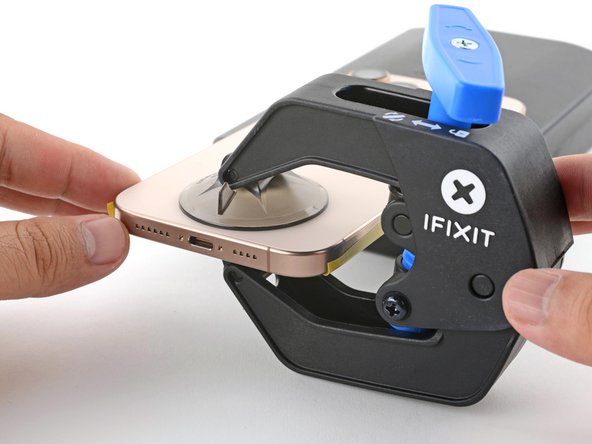
– Give it a firm pull with a nice, even pressure to pop open a little gap between the back glass and the frame. Easy peasy!
– Slide the tip of an opening pick into that gap you just created. You’re on your way!
Tools Used
Step 11

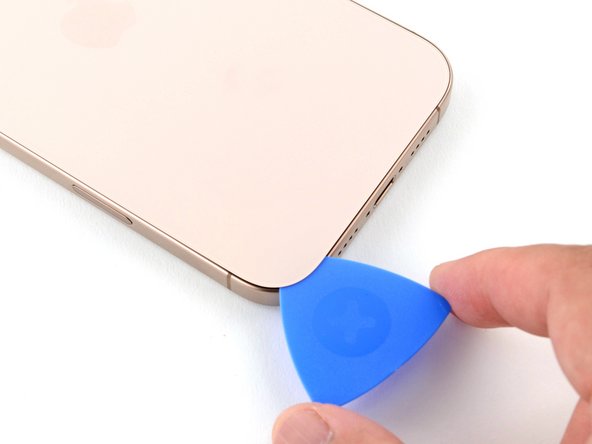
When you’re slicing through the adhesive holding the back glass, keep your pick shallow (no deeper than 3mm) to avoid messing up these critical spots:
– Be careful with that fragile cable connecting the back glass to your iPhone, located right next to the volume up button. We recommend avoiding inserting your pick here to keep that cable safe and sound!
– Watch out for the multiple spring contacts that are hanging out around the edges of your iPhone. They’re important, so give them some space!
Step 12

If you’re finding it tough to slice through that adhesive, just give the edge a little reheat for about a minute and then give it another go. You’ve got this!
– Gently slide the opening pick along the bottom edge to cut through that adhesive like a pro.
– Keep the opening pick nestled in the bottom-left corner to stop the adhesive from sticking back together.
Step 13

– Grab your trusty hair dryer or heat gun and warm up the left edge of that back glass until it feels nice and toasty!
Tools Used
Step 14


Keep your pick to a maximum of 3 mm depth to steer clear of any mishaps with the spring contacts. You’re doing great!
You’ll know when the metal clips pop free with a click and a feel.
– Pop in a second opening pick at the bottom-left corner, cozying up to the existing pick like best buds.
– Gently glide your pick along the left edge to loosen the adhesive and free those metal clips. You’re doing great!
– Keep that pick snugly in the top-left corner to stop the adhesive from playing hard to get again.
Step 15

– Grab your trusty hair dryer or heat gun and give some love to the top edge and top-right corner of that back glass. Heat it up until it’s nice and toasty to the touch!
Tools Used
Step 16


Keep your pick at 3 mm max—let’s keep those spring contacts safe and sound!
– Pop in a third opening pick into that top-left corner like it’s no big deal.
– Gently glide the pick along the top edge and around the top-right corner, taking a little pause just above the volume up button.
– Keep this pick in place to ensure the adhesive doesn’t start playing tricks on you again.
Step 17

– Grab your trusty hair dryer or heat gun and gently warm up the right edge of that back glass until it’s toasty enough to touch. You’ve got this!
Tools Used
Step 18


Keep your pick to a maximum depth of 3 mm to steer clear of any damage to those delicate spring contacts!
– Pop in a fourth opening pick at the bottom-right corner like a pro!
– Gently glide that pick around the corner and up the right edge, stopping just below the volume down button. You’re doing great!
– Keep this pick in place to stop that pesky adhesive from making a comeback.
Step 19


At this stage, the back glass should be popping off the frame with ease. If it feels like it’s playing hard to get, take a moment to run your pick around the edges again to see if there are any sneaky bits of adhesive or stubborn clips holding it back.
– Gently swing the back glass open to the right side of your iPhone, breaking free the leftover adhesive like a pro.
– Prop up the back glass with a clean, sturdy object to keep it nice and secure while you work your magic.
Step 20

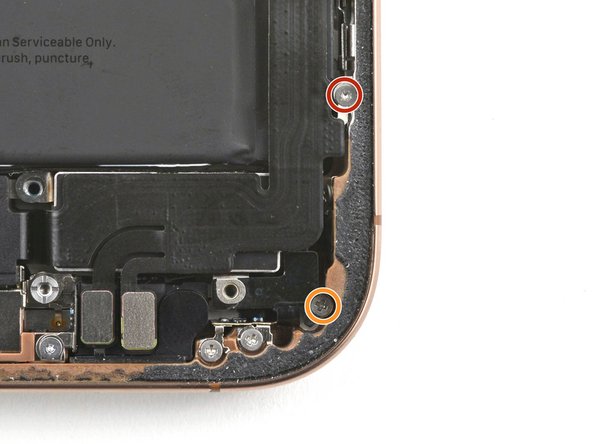
– Grab your trusty tri-point Y000 driver and get ready to tackle those screws holding the battery connector cover in place:
– You’ll need to unscrew two 1.3 mm-long screws
– And don’t forget about that one 1.0 mm-long screw
Step 21


– Gently pop off the battery connector cover and set it aside like a pro.
Step 22


– Grab your trusty spudger and gently use its point to lift up and disconnect the battery press connector. You’re doing great!
– To reconnect those press connectors, just line them up carefully and press down on one side until you hear that satisfying click. Then, do the same on the other side. You’ve got this!
Tools Used

Step 23

– Grab your trusty tri-point Y000 driver and let’s get those four screws out of the way to free the back glass connector cover:
– Two screws measuring 1.3 mm long
– Two screws measuring 1.0 mm long
Step 24


– Gently lift the back glass connector cover straight up and pop it off. If you need help, you can always schedule a repair
Step 25


– Grab your trusty spudger and gently nudge up that back glass connector to disconnect it. You’ve got this!
Tools Used
Step 26

Now’s a perfect time to give your iPhone a little test drive before sealing it up! Just reconnect the battery and back glass temporarily, power it on, and see if everything’s running smoothly. If all is well, power it back down and let’s keep going with the reassembly!
– Let’s get that back glass off! It’s time to remove it.
– As you put everything back together:
– Follow this guide to reapply the adhesive and securely attach your back glass again. You’ve got this!
Step 27


– Grab your trusty Phillips screwdriver and let’s tackle those three screws holding the Taptic Engine cover in place:
– One screw that’s 2.9 mm long
– One screw that’s 1.3 mm long
– One screw that’s 2.4 mm long
Step 28


– Grab your trusty tweezers or just your fingers and gently lift the top edge of the Taptic Engine cover. You’ve got this!
– Once you hear that satisfying click as the bottom edge pops away from the frame, go ahead and lift off the Taptic Engine cover like the pro you are.
– When it’s time to put everything back together, just make sure that bottom edge of the cover snaps back into place with a nice, secure latch. Easy peasy!
Tools Used

Step 29


– Grab the pointy end of your trusty spudger and gently nudge it to lift and disconnect the lower assembly cable from the logic board. You’ve got this!
Tools Used
Step 30


– Gently use the tip of a spudger to lift and disconnect the two connectors located near the bottom right edge of the frame. You’ve got this!
Tools Used
Step 31

– Unscrew the two fasteners holding the lower assembly cable:
– One 1.0 mm tri-point Y000 screw
– One 1.3 mm Phillips screw
Step 32

– Grab your trusty hair dryer and give that lower assembly cable section on top of the Taptic Engine a warm hug until it feels nice and toasty!
Tools Used
Step 33


– Slide an opening pick under the lower assembly cable to disconnect it from the Taptic Engine.
– Gently bend the cable out of the way so you can get to the Taptic Engine.
Step 34

– Grab your trusty Phillips screwdriver and gently unscrew the 2.1 mm-long screw holding the Taptic Engine in place. You’ve got this!
Step 35


– Gently nudge the corner bracket upwards using the tip of a spudger. You’ve got this!
Tools Used
Step 36


– Gently glide the tip of your trusty opening pick along the top edge of the Taptic Engine to gracefully detach the plastic buffer strip that’s hanging on for dear life.
Step 37


Careful now, folks! Avoid prying near the battery. If you need help, you can always schedule a repair
– Grab a spudger and gently pop up that Taptic Engine.
– Slide out the Taptic Engine with care.
Tools Used
Step 38


– Let’s get this party started by taking out the four screws holding the loudspeaker in place:
– One Phillips screw that’s 1.7 mm long
– One Phillips screw that’s 1.5 mm long
– One standoff screw measuring 4.1 mm long
– And finally, one tri-point Y000 screw that’s 1.3 mm long
Step 39


– Gently slide the point of a spudger under the bottom-right screw hole of the loudspeaker.
– Carefully pry it up and lift the loudspeaker out!
Tools Used
Step 40

– Take out the three screws holding down the bottom microphone:
– One 3.4 mm-long standoff screw
– One 3 mm-long standoff screw
– One 1.4 mm-long tri-point Y000 screw
Step 41


Be gentle with the battery; prying too hard might just give it a bad day.
You might notice a bit of a tug as the microphone pops free from its cozy frame gasket.
– Grab that trusty spudger and use its flat end to gently lift the bottom microphone up. You’re doing great!
– Now, go ahead and remove the bottom microphone. Almost there!
Tools Used
Step 42

– Alright, it’s reassembly time! Let’s make this happen:
– Grab those tweezers or your trusty fingers and gently take off that old adhesive gasket from the bottom of the frame. Go on, you got this!
– If your shiny new microphone has a pre-installed adhesive gasket, just peel off the liner to reveal the sticky side. Easy peasy!
– No gasket? No problem! Just slap on a fresh one either on the frame or right onto the microphone itself.
– Now, reinsert that microphone at a slight downward angle, then press it flat against the frame. You’re doing great—keep it up and let’s finish this assembly!
Tools Used
Step 43


Make sure to take out those pesky pentalobe screws next! If you don’t, they might just play hard to get when you’re trying to pop on that back glass.
These screws are snug and a bit tricky to get to. Try to angle your screwdriver as flat as you can, but be cautious not to press against the battery. If you need help, you can always schedule a repair.
– Grab your trusty Phillips screwdriver and get ready to pop off those two 3.3 mm screws holding the charge port snug against the frame. Let’s get that port free!
– When it’s time to put the charge port back in its happy place, go ahead and loosely screw in those two external P2 pentalobe screws. They’ll help you line everything up just right. Once everything looks good and aligned, tighten up that port with its Phillips screws and you’re all set!
Step 44


The charge port is snugly held in place with an adhesive gasket that seals it against the bottom of the frame. Plus, it’s cleverly tucked behind two prongs, making it a bit tricky to pull the port away from the frame. But don’t worry, you got this!
– Slide the tip of a spudger under one edge of the charging port.
– Gently pry it upwards to free the gasket and lift the port out.
– Do the same on the opposite side to completely loosen the port.
Tools Used
Step 45

– Time to say goodbye to that charge port! Go ahead and remove it.
Step 46
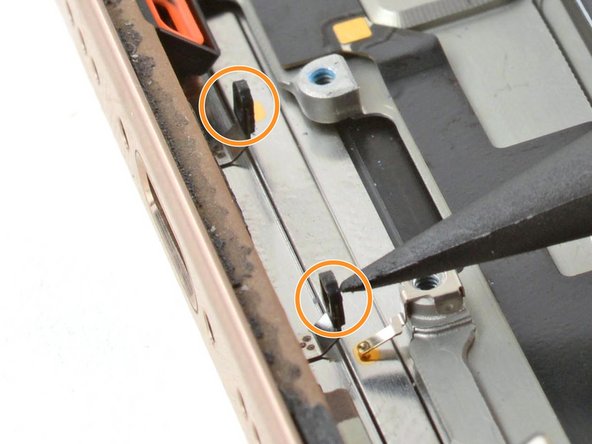
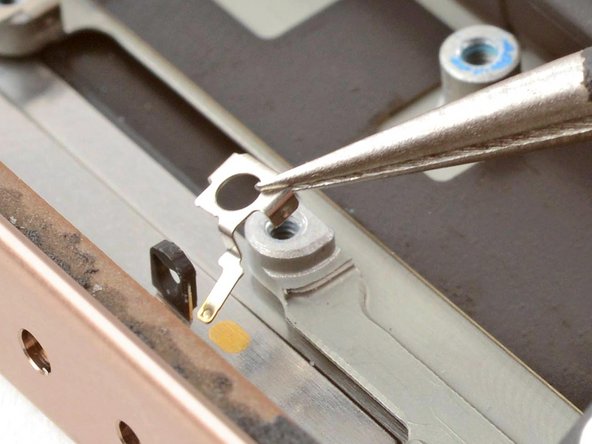
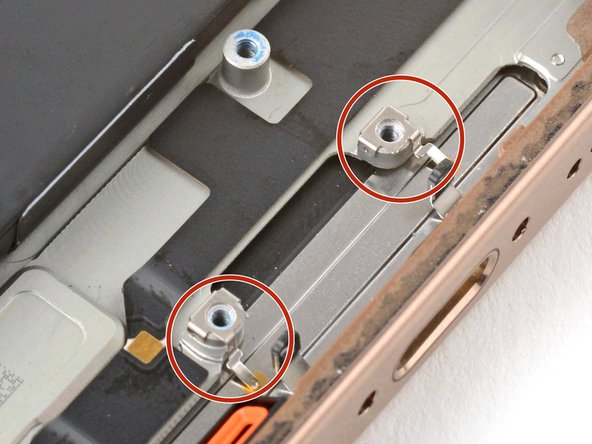
– As you put everything back together, keep these in mind:
– There are two screw posts under the charge port that have grounding clips. When reassembling, make sure the clips are still attached. They should point towards the bottom of the iPhone.
– Ensure the two black prongs are standing straight. If they got bent while removing the charge port, use the tip of a spudger to carefully straighten them.
Tools Used
