How to Replace iPhone SE 2020 Logic Board – Step-by-Step Tutorial
Duration: 45 minutes
Steps: 44 Steps
Hey there! Just a friendly reminder: make sure you follow the steps carefully to keep everything running smoothly. If you hit a snag, don’t hesitate to reach out! If you need help, you can always schedule a repair.
Hey there! Time for a fun little adventure – swapping out the logic board in your iPhone SE 2020. Just remember, this move will make that Touch ID of yours go on a little vacation, so it might be time to make some new pals with the home button. Not a problem though, because we’ve got your back. If you need help, you can always schedule a repair and we’ll be there with a big ol’ high five!
Step 1

Before diving in, make sure your iPhone battery is below 25%. A full lithium-ion battery can be a firecracker if punctured.
Power down your iPhone before you start taking it apart.
Opening up your iPhone’s display? Just a heads up, you might mess with those waterproof seals. Make sure you’ve got some replacement seals handy before diving in, or be super careful to keep it away from any liquids if you’re putting it back together without swapping those seals out. You’ve got this!
– Get ready to tackle those two 3.5 mm pentalobe screws hanging out at the bottom edge of your iPhone. Let’s get them out of there!
Step 2


Watch out! If you push that opening pick in too deep, you might accidentally give your device a little love tap that it doesn’t need. So, let’s take a moment to mark your pick properly and keep everything safe and sound.
– Grab your trusty opening pick and measure out a cool 3 mm from the tip. Give it a little mark with a permanent marker so you know where to go!
Step 3


Ready for the next steps? We’re going to show you how to use the Anti-Clamp to make this opening process a breeze. Not using the Anti-Clamp? No problem! Skip ahead three steps for an alternative method. And remember, if you need help, you can always schedule a repair.
– Give that blue handle a gentle tug backwards to free the Anti-Clamp’s arms.
– Slide those arms over the left or right edge of your iPhone like you own the place.
– Place the suction cups just above the home button near the bottom edge of your iPhone—one on the front and the other on the back.
– Squeeze the cups together to create a solid grip on that area. You’re doing great!
Step 4


– Slide the blue handle forward to secure the arms in place.
– Rotate the handle clockwise a full turn or until you see the cups stretching.
– Keep those suction cups aligned. If they start to slip, just loosen them up a bit and get them back in line. Need help? You can always schedule a repair.
Step 5


– Warm up your iOpener and slide it between the arms of the Anti-Clamp.
– Bend the iOpener so it rests on the bottom edge of your iPhone.
– Give it a minute to loosen the adhesive and create a gap.
– Slide an opening pick into the gap.
– Skip the next three steps.
Tools Used

Step 6

The next three steps will guide you on how to detach the screen with the help of a suction cup. Let’s get started!
– Heat up the lower edge of your Salvation Repair device using a hairdryer or an iOpener for about 90 seconds. This will help soften the adhesive securing your screen—making the opening process a breeze!
Tools Used
Step 7


– Grab a suction cup and place it on the lower part of the front panel, just above that trusty home button.
Step 8


The adhesive keeping the screen snug is super strong, so getting that first gap open takes some serious effort. If you’re struggling a bit, try applying a bit more heat and gently wiggle the screen up and down. This will help loosen the adhesive until you’ve got just enough space to slip your tool in there. You’ve got this!
– Get a grip on that suction cup and pull up with some steady pressure – you’re aiming for a tiny gap between the screen and the frame, just enough to get started.
– Now it’s time to bring in the opening pick – slide it into the gap you just created and you’re making progress! If you need help, you can always schedule a repair
Step 9


Avoid attempting to gently wiggle the top edge of the display away from the rear case; it’s snugly held by some plastic clips that could snap if pushed too hard. Keep it cool and be kind to your device!
– Gently slide that opening pick along the left edge of your phone, starting from the bottom and making your way up to the volume control buttons and silent switch. You’re breaking up the adhesive that’s keeping the display snug as a bug!
– Take a little pause just before you reach the top left corner of the display.
Step 10

Hey there! Watch out for those delicate cables on the right edge of your iPhone. No need to stick your pick there as you might damage those tiny cables. If you need help, you can always schedule a repair!
Step 11


– Slide your tool back into the lower right corner of your iPhone, then smoothly glide it around the corner and up the right side to loosen that adhesive. If you need help, you can always schedule a repair
Step 12


– Gently give a little lift to the suction cup and watch the magic happen as the bottom edge of the display starts to rise.
– Now, give a gentle tug on the little nub of the suction cup to bid adieu as it cheerfully separates from the front panel.
Step 13


– Sneak an opening pick under the display at the top left corner and glide it along the top edge to loosen the last bits of adhesive.
Step 14


– Gently nudge the display assembly downwards (away from the top edge of your phone) to pop the clips holding it to the rear case. If you need help, you can always schedule a repair.


Step 16


– Pop out the four Phillips screws securing the lower display cable bracket to the logic board. They come in these lengths:
– Remember to keep your screws organized, so they each go back in their original spots during reassembly. Mixing them up can cause damage.
– Lift off the bracket.
Step 17


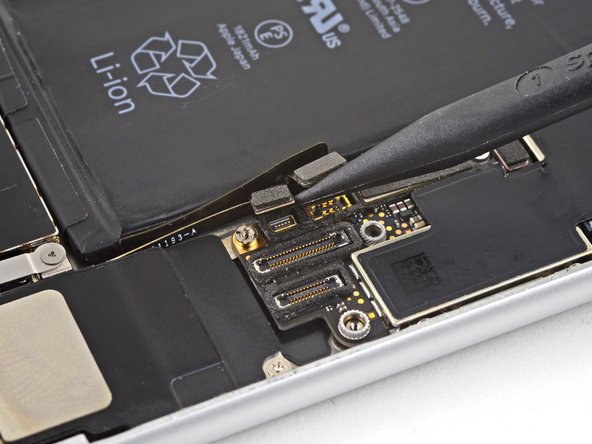
– Get ready to rock by using the point of a spudger to gently pry the battery connector out of its cozy socket in the logic board.
– Give the battery connector cable a little bend-away party from the logic board to keep it from accidentally mingling with the socket and giving power to the phone while you work your magic.
Tools Used

Step 18


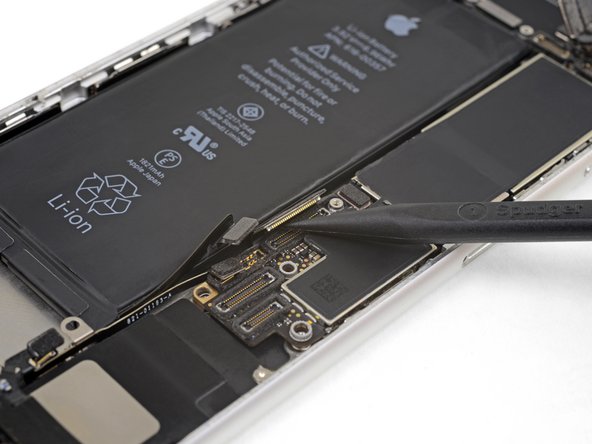
– Use the pointy end of a spudger to pop the lower display connector out of its socket.
– To reconnect those press connectors, press down on one side until you hear a click, then do the same on the other side. Avoid pressing down in the middle. If the connector is even a bit off, it can bend and cause permanent damage. If you need help, you can always schedule a repair
Tools Used
Step 19


– Now it’s time to disconnect the second lower display cable – use the point of a spudger to gently pry it loose. If you need help, you can always schedule a repair
Tools Used
Step 20


– Get ready to unleash your inner repair guru by removing those three tiny 1.3 mm Phillips screws that are holding down the bracket over the front panel sensor assembly connector.
– Give that bracket the freedom it deserves – remove it with confidence and a smile!
Step 21


– Grab your trusty spudger and pop off that front panel sensor assembly connector. If you need help, you can always schedule a repair.
Tools Used

Step 23


– Grab a SIM card eject tool, bit, or even a straightened paperclip and pop it into the tiny hole in the SIM card tray.
– Give it a press to pop that tray out.
Tools Used

Step 24


– To kick things off, gently pop out the SIM card tray from your trusty iPhone.
– When popping the SIM card back in, make sure it’s lined up just right with the tray.
– To keep those pesky water droplets and dust bunnies at bay, there’s a nifty rubber gasket encircling the SIM card tray. If this gasket’s seen better days, swap it out or grab a fresh tray to shield your iPhone’s insides.


Step 26

– Let’s get those two screws out to free the rear-facing camera bracket:
Step 27

– Pop off that rear-facing camera bracket!


Step 29

– Let’s take out the two screws holding the top cable bracket in place:
Step 30

– Time to say goodbye to the upper cable bracket! Go ahead and remove it with confidence.


Step 32

– Take out the three Phillips 1.3 mm screws holding the top left antenna component in place. If you need help, you can always schedule a repair.
Step 33

– Unlock the mystical power of the 1.4 mm Phillips screw that is holding together the antenna component with the top edge of the case.
Step 34

– Let’s get this party started by carefully taking out the antenna component!
Step 35

– To kick things off, delicately remove the pair of Phillips screws that are holding down the grounding clip snugly in place on the top left corner of the logic board.
Step 36

– Time to give that grounding clip its independence. Remove it with care and ease.
Step 37

– Time to get down to business! Unscrew those three little screws that are holding the motherboard in place. You’ve got this!
Step 38
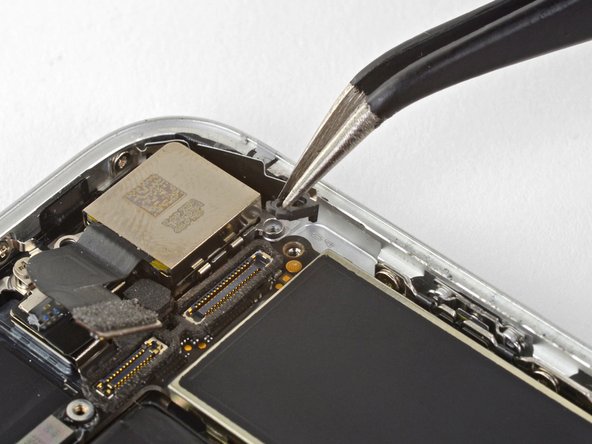

– Grab those tweezers and give the logic board grounding bracket a gentle nudge to the side. It’s a simple move that lets you get to the good stuff!
Tools Used

Step 39

– Grab your trusty spudger and nudge the SIM card eject plunger out of the logic board’s way. If you need help, you can always schedule a repair.
Tools Used


Step 42

– Grab your trusty spudger and gently pry up to disconnect that wireless charging coil connector. You’ve got this!
Tools Used
Step 43


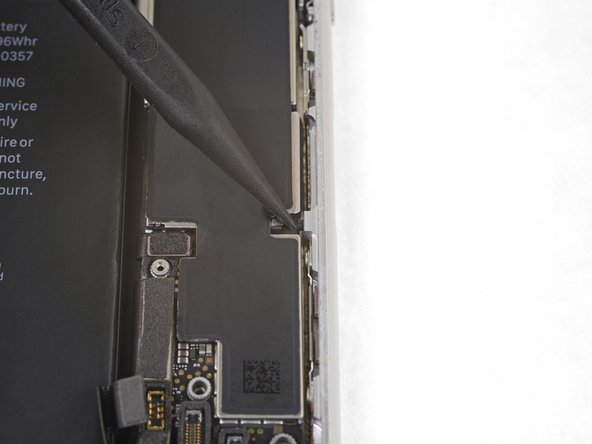
– Use the flat end of a spudger to carefully nudge the battery connector side of the logic board upwards. Take it easy, you’re doing great!
Tools Used
Step 44


Be gentle when handling the logic board to avoid catching it on any cables, and you’ll be one step closer to a successful repair – if you need help, you can always schedule a repair
– With a gentle grip on the edges, lift the logic board near the battery connector and take it out.