
How to Replace MacBook Pro 15 Bluetooth Antenna Guide
Duration: 45 minutes
Steps: 10 Steps
Hey there! Just a friendly reminder to take your time and follow each step carefully. If you hit a snag or need a hand, don’t hesitate to reach out and schedule a repair. You’ve got this!
Time to give your device a little tune-up! Say goodbye to the old and hello to the new by swapping out the Bluetooth board with a fresh one. Your device will be singing in harmony again in no time!


Step 2


– Unscrew the trio of 2mm Phillips screws holding the memory door in place. They’re all twinsies, so keep track of them!
– Give the memory door a little lift and slide it towards yourself to free it from its cozy casing.
Step 3

– Unscrew the two 2.8 mm Phillips screws sitting cozy near the latch in the battery compartment. You got this!
Step 4

– Unscrew those 6 screws like a pro!
Step 5

– Unscrew the four 3.2 mm PH00 Phillips screws located on the port side of your computer. Let’s get those screws out and get this party started!
Step 6

– Give your computer a little twist and turn it 90 degrees! Now, let’s get those two 3.2 mm Phillips screws out from the back. You’ve got this!
Step 7

– Give your computer a little twist—rotate it 90 degrees once more! Now, let’s tackle those four 3.2 mm Phillips screws hanging out on the side. Time to unscrew and show them who’s boss!
Step 8


Hey there! When removing the upper case, remember to take it slow. It’s connected to the logic board with a delicate ribbon cable.
– Start by gently lifting the back of the case and let your fingers glide along the sides, releasing it as you go. Once the sides are free, you might need to give the case a little wiggle up and down to loosen the front of the upper case.
– There are four tricky plastic clips right above the DVD slot, plus another one just above and to the left of the IR sensor. These clips can be a bit of a challenge to disengage without some gentle prying. And remember, getting them back in place during reassembly can be a bit of a puzzle too!
– Reassembly Tip: Give a good, firm push down on the tip of the top case right above each clip location until you hear that satisfying snap! That’s how you know they’re seated back in their slots.
– Reassembly Tip: The two center DVD clips can be a bit stubborn and often won’t snap back into place without a little extra help. Just apply some downward pressure, and instead of bending the frame around the DVD slot, support it by slipping a plastic spudger into the DVD slot right under the clip until it fits snugly. Then, press down until you hear that delightful snap!
Tools Used

Step 9


Heads up! You can swap out the hard drive without detaching the keyboard from its frame—just prop it up to stay clear of your workspace, giving you free hands to tackle the drive removal.
Take care with the keyboard-trackpad ribbon cable when freeing the rear of the upper case near the hinge. Watch out—it’s super easy to accidentally twist those screw receivers flanking the keyboard!
– Unplug the trackpad and keyboard ribbon cables from the logic board, peeling off any tape that gets in your way.
– Lift off the upper case like you’re unveiling the secret to eternal gadget life.
Step 10


Hey there! Just so you know, the Bluetooth board has made its home on the upper case.
– Unscrew the two Phillips screws that are keeping the cool black antenna holder in place. You’ve got this!
– Gently lift the black Bluetooth antenna holder away from the upper case like you’re lifting a slice of pizza.
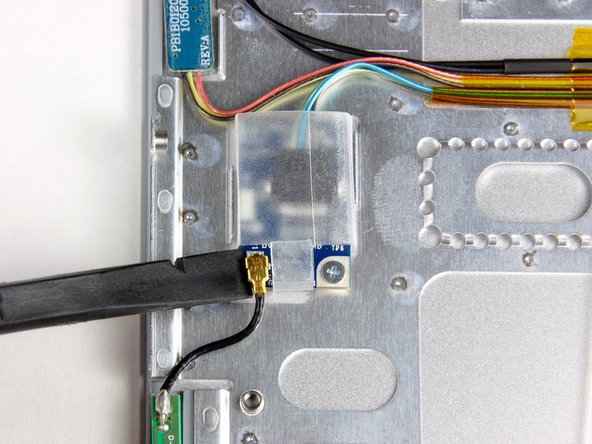
– Unplug the Bluetooth antenna cable from the Bluetooth board. It’s just a tiny tug away!
– Carefully lift the Bluetooth antenna from its snug home in the upper case. It might be a bit sticky due to some adhesive, so a little wiggle here and there should do the trick!


