How to Replace MacBook Pro 15 Display Assembly
Duration: 45 minutes
Steps: 19 Steps
Hey there, repair rockstar! Just a friendly reminder: make sure to turn off your device before diving into the repair. It’s always a good idea to keep things safe and sound. If you need help, you can always schedule a repair.
Follow this guide to swap out the whole display assembly. If you need help, you can always schedule a repair
Step 1

– Time to get your screwdriver ready! Let’s tackle those ten screws that are holding the lower case snugly against the upper case. Unscrew them and set them aside—you’re doing great!
Step 2


– With both hands, lift the lower case near the vent to pop it off the two clips holding it to the upper case.
– Take off the lower case and set it aside.
Step 3

No need to stress about steps 3-6 for removing the battery if you’re just swapping out the hard drive. However, it’s always a good idea to disconnect all power sources from your electronics before diving in. Safety first, techies! If you need help, you can always schedule a repair.
– Get ready to rock by removing the two 5-Point Pentalobe screws along the top edge of the battery.


Step 6

– Gently tilt the battery back just enough to reveal the battery cable connector. You’ve got this!
– Carefully pull the battery cable connector away from its cozy spot on the logic board and lift the battery out of the upper case. Easy peasy!
Step 7

Hey there! Apple cleverly placed a tiny strip of clear plastic with sticky stuff on the back, right behind the camera cable connector on the logic board. This little trick is here to help keep things in place. Just be gentle when you move it aside, so you don’t accidentally pop off any tiny components from the logic board. Keep it cool and steady!
– Get your trusty spudger and gently twist the plastic retainer away from the camera cable connector.
Tools Used
Step 8


Gently slide the connector out parallel to the logic board’s surface—no need to pull it straight up!
– Gently wiggle the camera cable and pull it away from its cozy spot on the logic board. You’ve got this!
Step 9
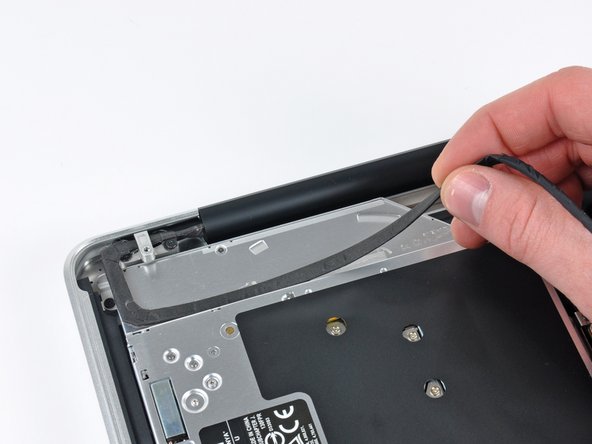
– Gently lift the camera cable away from the sticky stuff holding it to the optical drive. You’ve got this!
Step 10


Give that connector a gentle nudge in the direction of the logic board’s face, not a vigorous yank straight upwards.
– Gently pull the male end of the Bluetooth cable straight out from its socket—no tugging, just a smooth exit!
– Grab your trusty spudger and use its flat end to carefully lift the Bluetooth antenna cable up from its cozy spot on the board.
Tools Used
Step 11


Only tackle this step if your display has that nifty anti-glare feature.
Watch out! One of the screws might be playing hide and seek in the Bluetooth/camera cable ground loop. If you’re swapping out the display, don’t forget to move this little guy over to the new one!
– Unscrew those two 8 mm Phillips screws holding the Bluetooth/camera cable retainer snugly to the upper case.
– Gently lift the Bluetooth board/cable retainer assembly out of the upper case like a pro.
Step 12


– Let’s start by unscrewing those two 8 mm Phillips screws that are holding the camera cable retainer in place on the upper case. Easy peasy!
– Keep an eye out; one of those screws might decide to stay put in the camera cable ground loop. If you’re swapping out the display, don’t forget to move this little guy over to the new one.
– Now, gently lift the camera cable retainer out of the upper case and you’re one step closer to your repair victory!
Step 13


– Grab the plastic pull tab on the display data cable lock and swing it toward the DC-In side of the computer.
Step 14


– Take out the lone 7 mm Phillips screw holding the display data cable retainer to the upper case.
– This screw might stick around in the display data cable ground loop. If you’re swapping out the display, make sure to transfer this screw to the new one.
– Lift the display data cable retainer from the upper case.
Step 15

Be sure to gently pull the connector parallel to the face of the logic board, rather than yanking it straight up from its socket.
Make sure to twist that display data cable lock towards the DC-In board before you dive into the next steps!
– Gently wiggle and pull the display data cable connector straight out of its socket. You’ve got this!
Step 16


– Pop off the outer two T6 Torx screws that keep both display hinges attached to the upper case (four screws in total).
Step 17

– Bring your MacBook Pro to life by opening it up gently until the screen is at a perfect right angle with the upper case.
– Give your MacBook Pro a cozy spot on a table, just like in the pictures.
– With one hand securing the screen and upper case, use the other hand to bid farewell to the last T6 Torx screw hanging out in the lower display bracket.
Step 18

Make sure to keep a firm grip on the display and upper case with your left hand. If you let go, there’s a chance they might take a tumble and get hurt, and we wouldn’t want that for our precious components!
– Time to bid adieu to the last remaining T6 Torx screw holding the display to the upper case.
Step 19


– Get a good grip on the upper case with your right hand and give it a little twist towards the top of the display so the upper display bracket can slide free from the edge of the upper case.
– Gently rotate the display away from the upper case.
– Lift the display up and away from the upper case, being mindful of any brackets or cables that might cause a snag.


