
How to Replace MacBook Pro 15 Hard Drive – DIY Guide
Duration: 45 minutes
Steps: 13 Steps
Heads up, tech wizard! Make sure you’ve got your tools and confidence ready. This guide’s going to be your best pal in getting your gadget back to its awesome self!
Heads up, tech whiz! You can pop in hard drives as thick as 9.5mm. Neat, huh?


Step 2


– Unscrew those three super-cool 2mm Phillips screws from the memory door.
– Gently lift the memory door just enough to get a good grip, then slide it toward you to free it from its cozy home in the casing.
Step 3

– Unscrew the duo of 2.8 mm Phillips screws chilling by the latch in the battery compartment.
Step 4

– Unscrew the following 6 screws:
Step 5

– Unscrew the four 3.2 mm PH00 Phillips screws on the port side of the device. Let’s get those tiny dancers out of there!
Step 6

– Give your computer a cool 90-degree spin and whisk away the two 3.2 mm Phillips screws chilling at the back. Keep it breezy!
Step 7

– Give your computer a little twirl, turning it 90 degrees. Next, whisk away the four 3.2 mm Phillips screws from the computer’s side with a flourish!
Step 8


Take it slow, champ! Don’t just pull off the upper case like you’re tearing into a birthday present. Remember, there’s a sneaky ribbon cable connecting it to the logic board. Let’s keep everything in one piece, shall we?
– Start by gently lifting the back of the case and let your fingers dance along the sides, freeing it as you go. Once the sides are free, give the case a little wiggle up and down to release the front of the upper case.
– You’ll find four sneaky plastic clips hiding above the DVD slot, plus another one above and to the left of the IR sensor. These little guys can be quite the challenge to disengage without a little prying. And just a heads up, getting them back in place during reassembly can be a bit tricky too.
– Reassembly Tip: Give a firm press on the tip of the top case right above each clip until you hear that satisfying snap, letting you know they’re back in their cozy slots.
– Reassembly Tip: The two center DVD clips can be a bit stubborn and might not snap back into place without a little extra love. To avoid deforming the frame around the DVD slot, support it by sliding a plastic spudger into the DVD slot right under the clip location until it feels snug, then press down until you hear that delightful snap.
Tools Used

Step 9


Heads up! You can totally swap out the hard drive without having to disconnect the keyboard from the body. Just prop it up to keep it out of your way, giving you free hands to rock that drive removal.
Watch out when you’re removing the keyboard-trackpad ribbon cable. Make sure the back end of the upper case is free from the hinge area. It’s super easy to accidentally tweak the screw receivers flanking the keyboard.
– Unplug the trackpad and keyboard ribbon cable from the logic board, and don’t forget to peel off any tape if it’s being stubborn.
– Carefully take off the upper case.
Step 10


It might be a slick move to start loosening the left edge, shimmy over to the right, and then tackle the center. This way, you’re spreading the love and easing the stress on that pesky sticky area!
– Time to disconnect that orange hard drive ribbon cable from the logic board! You’ve got this!
– Peel away any tape that’s in your way and grab a spudger (or sneak a credit card under the tape) to gently loosen the adhesive that’s holding the sleep light and IR sensor connectors snugly to the top of the hard drive.
Tools Used
Step 11


– First things first, grab your trusty T6 Torx screwdriver and remove those two 8.2 mm screws holding the hard drive retaining bracket snugly in place on the lower case.
– Now, gently lift that hard drive retaining bracket up and out of your device like a pro.
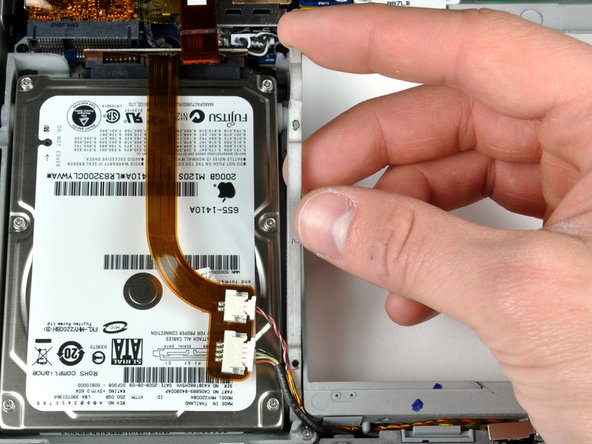
– With one hand, lift the hard drive up and with the other, carefully disconnect the hard drive cable. You’re doing great!
Step 12

You’ll have a blast transferring these screws over to your new hard drive if you’re swapping out drives!
– Time to get your tools out! Unscrew those two shiny T6 6 mm Torx screws hanging out on the left side of the hard drive. You’ve got this!
Step 13

Don’t forget to transfer these screws and bumpers over to your new hard drive if you’re swapping out drives.
When installing a new hard drive, check out our OS X install guide to breeze through the setup process.
– Take out those two black T6 Torx screws and gently lift off the white rubber bumpers from the right side of the hard drive. You’re doing great!


