
How to Replace MacBook Pro 15″ LCD Panel Guide
Duration: 45 minutes
Steps: 35 Steps
Hey there, savvy fixer-upper! Just a friendly reminder: handling your device with care is super important. If you run into any trouble along the way, don’t hesitate to reach out for a helping hand. You can always schedule a repair if you need assistance. Happy repairing!
Why spend the big bucks on a whole new display when you can just swap out the LCD and keep that wallet happy? Yeah, it’s not rocket science, and you’ll feel like a tech wizard! If you need help, you can always schedule a repair.


Step 2


– Unscrew the trio of snazzy 2mm Phillips screws securing the memory door.
– Give the memory door a gentle lift and slide it towards you to free it from its cozy home.
Step 3

– Unscrew the two 2.8 mm Phillips party crashers chilling in the battery compartment near the latch.
Step 4

– Time to say goodbye to those pesky screws! Go ahead and unscrew the following 6 screws:
Step 5

– Whip out your PH00 Phillips screwdriver and gently remove the four 3.2 mm screws chilling on the port side of your computer. Let’s keep things light and breezy as we dive into this fabulous fix!
Step 6

– Twist your computer 90 degrees and unscrew the two 3.2 mm Phillips screws from the back. Keep going, you’re doing great!
Step 7

– Give your computer a little twist to the right, another 90 degrees of fun, and whisk away those four 3.2 mm Phillips screws from the side. Keep the good vibes and your screwdriver rolling!
Step 8


Hold your horses – don’t just rip the upper case off! There’s a sneaky ribbon cable keeping it attached to the logic board. Slow and steady wins the race here.
– To begin this repair journey, lift up at the rear of the case and work your magic along the sides, freeing the case as you go. Once you have freed the sides, you may need to rock the case up and down to free the front of the upper case.
– Let’s talk about these four plastic clips above the DVD slot, and another above and to the left of the IR sensor. These clips can be quite the challenge to disengage without a little bit of gentle prying. They can also be a bit stubborn to re-engage during reassembly.
– Reassembly Pro Tip: Press down firmly on the tip of the top case above the location of each clip until you hear a satisfying snap to reseat them in their slots.
– Reassembly Pro Tip: The two center DVD clips might play hard to get and won’t snap back into place properly without a little assistance. Downward pressure will only lead to a frame deformation around the DVD slot. Show some love by supporting the frame – try inserting a plastic spudger into the DVD slot directly under the clip location until it’s snug, then press down until you hear that magical snap.
Tools Used

Step 9


Heads up! You can totally swap out the hard drive without having to disconnect the keyboard from its home base. Just prop it up to keep it out of your workspace, giving you free hands to work on popping that drive out.
Watch out when you’re removing the keyboard-trackpad ribbon cable. Make sure the back end of the upper case is free from the hinge area. It’s super easy to accidentally bend the screw receivers flanking the keyboard.
– Gently unplug the trackpad and keyboard ribbon cable from the logic board, and feel free to peel off any tape that’s in the way.
– Carefully take off the upper case.
Step 10

– Unplug those two or three antenna cables from the Airport Extreme card. Keep in mind, depending on your model, one of them might be hanging out in the back with a black shrink tube, just chillin’.
– Apple did us a solid by adding a handy label to show where each color-coded antenna cable needs to go. So, give it a glance when you’re plugging everything back in!
Step 11

– Wiggle those Airport antenna cables out of their hip hideout in the left speaker’s channel.
Step 12

– Slide the iSight cable to the left and gently pull it out of its connector on the logic board. Easy peasy!
Step 13

– Hold the screen steady with one hand while you unscrew the following screws with the other. Let’s keep things together, folks!
Step 14

– Gently detach the inverter cable from the left I/O board by sliding a spudger underneath it and giving it a little lift.
Tools Used
Step 15


– Unplug the display data cable from the logic board like a boss.
– Peel off the foam bumper from the top of the right hinge of the display with style.
Step 16

– Unscrew the shiny silver 9.2 mm T6 Torx that’s keeping the ground loop of the display data cable snug against the casing. It’s like setting the ground loop free!

Step 18

– Grab hold of the display assembly on either side and gently lift it up and away from the computer. You got this!
Step 19


– Unscrew the 4.5 mm Phillips screws chilling on the lower left and right corners of your display (you’ll find two of these sneaky little screws). Just a heads up, these screws rock a .8 mm thick head!
Step 20


Hey, keep that spudger away from the space between the plastic strip and the rear bezel, alright? Let’s keep things smooth and accident-free!
– Pop the flat end of a spudger in, just like a toast, between the plastic strip clinging to the rear bezel and the front bezel. Make sure it’s perpendicular to the display face!
– Keep that spudger in place and give it a twist away from the display. It’s like opening a jar of your favorite jam!
– Saunter along the right edge of the display, coaxing the rear bezel to break up with the front bezel until they’re evenly split.
Tools Used
Step 21


– Wedge your spudger into the cozy space between the front and rear display bezels at the lower right corner of the display. It’s like they’re getting a little too close, and you need to remind them about personal space!
– Give the rear bezel a gentle pry away from the front bezel to tease apart the bottom edge of the rear display bezel just a smidge.
Tools Used
Step 22


– Place the flat end of a spudger into the gap between the rear display bezel and the clutch cover.
– Rotate the spudger to detach the lower edge of the rear display bezel from the clutch cover.
– Continue along the lower edge of the rear bezel until it is uniformly detached from the clutch cover.
Tools Used


Step 24


– Wedge the flat end of a spudger between the front bezel and the plastic strip clinging to the rear bezel near the screw holes at the bottom corners of the display.
– Twist your spudger toward the rear bezel to coax it away from the front bezel.
– If needed, keep on prying the left edge of the rear bezel away from the tabs holding onto the front display bezel.
Tools Used


Step 27

Gently keep the iSight cable pressed down while you peel away the tape. You’re doing great!
– Peel off the two strips of tape that are sneakily hiding the iSight and camera ribbon cables at the top of your display.
Step 28
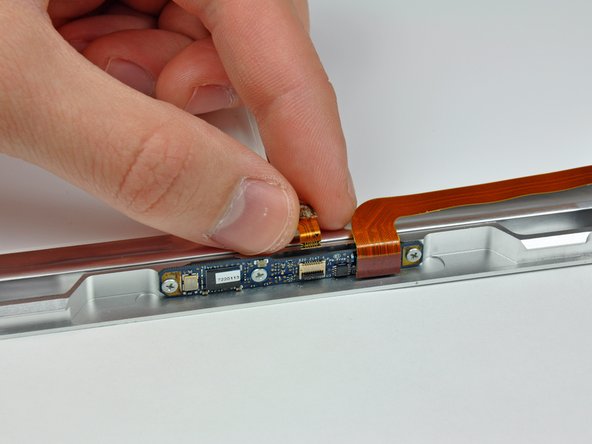

– Take extra care with the ZIF cable retainer—gently flip it up using the edge of a plastic opening tool. Remember, it’s a bit delicate!
– Gently pull the iSight cable from its cozy home in the socket on the camera board. Easy does it!
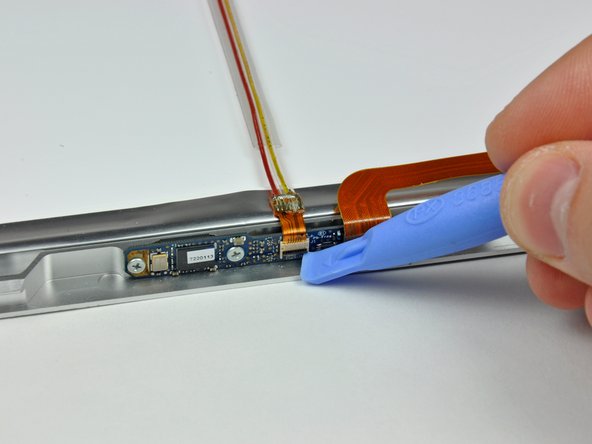
Step 29

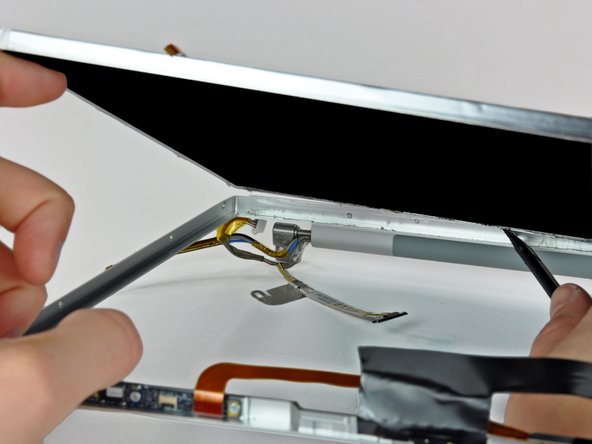
– Alright, let’s dive in! First up, whip off that strip of tape hiding the iSight cable. Easy peasy!
– Now, let’s keep the momentum going! Peel back those three zesty orange antenna straps from the lower rim of the LCD. You’re doing great!
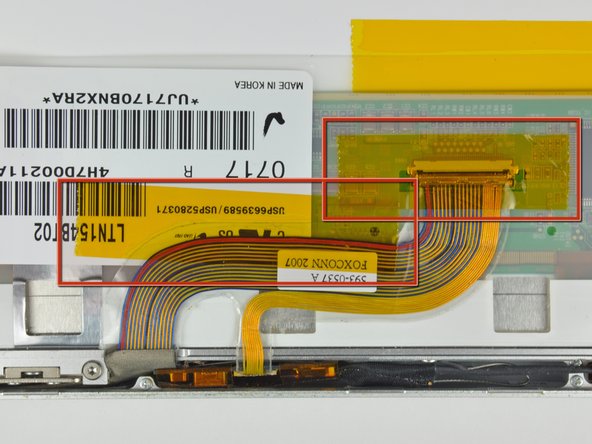
– Almost there! Snag those two pieces of tape that are holding the display data cable hostage on the LCD. Freedom at last!

Step 31
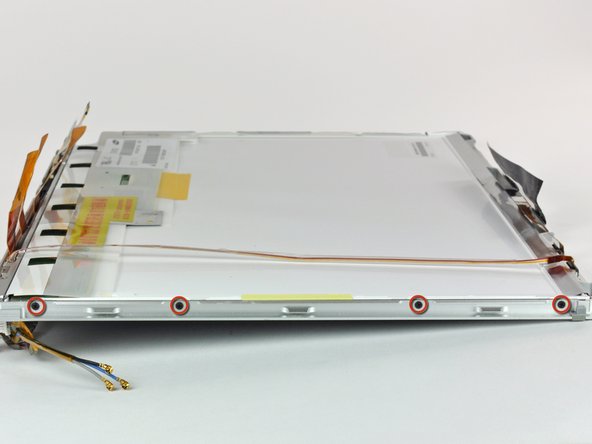

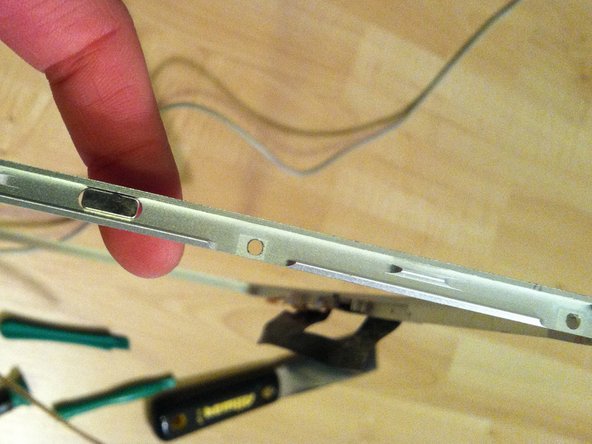
– Unscrew the eight 3 mm Phillips screws flanking the display—four on each side. Keep track of those tiny dancers!
Step 32

– Grab the flat end of your trusty spudger and gently nudge one of the top corners of the LCD away from the front bezel. Easy does it!
The adhesive clings like a koala to a eucalyptus tree around the steel strip border of the LCD. When you’re coaxing the LCD from the front panel, make sure you’re nudging the front panel away from the LCD’s steel couture.
Tools Used
Step 33

– Gently glide your way along the top edge of the LCD, smoothly freeing the attached steel strip from the front bezel.
Step 34

– With the top edge now free, gently lift the LCD away from the front bezel just enough to wiggle that steel strip along the bottom edge out of its cozy spot.
– Carefully pry along the lower edge of the LCD until it breaks free from the adhesive holding it to the front bezel.
– Remember, don’t yank the LCD unit away from the screen! Slide your tool between the metal of the bezel and the metal of the LCD. If the adhesive is feeling particularly clingy, take a couple of passes along the bottom edge to keep the pressure in check.
Step 35

Make sure to transfer that little magnet hanging out on the right side of the LCD over to the new LCD. If you forget, your MacBook Pro might just decide to stay up all night, and nobody wants a tired laptop!
– Get ready to gently lift the LCD out of the front bezel, making sure to avoid any potential tangles with cables.
– Quick Tip: The replacement panel comes with some slick plastic shims stuck on using adhesive along the sides and bottom. Remember to transfer these shims to the new panel for a perfect fit.


