How To Replace MacBook Pro 15 LCD – Step-by-Step Guide
Duration: 45 minutes
Steps: 35 Steps
not quite
Why replace the whole display when you can just swap out the LCD and save some cash? Keep in mind, this guide won’t work for anti-glare displays. If you need help, you can always schedule a repair.
Step 1

– Time to get your screwdriver ready! Let’s tackle those ten screws that are holding the lower case snugly against the upper case. Unscrew them and set them aside—you’re doing great!
Step 2


– With a bit of finesse, lift up the lower case near the vent to unclip it from the upper case.
– Gently remove the lower case and place it to the side.
Step 3

No need to stress about steps 3-6 for battery removal if you’re just looking to swap out that hard drive. But hey, it’s always a smart move to disconnect all power sources from your devices before diving in. Safety first, right?
– Start by unscrewing those two 5-Point Pentalobe screws at the top edge of the battery. You’ve got this!


Step 6

– Gently tilt the battery back just enough to get to the battery cable connector – it’s like a little game of peek-a-boo!
– Now, give a gentle tug on the battery cable connector to pull it away from its cozy spot on the logic board, and then you can lift the battery out of the upper case.
Step 7

Hey there! Just a heads up: Apple uses a nifty little strip of clear plastic with adhesive on one side to keep the logic board snug behind the camera cable connector. When you’re moving it aside, be super careful not to knock off any of those tiny surface-mount components. You’ve got this! And if you need help, you can always schedule a repair.
– Get your trusty spudger ready and gently twist the plastic retainer away from the camera cable connector.
Tools Used
Step 8


Gently slide the connector out parallel to the logic board’s face—no need for a dramatic lift!
– Gently wiggle the camera cable and slide it out of its cozy spot on the logic board.
Step 9
– Gently remove the camera cable from the cozy adhesive cuddling it to the body of the optical drive.
Step 10


Gently slide the connector out parallel to the logic board’s face—no need to yank it straight up!
– Gently unplug the Bluetooth cable by pulling the male end straight out from its connector—easy peasy!
– Grab your trusty spudger and use its flat end to carefully lift the Bluetooth antenna cable out of its socket on the board. You’re doing great!
Tools Used
Step 11


– Unscrew the two 8 mm Phillips screws holding down the Bluetooth/camera cable retainer on the upper case. It’s just a twist away!
– Hoist the Bluetooth board/cable retainer assembly out of the upper case like you’re lifting a treasure chest out of the sand.
Step 12


– Time to unscrew those two 8 mm Phillips screws holding the camera cable retainer in place on the upper case.
– One of these sneaky screws might stay put in the camera cable ground loop. If you’re swapping out the display, don’t forget to move this screw over to the new display.
– Go ahead and lift that camera cable retainer out of the upper case.
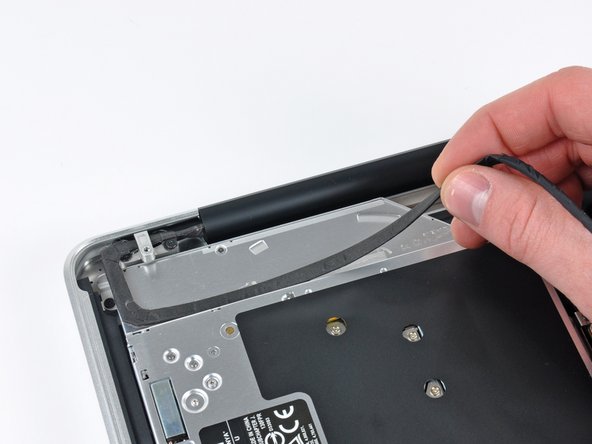
Step 13


– Locate the handy plastic pull tab attached to the display data cable lock, give it a gentle twist in the direction of the DC-In side of your device.
Step 14


– Let’s kick things off by unscrewing that pesky 7 mm Phillips screw that’s holding the display data cable retainer snugly to the upper case.
– No worries if this screw decides to hang out in the display data cable ground loop; just remember to pass it along to the new unit if you’re swapping out the display.
– Now, gently detach the display data cable retainer from the upper case and you’re making great progress!
Step 15

Be sure to gently pull the connector straight out from the logic board, keeping it parallel to the surface, rather than yanking it straight up from its socket. You’re doing great!
Make sure the display data cable lock is turned towards the DC-In board before moving forward with the repair.
– Gently wiggle the display data cable connector and pull it straight out from its socket. You’ve got this!
Step 16


– Time to get those display hinges free! Start by unscrewing the two T6 Torx screws on each side that are holding them to the upper case. That’s four screws in total, so let’s make sure they’re all out!
Step 17

– Kick things off by opening your MacBook Pro until the display stands tall and proud, forming a perfect right angle with the upper case.
– Set your newly opened MacBook Pro down on a flat surface, just like in the picture – it’s showtime!
– With your left hand holding the display and upper case snugly together, go ahead and pop out the last T6 Torx screw from the lower display bracket. You’ve got this!
Step 18

– Unscrew the last T6 Torx screw that’s keeping the display snug against the upper case. You’re almost there!
Step 19


– With your trusty right hand, gently grab the upper case and give it a little twist towards the display. This helps the upper display bracket slide past the edge of the upper case like a pro.
– Now, give that display a slight nudge away from the upper case. You’re doing great!
– Carefully lift the display up and away from the upper case, keeping an eye out for any pesky brackets or cables that might want to tag along.
Step 20


When using the heat gun, always remember to point it away from the delicate rubber strip surrounding the display glass. Overheating this rubber strip can lead to unwanted deformities and a glossy finish instead of its original matte look. Remember, a happy rubber strip makes for a happy repair process!
Get ready to bring the heat! In the upcoming steps, we’ll be using a heat gun to gently loosen the adhesive that’s holding that sleek black border around the back of your front glass panel. You’ll spot the adhesive area highlighted in red in the second picture, so keep an eye out for it!
As we turn up the temperature, you might see some condensation forming on the inside of the glass panel or the outside of the LCD. No worries! That’s totally normal. Once you’ve separated the glass from the display, a little glass cleaner will make it sparkle again.
– Before diving in, start off by giving the display glass a good wipe with a soft, lint-free cloth dampened with a gentle solution. This prep step will help the suction cup stick like a champ and make spotting any pesky dust during reassembly a breeze.
– Grab your trusty heat gun and set it to low. Begin by gently warming up the outer black border, focusing near the upper right corner of the glass panel.
Tools Used

Step 21


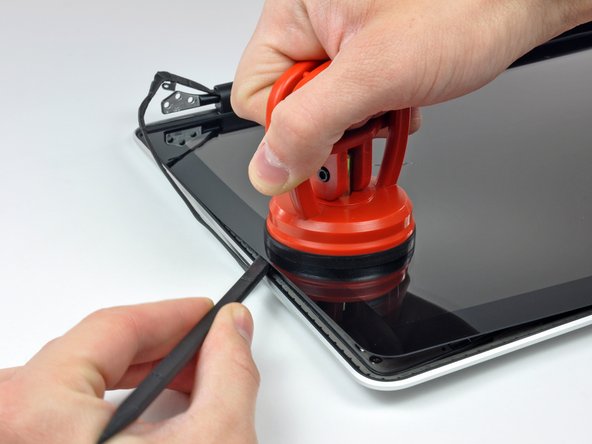
Avoid sticking that suction cup right on top of the rubber strip around the edge of the display glass. Keep it clear for a smoother lift!
To get those awesome suction cups attached, start by positioning one with the handle that moves in line with the glass. Gently press it against the glass, then lift that handle until it’s in line with the other one.
If the glass only lifts from the top edge (like the third picture shows), just redo the first two steps until you can lift the panel’s corner.
– Once you’ve warmed up that panel like a cozy blanket, grab a sturdy suction cup and place it near the upper right corner of the display glass.
– Now, with a gentle touch, start pulling that corner of the display glass away from the display assembly. Take it nice and slow!
Step 22


– Time to show that display who’s boss! Lift the corner of the display glass gently, just enough to sneak in a spudger. Now, let’s use that spudger like a pro to wiggle out the adhesive holding the front glass in place. Next, it’s superhero time! Carefully lift the glass panel a few inches away from the upper right corner along the top and right edges of the display.
Tools Used
Step 23

A guitar pick or a similar thin plastic tool can be your best buddy here! Use it to keep that upper right corner of the front glass panel from sticking back down to the display assembly. You’ve got this!
– Grab your trusty heat gun and gently warm up the adhesive hiding beneath the black strip on the right side of the front glass panel.
– Next, pop a suction cup onto that same right side of the front glass panel.
– With a little upward tug on the glass panel, use the flat end of a spudger to carefully pry it away from the display assembly.
– Keep working your way along the right edge of the front display glass until it’s fully free from the display.
Step 24


– Grab your heat gun and gently warm up the adhesive hiding under that black strip at the top of the glass display panel. It’s like giving it a little spa treatment!
– Now, take a suction cup and place it near the top edge of the glass display panel. Pull up gently to lift the glass panel away from the display. You’re doing great!
– Keep working along the top edge of the glass panel. If you encounter any stubborn adhesive, use the flat end of a spudger to carefully coax it apart. You’ve got this!
Step 25


To prevent the glass from sticking back down to the display assembly, consider using a guitar pick or another thin plastic object after detaching the upper left corner from the display. Need a hand? You can always schedule a repair.
– Time to bring out the heat gun to gently soften the adhesive lurking under the mysterious black strip near the upper left corner of your precious glass display panel.
– Attach the suction cup like a pro right by the upper left corner of the glass display panel.
– With steady hands, lift that suction cup up and let the trusty flat end of a spudger do its magic, delicately easing out the glass display panel from its cozy display assembly.
Step 26


– Grab your trusty heat gun and gently warm up the adhesive hiding beneath that black strip on the left side of the front glass panel.
– Next, pop a suction cup onto the left side of the front glass panel to give yourself a solid grip.
– With a gentle tug on the glass panel, use the flat end of a spudger to carefully pry it away from the display assembly.
– Keep working your way along the left edge of the front display glass until it’s fully free from the display. You’re doing great!
Step 27


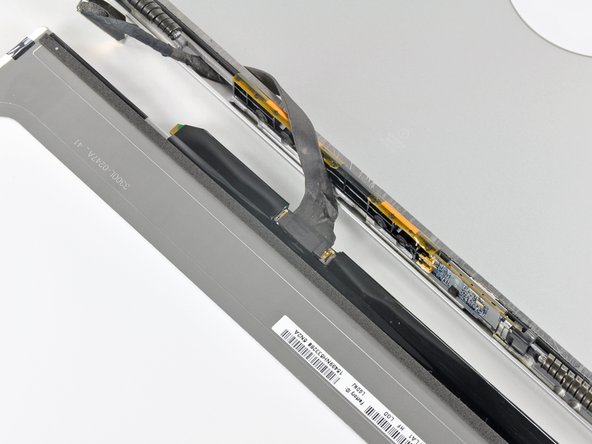
– Alright, you’ve got the top, left, and right edges of the glass all set free from the display! Now, gently lift the top edge of the glass panel and carefully rotate it out of the display. Easy peasy!
– Before you put everything back together, take a moment to give both the inside of the glass display panel and the LCD a good clean. Trust me, any dust or fingerprints hiding in there will be super annoying when your device is powered on!
Tools Used
Step 28


– Gently slide the edge of a plastic opening tool between the display glass and the camera bracket, then glide it around the camera bracket to carefully detach it from the display glass.
– Remember to secure the camera bracket onto the new front display glass before putting everything back together!
Step 29


As you tackle the glass removal, keep an eye out for the camera cable—it might just decide to cling to the adhesive on the glass panel! If it does, it could disconnect from the camera board when you lift the panel. But no worries! If your camera cable is still happily connected to the camera board, feel free to skip this step.
– Alright, let’s get that cable back in action! Start by using the tip of a spudger to gently peel away the foam tape that’s cozying up to the camera cable ZIF socket.
– Next up, grab that spudger again and give a little flip to the ZIF cable retainer on the camera cable socket. It’s like a tiny door that needs to swing open!
– Now, it’s time to slide the camera cable into its home on the camera board. Once it’s snug, use the spudger to snap down the ZIF cable retainer, securing that cable like a pro.
– Finally, don’t forget to reapply the piece of tape that covers the camera cable socket. It’s like tucking in your shirt before heading out!
Tools Used
Step 30


The clutch cover will shift about .25″ and then take a little break. Just remember, don’t push it too far to the right!
Step 31


– Begin at the far left side and gently rock that clutch cover along its long axis while pulling it away from the clutch hinge. Easy peasy!
– Now, moving from right to left, continue to carefully release and lift the clutch along the lower edge of the display assembly.
– Once you’re there, lift that clutch cover right off the front bezel and set it aside like a pro.
– When it’s time to put the clutch cover back on, just remember to widen the opening as you slip it over the small black plastic cosmetic cover at the open end of the clutch cover. Those delicate little plastic arms are holding on tight to the right clutch hinge, so give them some love!
Step 32

– Time to get your screwdriver ready! Unscrew those six 2.9 mm Phillips screws that are holding the LCD panel snugly against the front bezel. You’ve got this!
Step 33

Using one hand to gently guide the display data cable through its path in the aluminum display assembly while pulling the LCD toward the top edge of the display with the other hand can make this step a breeze. If you need help, you can always schedule a repair.
Step 34
– Gently lift the tape that’s covering the display data cable connector, starting from the edge nearest to the LCD. You’ve got this!
Step 35

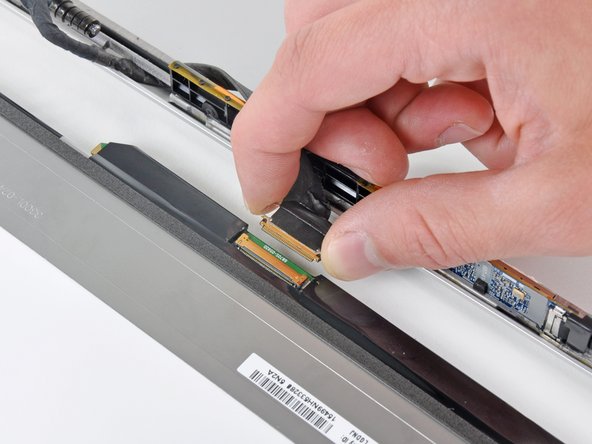
– Grab your trusty spudger and gently nudge that thin steel clip up to release the display data cable from its cozy spot on the LCD.
– Now, give that display data cable a nice, straight pull to free it from the LCD socket.
– Carefully lift the LCD out of the display assembly and set it down gently to the side, like a pro!
Tools Used


