How to Replace Microsoft Surface Laptop 4 (15-inch) Speaker
Duration: 45 minutes
Steps: 16 Steps
Follow this guide to swap out or remove the right speaker in your Microsoft Surface Laptop 4 (15-inch). If your battery looks puffy or swollen, take proper safety precautions. Some of the photos in this guide might show a different model, so there could be slight visual differences, but don’t worry—they won’t interfere with the steps.
Step 1
Before you start, make sure your laptop’s battery is below 25%. This is a safety precaution – a charged battery can be a fire hazard if it’s damaged during the repair. Let’s get started with a safe and successful fix!
– Disconnect all cables and power down your laptop completely.
Step 2
– Gently close your laptop’s screen and flip it over so the back is facing up, giving you a great view of those four rubber feet waiting for your attention.
Step 3
Each foot features a little groove to make it easier to pop it off the laptop!
– The back feet recesses are hanging out just a smidge from the back edge of the laptop.
– The front feet recesses are cozying up near the front edge of the laptop.
Step 4
Watch out for those speedy little feet—they have a knack for disappearing fast! Keep an eye on them so they don’t wander off.
– Slide one arm of your tweezers into the little groove of one of the feet.
– Give your tweezers a gentle twist and pop it up to break the adhesive seal and unclip that foot from your laptop.
– Say goodbye to the foot and remove it!
– Now, just rinse and repeat this fun little dance with the other feet.
Tools Used
Step 5
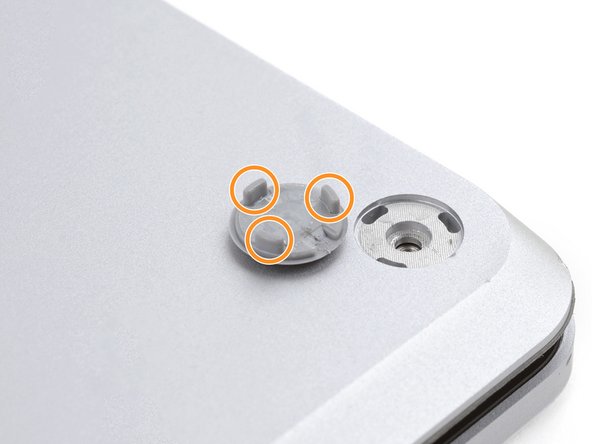
– This laptop rocks two unique types of feet—front and rear. When you’re putting it all back together, be sure those feet find their rightful spots.
– Pop the feet into their snug little homes to lock them onto the frame. Easy does it!
– The rear feet? They’ve got a single center clip to keep things straightforward.
– Now, the front feet are fancy—they’ve got three clips and only fit in one particular way. So, no guesswork here!
– If the old feet have lost their stickiness, peel off the gunky adhesive and freshen things up with a dab of Tesa Tape where it used to be. Keep it fresh, keep it solid!
Step 6
– Got feet that are busted or just worn down? Grab some 8 mm rubber furniture pads.
– Peel one of those pads off its backing—easy, right?
– Line it up with the foot cavity, press it down snug, and voila! All set and sturdy.
Step 7
These screws can be a bit temperamental! Keep a steady downward pressure to avoid any stripping mishaps.
As you dive into this repair, make sure to keep track of every single screw and remember exactly where it came from.
– Let’s get started! Use a T5 Torx driver to remove the four 3mm screws that hold the upper case in place. This is the first step in freeing up the case, and it’s a breeze!
Step 8
– Turn your laptop upside down and swing that screen wide open!
Step 9
Hold up! Don’t go yanking that upper case off just yet—it’s still tethered to the laptop by a cable.
Give the upper case a quick once-over to make sure it’s snug all around. Any gaps near the screen could lead to some nasty surprises when closing it—like a damaged screen. Nobody wants that!
The top cover stays in place thanks to some sneaky magnets.
– Gently grab the top edge of the upper case above the keyboard and lift straight up to pop it loose. No need for muscle—just let the magnets do their thing!
– Now, carefully lift the bottom edge of the upper case up and away from the laptop, keeping an eye on that ribbon cable underneath. Treat it like royalty—it’s delicate!
– When putting things back together, lower the upper case onto the lower case and let those magnets snap it into place. It’ll settle flat like it was meant to be there all along!
Step 10
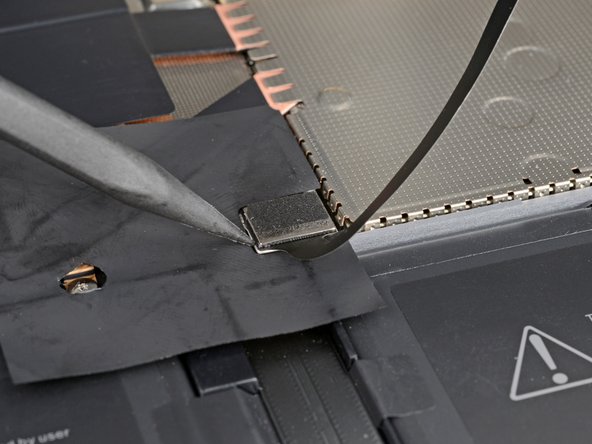
The keyboard and touchpad cable is the essential link connecting the upper case to your laptop. Keep it snug and secure for a smooth typing experience!
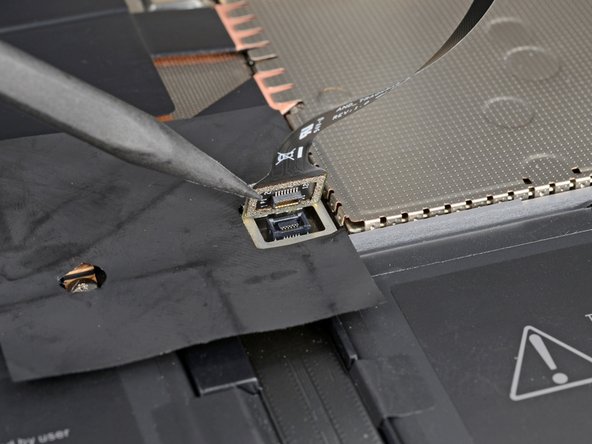
– Slide the pointy end of your spudger under one side of the magnet connector and gently pop it up to break the connection. Easy does it!
– Ready to reconnect? Line up the magnet connector with its socket, making sure the cable is pointing toward the bottom of the laptop. Press it down firmly and voilà—you’re back in action!
Tools Used
Step 11
– Let’s get started! Carefully remove the upper case and flip it over, placing it keyboard-side down on a clean, flat surface. This will give you a solid foundation for the repair process.
Step 12
Once the screw is out, the SSD gracefully tilts upward.
– Grab your T5 Torx driver and carefully unscrew that 2.7 mm bolt holding the SSD in place—steady hands win the day!
Step 13
Be gentle when pulling up, since yanking at a sharp angle can put your SSD and its socket at risk of damage.
Taking out the SSD is like hitting the reset button – it also disconnects the battery, so you’re good to go!
– Gently wiggle the SSD out of its cozy little home and set it free.
– When it’s time to put everything back together, slide the SSD in at a fun little angle for a smooth fit.
Step 14
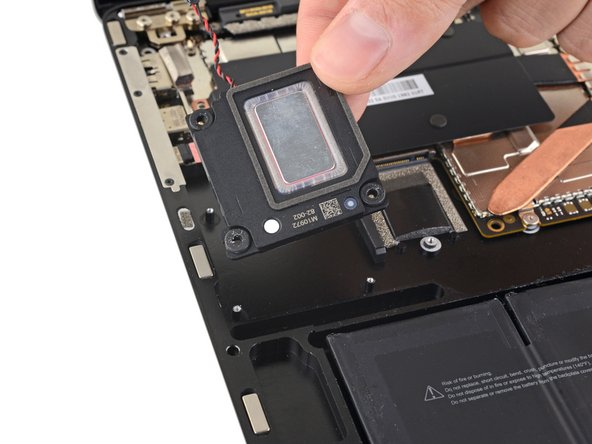
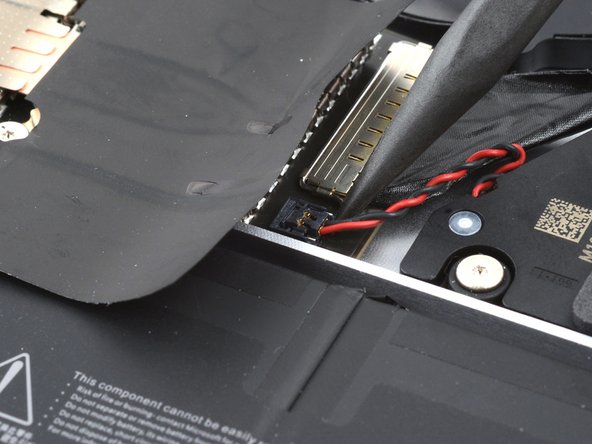
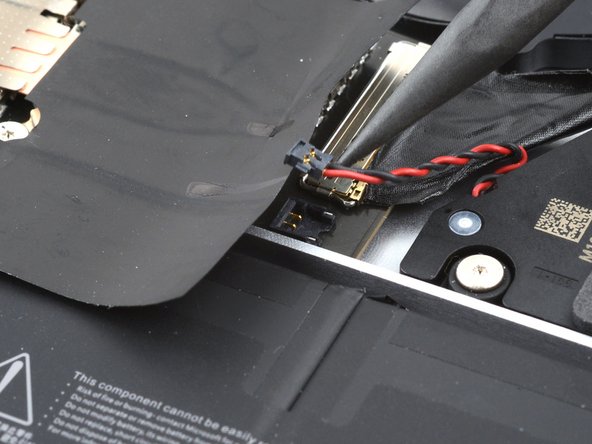
– Grab your trusty spudger and use the pointy end to gently lift and disconnect the right speaker wire from its spot on the motherboard.
Tools Used
Step 15
These screws can be a bit tricky! Keep a steady downward pressure to avoid any stripping mishaps.
– Grab your trusty T3 Torx driver and let’s get to work! Unscrew those three 2.6 mm screws holding down the right speaker. You’re doing great!
Step 16
– Match up your new part with the old one—double-check if you need to move any small bits or peel off any adhesive before dropping it in.
– Rewind these steps for reassembly and get your device back in action!
– Recycle your e-waste responsibly by finding an R2 or e-Stewards certified recycler.
– Got stuck somewhere? Dive into some troubleshooting or hit up our Answers community for a helping hand.
– Still feeling stuck? No worries—if the repair’s giving you a hard time, you can always schedule a repair.
Success!
