How to Replace Microsoft Surface Laptop 4 (15-inch) Speaker
Duration: 45 minutes
Steps: 18 Steps
Ready to tackle the challenge of swapping out the left speaker on your Microsoft Surface Laptop 4 (15-inch)? You’re in the right place! Just a heads-up: if your battery is looking a bit puffy, make sure to handle it with care. While some images in this guide might be from a different model and could show minor differences, rest assured that they won’t throw you off track. Let’s get started and get that speaker sounding great again!
Step 1


Let that laptop battery run down to below 25% before diving into this repair adventure. A full battery might just throw a tantrum and catch fire if it gets hurt!
– Disconnect all the cables, give your laptop a breather, and power it down completely. No shortcuts—your device deserves a proper nap before we dive in!
Step 2


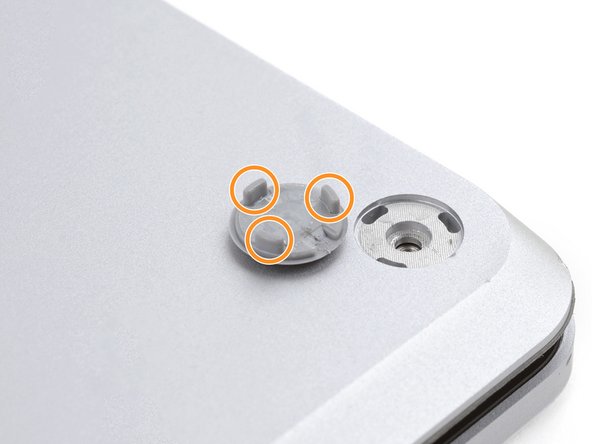
– Flip the screen shut, set your laptop belly-side up, and get ready to tackle those four little rubber feet.
Step 3


Each foot has a little groove that makes it easier to pop it off the laptop.
– The back feet notches are right near the laptop’s rear edge.
– The front feet notches are just up at the front edge of the laptop.
Step 4


Watch out for those speedy little feet—they can dart away before you know it! Keep an eye on them so they don’t go missing.
– Slide one arm of your trusty tweezers into the groove of one of the feet.
– Give those tweezers a little twist and gently pry up to break the adhesive seal and unclip the foot from the laptop.
– Now, just lift that foot off like a pro!
– Repeat this fun little dance with the other feet.
Tools Used

Step 5

– This laptop sports two unique types of feet. When putting it back together, be sure to place each foot in its designated spot.
– Gently press the feet into their spots to secure them to the frame.
– The rear feet come with a single center clip for easy attachment.
– The front feet feature three clips and can only be inserted in one specific direction.
– If the current feet aren’t sticking to the frame anymore, simply remove the old adhesive and add a little Tesa Tape where the old adhesive used to be.
Step 6


– Got some worn-out feet? No worries! Grab those 8 mm rubber furniture pads:
– Peel one off its backing like a pro.
– Line it up over the foot cavity and give it a good press to lock it in place.
Step 7

These screws can be tricky! Keep steady pressure downward to avoid any stripping drama.
As you dive into this repair, don’t forget to keep an eye on those pesky screws! Each one has its own special spot, so make sure they return home safe and sound.
– Let’s get started! Use a T5 Torx driver to remove the four 3 mm screws that hold the upper case in place. This is the first step in freeing up the upper case, and it’s a breeze!
Step 8


– Let’s get started! Begin by flipping your laptop over and opening the screen all the way.
Step 9


Don’t yank off the upper case just yet—it’s still tethered to the laptop by a cable, so take it slow!
Make sure the upper case hugs the edges snugly all around. Any gaps near the screen could lead to some screen drama when it shuts—so keep it smooth!
The top cover is held in place by some sneaky magnets.
– Grab the top edge of the upper case right above the keyboard and give it a straight lift to pop it off—easy does it!
– Now gently lift the bottom edge of the upper case up and away from the laptop, making sure not to tug too hard on that ribbon cable underneath—it’s sensitive!
– When putting it all back together, just lower the upper case onto the lower case. Let those magnets do their thing and snap it into place, so it sits nice and flat.
Step 10

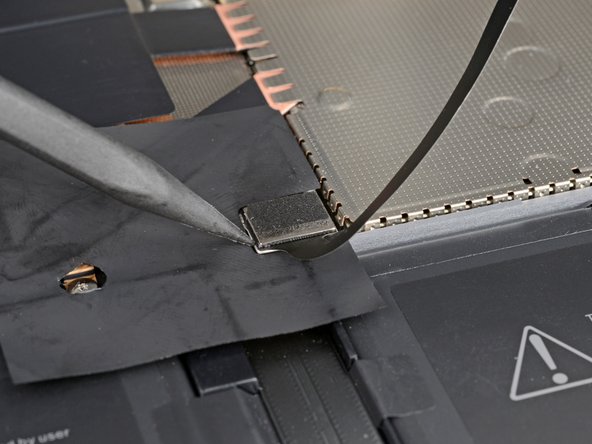
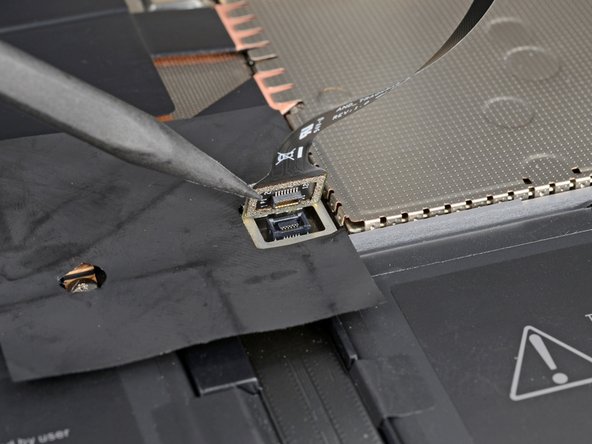
The cable that links the upper case to the laptop is the keyboard and touchpad cable. Don’t worry, you’ve got this!
– Take your trusty spudger, slip the pointy end under one edge of the magnet connector, and gently pry it up to pop it off.
– When you’re ready to reconnect, align the magnet connector over its socket with the cable heading towards the bottom of the laptop. Press it down firmly to lock it in place.
Tools Used

Step 11

– Gently lift the upper case and carefully place it keyboard-side down on a clean, flat surface. Make sure it’s safe and sound, ready for the next step!
Step 12

Once that pesky screw is out of the way, the SSD will gracefully rise at a gentle angle, ready for its next adventure.
– Remove the 2.7mm screw that’s holding the SSD in place using a T5 Torx driver – it’s time to set that SSD free!
Step 13


Avoid yanking it out at a steep angle—this could mess up the SSD or its snug little socket. Keep it chill and steady!
Pulling out the SSD doubles as a sneaky way to disconnect the battery—two birds, one stone!
– Gently slide the SSD out of its socket and remove it.
– When reassembling, insert the SSD at a slight angle.
Step 14

– Grab your trusty T3 Torx driver and take out that 3mm screw on the left side of the heatsink, right by the left speaker connector.
Step 15

– Gently grab the left side of the heatsink with tweezers or your fingers, right where that screw used to be, and give it a little lift.
Tools Used
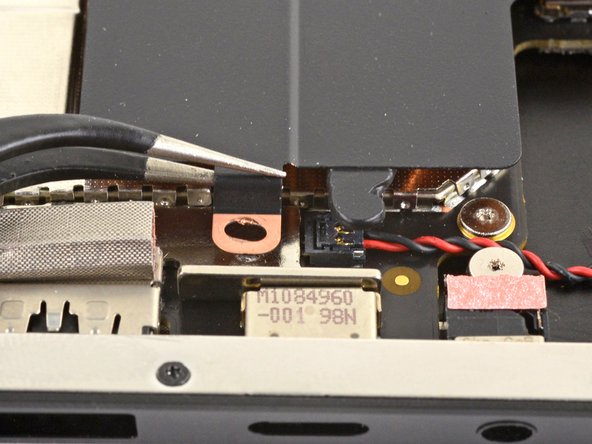
Step 16
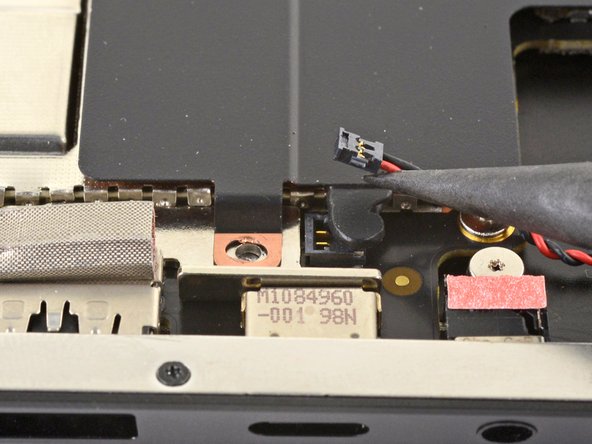

– With the heat sink lifted, use the pointy end of a spudger to gently pop the left speaker wire from its connector on the motherboard.
– Place the heatsink back where it belongs.
Tools Used
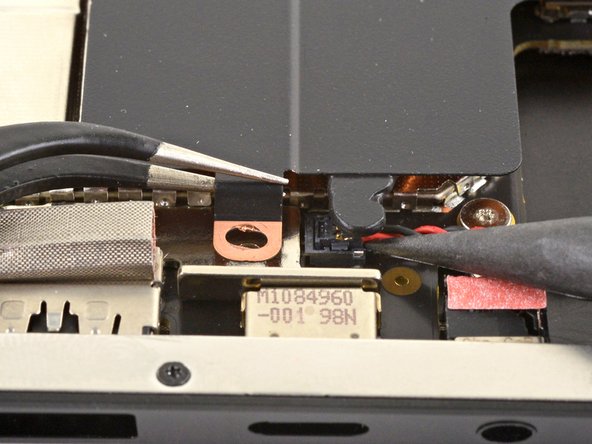
Step 17

These screws can be a bit fussy! Keep a steady downward pressure to avoid any stripping mishaps.
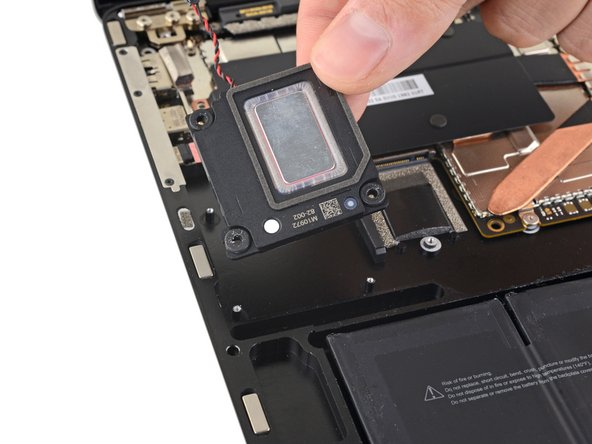
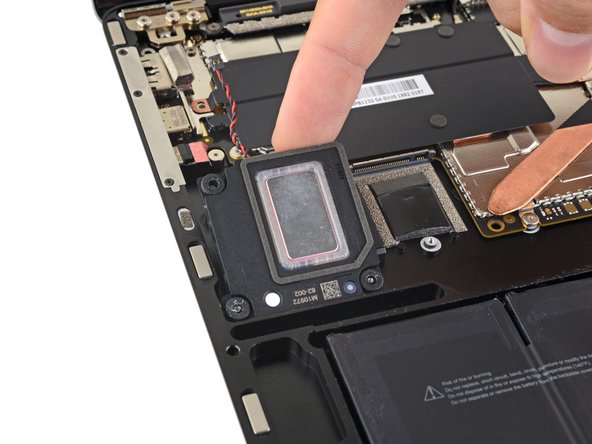
– Grab a T3 Torx driver and unscrew the three 2.6mm screws holding the left speaker in place.
Step 18


– Take a moment to compare your shiny new replacement part with the original—make sure to transfer any leftover components or peel off those pesky adhesive backings before diving into the installation.
– When it’s time to put your device back together, just retrace your steps in reverse. Easy peasy!
– Got some e-waste lying around? Don’t toss it! Swing by an R2 or e-Stewards certified recycler to give it a proper send-off.
– If things didn’t quite go as planned, don’t sweat it! Try some basic troubleshooting or pop over to our Answers community for some friendly advice.
–
Success!