How to Replace Microsoft Surface Laptop 5 (13.5-inch) Case
Duration: 45 minutes
Steps: 12 Steps
Get ready to breathe new life into your Microsoft Surface Laptop 5 (13.5-inch) by replacing the upper case, which houses the keyboard and touchpad. Before you start, be aware that if your battery is swollen, you’ll need to take some extra precautions. Don’t worry if some of the photos look a bit different – they’re from a similar model, and the steps will still be spot on. Follow this clear and easy-to-read guide, and you’ll be typing away in no time. If you need help, you can always schedule a repair.
Step 1


Before you start, make sure your laptop’s battery is below 25%. This is a safety precaution – a charged battery can be a fire hazard if it’s damaged during the repair process.
– Disconnect all cables and power down your laptop completely.
Step 2


– Flip your laptop screen closed, then lay it down with the rear case facing up to get to those four little rubber feet.
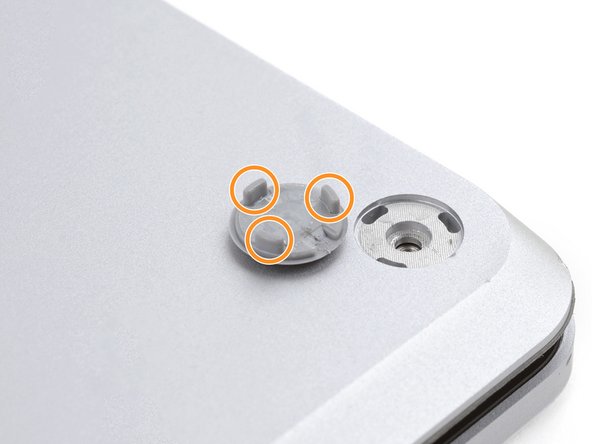
Step 3


Each foot features a little groove to make it easier to pop it off the laptop!
– The back feet recesses hang out just near the back edge of the laptop.
– The front feet recesses cozy up close to the front edge of the laptop.
Step 4


The feet tend to pop out really fast—watch out so they don’t go missing!
– Slide one arm of your trusty tweezers into the little nook of one of the feet.
– Give your tweezers a twist and gently pry it up to break free the adhesive and detach the foot from the laptop.
– Out comes the foot!
– Now, let’s do the same dance with the other feet.
Tools Used

Step 5

– This laptop has a unique duo of feet. When putting it back together, ensure each foot finds its rightful home.
– Give the feet a gentle press into their spots to lock them into the frame.
– The rear feet sport a single center clip.
– The front feet feature three clips and can only be snapped in one way.
– If the existing feet aren’t sticking anymore, remove the old adhesive and apply a bit of Tesa Tape where the old adhesive was.
Step 6


– Got some wobbly feet? No worries! Grab those 8 mm rubber furniture pads:
– Peel one off its backing like it’s a sticker from your childhood.
– Now, line it up right over that foot cavity and give it a good press to lock it in place. Easy peasy!
Step 7

Watch out for those screws! They strip easily, so keep that downward force steady to avoid any mishaps.
As you work through this repair, keep an eye on each screw and remember where each one belongs.
– Grab a T5 Torx driver and unscrew those four 3 mm screws holding the upper case together. It’s like unlocking a treasure chest—only with fewer pirates.
Step 8


– Flip that laptop over like a pro and swing the screen wide open.
Step 9


Hey there! Just a friendly reminder: don’t go all out trying to yank off the upper case; it’s still hanging on by a cable. Take it easy!
Make sure the upper case is sitting nice and snug all the way around. If you spot any gaps between the upper and lower case near the screen, you might be asking for trouble when it closes. Let’s keep that screen safe and sound!
The top case is held in place by some nifty magnets.
– Grab the top edge of the upper case above the keyboard and pull it straight up—firm but gentle—to pop it loose.
– Lift the bottom edge of the upper case away from the laptop carefully, keeping an eye on that ribbon cable underneath. No need to tug-of-war here!
– When putting it back together, lower the upper case onto the lower one until the magnets click into place. Make sure it’s lying nice and flat, and you’re good to go!
Step 10

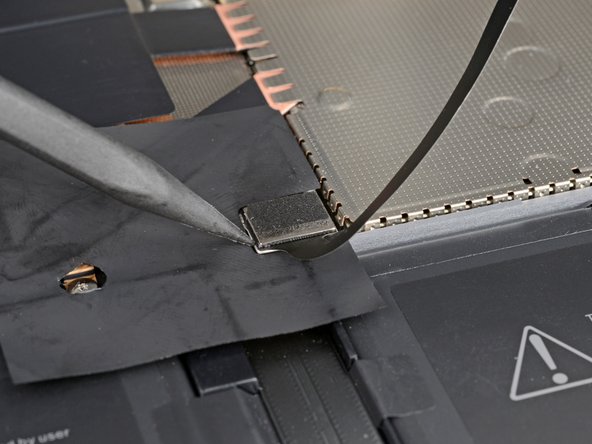
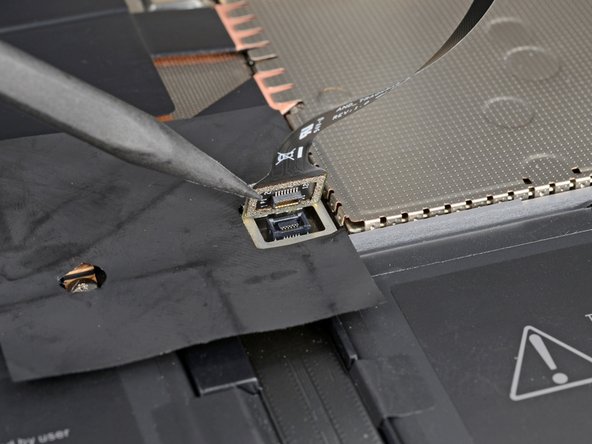
The keyboard and touchpad cable is the unsung hero, linking the upper case to the laptop. It’s the vital connection that keeps everything running smoothly, so treat it with care!
– Slide the pointed end of a spudger beneath one edge of the magnet connector and gently pry it up to disconnect it. You’ve got this!
– To reconnect the cable, simply line up the magnet connector over its socket, ensuring the cable is facing the bottom of the laptop. Give it a good press down to secure it in place. Nice work!
Tools Used

Step 11

– Pop off the upper case and gently lay it keyboard-side down on a clean surface—easy as pie!
Step 12
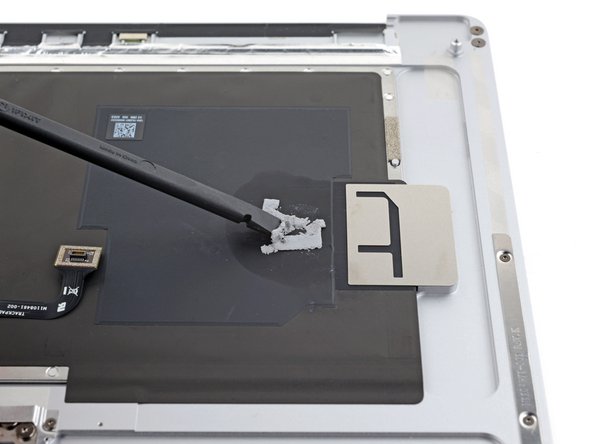


Your SSD is rocking some thermal paste that creates a snug connection to the upper case. Alternatively, feel free to put a little bead of thermal paste right on the SSD’s label. Go for the dot method with a bead that’s just a smidge bigger than the screw head holding that SSD in place.
– Now, let’s put your device back together by retracing your steps – it’s like a fun little dance!
– Got some e-waste? Don’t just toss it; take it to an R2 or e-Stewards certified recycler to give it a proper send-off.
– Things not going as smoothly as you hoped? Don’t sweat it! Give some basic troubleshooting a shot, or swing by our Answers community for a helping hand.
– And just like that, you’re not alone in this journey!
Tools Used

Success!

