How to Replace Microsoft Surface Laptop 5 SSD (13.5-Inch)
Duration: 45 minutes
Steps: 14 Steps
Time to tackle the SSD in your Microsoft Surface Laptop 5 (13.5-inch). Replacing the SSD also acts as a battery disconnect and should be your first move before diving into any major repairs. If you’ve got a swollen battery, take the right precautions. Some photos here are from a different model and might have slight visual differences, but they won’t trip you up in following the steps.
Step 1


Make sure your laptop’s battery is under 25% charge before diving into this repair. A full battery can be a bit too fiery if it gets damaged—better to play it safe!
– Disconnect all cables and power down your laptop completely.
Step 2


– Flip your laptop over, screen closed, and let it chill face-down with the rear case looking up at you—time to tackle those four little rubber feet.
Step 3


Each foot has a little groove that makes it easier to pop it off the laptop!
– Alright, let’s talk laptop feet! The rear feet grooves are chilling closest to the back edge of the laptop—makes sense, right?
– Now, the front feet grooves are hanging out near the front edge of the laptop. Easy peasy placement!
Step 4


Watch out for those speedy little feet—they like to make a break for it! Keep an eye on them so they don’t go missing.
– Time to get a grip! Insert one arm of your trusty tweezers into the recess of one of the feet and get ready to set it free.
– Now, twist those tweezers and gently pry up to loosen the adhesive and unclip the foot from the laptop. You got this!
– The foot is now free, so go ahead and remove it.
– Repeat this process for the remaining feet. You’re making great progress!
Tools Used

Step 5
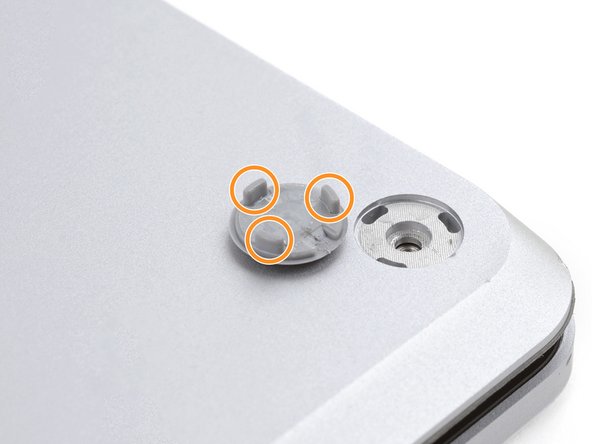

– This laptop features two unique types of feet. When putting it back together, be sure to place each foot into its rightful spot.
– Gently press the feet into their designated recesses to secure them snugly to the frame.
– The rear feet are equipped with a single center clip for easy placement.
– The front feet come with three clips and can only be reinserted in a specific orientation.
– If the current feet aren’t sticking like they used to, simply remove the old adhesive and add a little Tesa Tape where the old glue used to be.
Step 6


– If the feet are showing signs of wear or damage, grab some 8mm rubber furniture pads.
– Peel the pad off its backing to reveal the sticky side.
– Position the pad over the foot cavity and press down gently to secure it in place.
Step 7

These screws can be a bit tricky! Keep a steady downward pressure to avoid any stripping mishaps.
As you work through this repair, make sure to keep track of every single screw and put it back exactly where it belongs.
– Grab your trusty T5 Torx driver and unscrew the four 3mm screws that are holding the upper case in place. It’s just a few simple turns, and you’ll be one step closer to getting inside.
Step 8


– Turn your laptop upside down and swing that screen wide open!
Step 9


Keep the upper case attached—it’s got a cable holding it together, so don’t go yanking it off!
Make sure the upper case hugs the laptop snugly all the way around. Any gaps near the screen could lead to trouble when closing, and nobody wants a damaged screen.
The upper case is held in place by some pretty cool magnets, making it easy to remove and replace when you need to.
– Grip the top edge of the upper case above the keyboard and pull it straight up – it’s like opening a lid, and it should release easily!
– Lift the bottom edge of the upper case up and away from the laptop, being careful not to strain the ribbon cable underneath – we don’t want any damage!
– During reassembly, lower the upper case onto the lower case until the magnets snap into place and it lies flat – you’ll know it’s in when it feels snug and secure.
Step 10

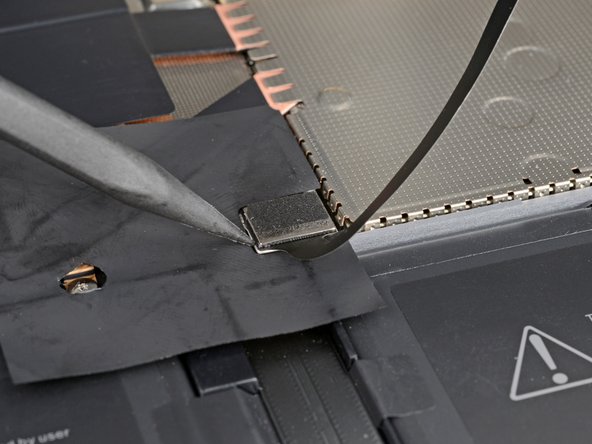
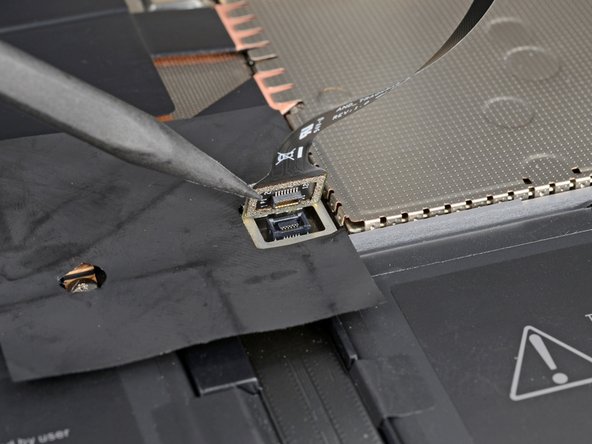
The keyboard and touchpad cable is the trusty link that connects the upper case to your laptop. Keep it in mind as you dive into your repair adventure!
– Slide the spudger’s pointed end beneath one side of the magnet connector and gently pry it up to detach it.
– To reattach the cable, position the magnet connector over its socket with the cable facing the bottom of the laptop. Give it a little press to lock it in place.
Tools Used

Step 11

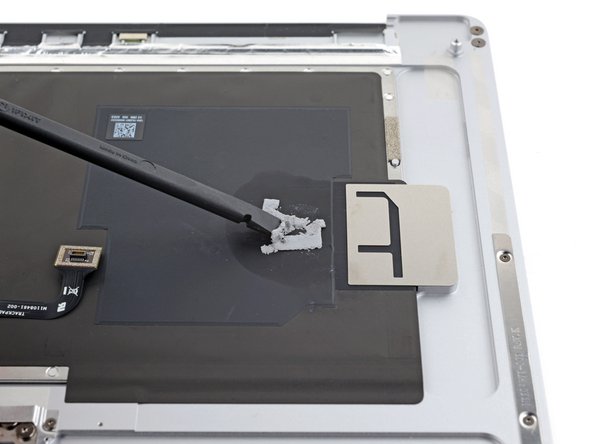
– Gently flip over the upper case and carefully place it keyboard-side down on a clean surface. This way, you keep everything neat and ready for the next steps.
Step 12

Now that the screw is out, the SSD will pop up at a slight angle, making it easy to access and remove.
– Grab your trusty T5 Torx driver and remove the 2.7mm screw holding down the SSD.
Step 13


Avoid yanking it up at a sharp angle; doing so might just give your SSD and its socket a bad day!
Taking out the SSD is like giving your battery a little vacation!
– Gently wiggle that SSD out of its cozy little home and set it free!
– When it’s time to tuck the SSD back in, give it a slight angle for a smooth reentry.
Step 14


Your SSD is cozy with some thermal paste that creates a nice bond to the upper case. If you’re feeling adventurous, you can also put a little dab of thermal paste right on the SSD’s label. Just use the dot method, and make that bead a tad bigger than the screw head that’s keeping the SSD snug as a bug.
– Now that you’ve tackled the repair, it’s time to put your device back together—just retrace your steps in reverse!
– When it’s time to part with e-waste, don’t forget to drop it off at an R2 or e-Stewards certified recycler.
– Things didn’t go exactly as you hoped? No sweat! Give some basic troubleshooting a shot, or reach out to our awesome Answers community for a helping hand.
–
Tools Used

Success!

