How to Replace Nintendo 3DS XL Motherboard
Duration: 45 minutes
Steps: 22 Steps
Ready to dive into the heart of your Nintendo 3DS XL? This guide will walk you through swapping out the motherboard—the brain of your device where all the magic happens!
Step 1


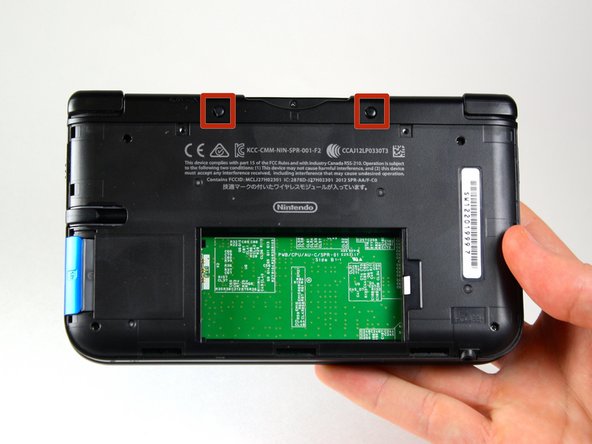
The screws come with little locking washers that keep them snugly attached to the back cover. No need to mess with these washers—they can stay put right where they are for this repair guide. Keep it simple and keep on going!
– Gently loosen the two #00 Phillips screws, each measuring 4.2 mm, that are nestled at the top of the back cover. You’ve got this!
Step 2


– Grab your device and flip it over so the cover is facing up like a sleepy turtle!
– Time to work your magic! Use a trusty plastic opening tool to gently pry off the cover, starting at the top right corner—just like opening a present, but more fun!
– Once you’ve popped off that cover, give it a little wave and set it aside; it’s taking a break now.
– Make sure to hold on to the edge of that cover—no surprises here, let’s keep it from making an impromptu comeback!
– Now, take a peek below the stylus compartment. If that cover is still hanging out, give it a gentle nudge with your tool at that spot and let it know it’s game over!
Step 3


– Grab your trusty plastic opening tool and gently slide it into the opening on the right side of the battery. It’s like giving your battery a little nudge!
– Carefully pry the battery away from its cozy home in the lower casing. Think of it like a mini-excavation!
– Lift the battery out of its case and place it to the side. You’ve successfully freed the battery!


Step 5


– Take out the six 6.2 mm screws with a Phillips #00 screwdriver, and let’s get this party started!
Tools Used

Step 6

– Grab your trusty (https://pollinations.ai/referral?topic=phillips%20screwdriver) and carefully take out the 2.3 mm screw that’s hanging out above the game cartridge slot. You’ve got this!
Tools Used
Step 7


– First things first, make sure you’ve taken out that SD card. Grab a plastic opening tool and start prying off the lower case, beginning at the bottom edge and working your way around.
– You’ll find two ribbon cables connecting the case to the circuit board. Be gentle and avoid yanking the case too hard to keep those ribbon cables intact.
Step 8


– Gently lift the ribbon cables tucked away under the left and right bumpers using a trusty plastic opening tool. They’re just waiting to be freed!
– Carefully detach the lower case from the rest of the device and set it aside like a pro.
Step 9


– Set your device up so the game cartridge slot is at the top. Trust me, it’ll be a game-changer!
– Spot the circle pad hanging out on the right side of your device. Hello there, circle pad!
– Let’s get those screws out! Remove the two 7.5 mm screws from the top left and bottom right corners. You’re doing great!
Step 10


Watch out for that sneaky little washer hiding between the circle pad joystick and the circle pad! It’s loose, so handle it with care and make sure it doesn’t go missing on you.
– Gently pry off the circle pad joystick using a plastic opening tool. It’s like a little hat, just pop it off!
– Easy does it! Don’t go Hulk-smash on it with the plastic opening tool. Remember, there’s a delicate ribbon connecting the circle pad joystick to the motherboard, and we want to keep that attached. Treat it like a secret handshake, firm but gentle.
Step 11


– Grab your trusty spudger and gently pry up the little retaining flap that connects the circle pad ribbon to the motherboard. Be careful, we want it to be a smooth operation!
– Now, go ahead and remove the ribbon along with the circle pad joystick. You’re making great progress!
Tools Used

Step 12


Oops! It looks like the IR board is flipped upside-down in these pictures. If you go ahead and install it like this, your DS just won’t boot up. So, take a good look at the orientation of your IR board before taking it out, and make sure to put it back the same way. You’ve got this!
– Get your device ready by placing it so the game cartridge slot is at the top – easy peasy!
– Now, track down the IR board, which is hanging out on the upper right side of the motherboard. It’s time to get familiar with the inside of your device!
– Use a plastic opening tool to carefully remove the IR board by sliding it under the board and gently prying it up. Take your time, you got this! If you’re feeling stuck, remember that you can always schedule a repair for some extra help.
Step 13


– Grab your trusty plastic opening tool and gently pry off the Wi-Fi board. No need to go all the way—just nudge it aside for now. It’s still connected by a wire, so just give it a little room to breathe while you work your magic!
Step 14


– Find the volume switch hanging out on the right side of the motherboard, chillin’ next to the circle pad joystick.
– Gently use those tweezers to free the volume board from its casing. It’s still got a ribbon cable lifeline tying it to the motherboard, so handle with care!
Tools Used
Step 15

– Grab the flat-head end of your trusty spudger and gently pop up the flap holding the volume board ribbon to the motherboard. Easy does it—no rush, no fuss!
– Once that’s free, carefully remove the volume board and set it aside. You’re doing great!
Tools Used
Step 16


– Using your fingers or tweezers, gently liberate the black plastic pieces from their cozy corners on the lower left and right.
– Another trick: Give your 3DS a little upside-down shake. Gravity might just do the work for you! Just be sure to catch those little pieces, they’re escape artists. If you need help, you can always schedule a repair
Tools Used
Step 17


– With a gentle touch, use the flat head side of the spudger to lift the flap connecting the two smaller ribbons to the motherboard. You’ve got this!
– You’ll find these flaps hanging out on the top right and bottom right sides of the motherboard, just waiting for some attention.
– Carefully detach the ribbons from the flap, and you’re one step closer to success!
Tools Used
Step 18


For the wider ribbons, remember to gently lift the flaps from the white side. You’ve got this!
– Grab the flat side of your spudger and gently lift the flaps holding the wider ribbons to the motherboard. Take it slow and steady.
– Once those flaps are open, carefully remove the ribbons from their resting place.
Tools Used
Step 19


To flip this flap, lift it up from the black side—easy does it!
– Grab your spudger and gently use the flat side to lift the flap that holds the ribbon to the motherboard. Take it slow and steady!
– Once the flap is up, remove the ribbon from it with care. No rush!
– Reassembly tip: The ribbon with the BLACK STRIPE should go on the top (the visible side) of the motherboard. Keep an eye out for that stripe when putting things back together.
Tools Used


Step 21


Hey there! Just a quick reminder: the (https://pollinations.ai/referral?topic=motherboard) is still hanging on at the top right corner, so let’s not pull it off completely just yet!
– Lift the board straight up, but just enough to clear the two plastic mounts near the top corners of the cartridge slot. No need to be a Hulk here!
– Gently flip the motherboard over the top side. Take it slow and steady!
Step 22


Gently lift the flap from the white side, and you’re on your way!
– Sweet! Now, just reverse those steps to put your device back together again.
– Need to bail? No worries! Just hit ‘Cancel’ – we won’t hold it against you.
– If you need help, you can always schedule a repair
Tools Used
Success!