How to Replace Nintendo GameCube Motherboard
Duration: 45 minutes
Steps: 12 Steps
Ready to swap out that old GameCube motherboard and give your system a fresh start? In this guide, we’ll walk you through the steps to remove the old one and install a brand new replacement. Let’s get started!
Step 1


– Flip that Gamecube over so its bottom side is looking up at you—like it’s ready for a spa day.
– Grab your trusty 4.5 mm Gamebit screwdriver and unscrew all four screws holding it together. Time to set them free!
Step 2


– Flip that GameCube over so the bottom is facing up, and with the screws out of the way, gently separate the bottom shell from the top half. Take it slow—no need to rush!
– Now, rotate the GameCube so its inner workings are staring you in the face. You’re doing great!
Step 3

– Give those clips on either side of the back panel a gentle press—no need to wrestle with them!
– Now, with a bit of care, lift off the back panel from the GameCube. Easy does it!
Step 4

Hey, don’t forget! A ribbon cable (outlined in orange) is still connected to the unit. Make sure to leave it plugged in for now.
– Gently unclip the controller ports located at the front of the unit. You’ve got this!
– The controller ports are the cozy little half-circular spots where your controllers connect to the game console. Easy peasy!
Step 5


This step might not be needed, depending on what you’re aiming to accomplish.
– Grab your trusty Phillips #2 screwdriver and unscrew the two screws hanging out on the back of the control port. Easy does it!
– Gently and carefully separate the gray outer shell of the control port from the circuit board inside. Take it slow, no rush!
Tools Used

Step 6


Hey, heads up! Don’t unhook the red and black cooling fan wire from the main unit. It’s highlighted in orange.
– On the left side of the unit, you’ll find the cooling fan chilling in its housing.
– Gently unscrew the two little fasteners holding the cooling fan housing in place. Take your time—no need to rush!
Step 7


– Let’s get started! First, grab your trusty Phillips #1 screwdriver and take out those four screws holding the ground springs in place.
– Once you’ve got those screws out, gently lift the ground springs away from the main unit. You’re doing great!
Step 8


– Your optical drive is held down by a metal plate.
– Grab your trusty Phillips #2 screwdriver and unscrew the twelve screws around the outer edge of the optical drive.
Tools Used
Step 9


– Gently wiggle the optical drive assembly and separate it from the rest of the GameCube. Take your time—no rush!
– The optical drive assembly is snugly connected to the motherboard underneath by a secure slot. A little muscle (but not too much!) will be needed to free it. Stay steady and patient.
– The metal plate and the optical drive itself will stay joined together, so no worries there!
Step 10


– Now that the Optical Drive Assembly is out of the way, your GameCube should be rocking this minimalist look.
– Grab a #1 Phillips screwdriver and carefully remove the six screws marked in orange on the heat sink. Take your time—you’re doing great!
Step 11

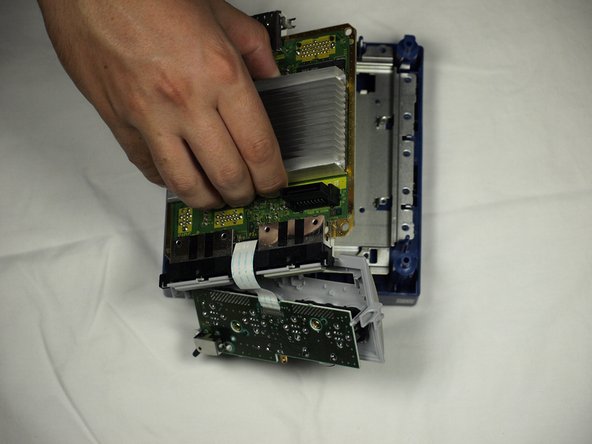
– Carefully pry the motherboard loose from the base, just like you’re handling a precious gem (check out the second picture for a visual guide).
Step 12


Swap out that old motherboard with a shiny new one, and your GameCube will be back in action—ready for endless gaming adventures!
– Let’s get started! Carefully release the ribbon cable that connects the motherboard to the front panel. Take your time and make sure it’s fully disconnected before moving on to the next step.
Success!