How to Replace Nintendo Switch Heat Sink: Step-by-Step Guide
Duration: 45 minutes
Steps: 17 Steps
Follow along to replace the heat sink on your Nintendo Switch. The Switch uses JIS screws, but if you don’t have the right screwdriver, a Phillips one will do just fine (just don’t strip them!). These Phillips bits are made to work with JIS screws, so no worries there. When you remove the shield plate, make sure to replace the thermal compound between the plate and the heatsink. Regular thermal paste won’t work here due to the gap, so K5 Pro viscous thermal paste is your best bet. For the CPU, you’ll need normal thermal paste though. This guide is good for both the original Nintendo Switch model from 2017 and the newer refreshed version from 2019 (models HAC-001 and HAC-001(-01)). If you need help, you can always schedule a repair.
Step 1
Before diving into this repair adventure, ensure your device is fully powered down and ready for action.
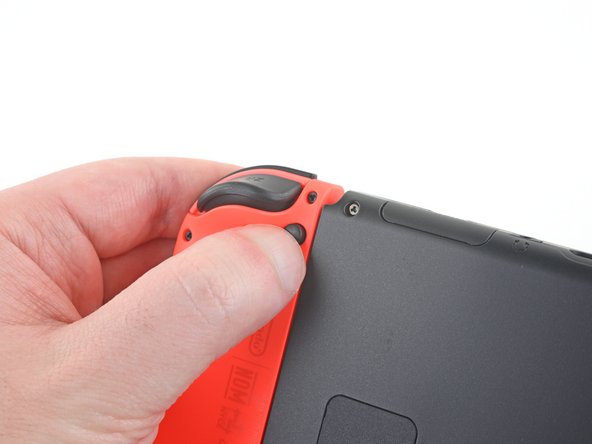
– Give that little round button on the back of your Joy Con controller a firm press and hold. It’s a bit shy, so it needs your encouragement!
– While you’re holding that button, slide the controller up like you’re giving it a gentle nudge to rise and shine!
Step 2
Now, give the other Joy-Con the same love and attention by repeating this process.
– Keep sliding that Joy Con upward until it pops right off the console like a champ!
Step 3
As you go through this repair, keep tabs on every screw and make sure it finds its way back to its original spot—no freelancing screws allowed!
– Grab your trusty Y00 screwdriver and unscrew the four 6.3 mm-long screws keeping the rear panel in place. Time to set those free!
Step 4
When tackling those stubborn screws, make sure to press down firmly, take your time, and go slow. If they’re still being tricky, switch it up and try a JIS 000 or PH 000 driver. Patience and the right tools are key!
– Grab your trusty JIS 000 driver or the official iFixit PH 000 driver and let’s get those screws out! We’re looking to remove the screws holding the rear panel in place:
– One little 2.5 mm screw hanging out on the top edge of the device
– Two more 2.5 mm screws chilling on the bottom edge of the device
Step 5
– Grab your trusty JIS 000 screwdriver or a PH 000 driver and carefully unscrew the two 3.8 mm center screws—one on each side of the device. Take it slow, and keep those screws safe!
Step 6
Before moving on to the next step, make sure to remove the microSD card from the microSD card slot if one is inserted. This will help prevent any potential issues or data loss during the repair process.
– Give that kickstand a little nudge with your finger and watch it pop up from the back of your device!
Step 7
– Grab your JIS 000 screwdriver or your trusty PH 000 driver and carefully unscrew the 1.6 mm screw hiding in the kickstand well. It’s like a tiny treasure hunt!
– Once that’s done, close up the kickstand and you’re good to go!
Step 8
The game card cartridge flap is like a little gatekeeper for the plastic shell, making sure you can’t fully lift the rear panel if it’s closed. Keep that in mind as you work your magic!
– Pop open that game card cartridge flap like a pro!
– Gently lift the rear panel starting from the bottom and watch it come off with ease!
Step 9
– Grab your trusty JIS 000 screwdriver or the official iFixit PH 000 driver and gently unscrew the 3.1 mm screw that’s holding the microSD card reader snugly in place. You’ve got this!
Step 10
– Use your fingers or a pair of tweezers to lift the microSD card reader straight up from the device to disconnect and remove it.
– When putting it back together, make sure the press connector under the foam pad is well connected to the motherboard. You might find it helpful to remove the foam pad before reinstalling the card reader.
Tools Used
Step 11
– Grab your trusty JIS 000 screwdriver (or a PH 000 driver if that’s your jam) and carefully unscrew the six 3 mm screws holding the shield plate in place. You’ve got this!
Step 12
If the foam feels stubborn, don’t fight it—no need to turn it into a battle. Gently try peeling from different spots until the foam gives way.
– Gently use your fingers or a pair of tweezers to peel back the foam at the top edge of the device near the fan exhaust port.
Tools Used
Step 13
A chubby pink layer of thermal paste snugly connects the shield plate to the copper heat sink below. This little helper keeps the Switch cool and collected.
You might hit some resistance here—don’t sweat it. The shield plate is lightly glued to the heat sink with thermal paste, so that’s totally normal.
– Slide your trusty spudger under the shield plate along the edge of the device—like you’re sneaking it into a secret club.
– Gently pry upward to pop off the shield plate and set it aside. Easy-peasy!
– If you’re careful, you can totally reuse the pink thermal compound—just keep it clean and ensure it makes good, solid contact between the heat sink and the shield when you’re putting things back together.
– Need to replace the thermal compound? No worries! Check out our thermal paste guide to clean off the old stuff and apply a proper replacement, like K5 Pro, during reassembly.
Tools Used
Step 14
– Grab your trusty spudger and gently pop the battery connector straight up and out of its snug little socket on the motherboard. Easy does it!
Tools Used
Step 15
– Grab your trusty JIS 000 screwdriver or the official PH 000 driver from iFixit, and let’s get those three 3 mm screws out of the way! They’re holding the heat sink snugly to the motherboard, and we need to set it free. You’ve got this!
Step 16
Be gentle with that foam! It’s super delicate and can tear easily. To remove it safely, follow this pro tip:
Just peel back the foam enough to give the fan some breathing room.
– Gently peel off the two foam pieces stuck over both the heatsink and the fan away from the fan. You got this!
– Slip the tip of a spudger under the part of the foam that isn’t glued down, easy does it.
– Hold the top of the foam with your finger to keep it in place. Steady hands, buddy!
– Roll the spudger tip under the foam all the way to the other end to free it up. Smooth and steady!
Tools Used
Step 17
You might feel a bit of pushback here—don’t worry, that’s just the heat sink holding on tight to the CPU with some thermal paste.
– Make sure to give your new replacement part a good look-over compared to the original. You might need to move some bits over or peel off sticky stuff before you pop it in!
– To put your gadget back together, just retrace your steps from earlier.
– Got some e-waste? Take it to an R2 or e-Stewards certified recycler and do your part for the planet!
– Things didn’t go as smoothly as you hoped? No worries! Check out some basic troubleshooting tips, or swing by our Nintendo Switch Answers community for a hand.
– If you’re feeling stuck, you can always schedule a repair.
Tools Used
Success!


