How to Replace PlayStation 4 Slim Motherboard DIY Guide
Duration: 45 minutes
Steps: 21 Steps
Hey there, looks like something needs fixing! No worries, we’ve got your back. Remember, if you need a hand, you can always schedule a repair with us. Let’s get this sorted out together, rockstar!
Get ready to swap out your PS4 Slim’s motherboard like a pro! Time to give your console a shiny new brain <3
Step 1


Taking off the warranty sticker? Chill, it won’t void your warranty. If you need help, you can always schedule a repair.
– Spot the plastic warranty sticker hanging out next to the three ports on the side of your console.
– Gently peel off that warranty sticker using any kind of spudger. If you need help, you can always schedule a repair
Step 2


– Whip out that TR8 security Torx screwdriver and loosen up that exposed 5.0mm screw with a chill counter-clockwise twist.
Step 3


It might need a bit of a push to pop open, and you’ll hear a pretty noticeable click when the bottom cover comes off.
– Flip that Playstation 4 Slim over with the side where you just popped off the screw facing you.
– Give a gentle nudge on the two corners that are looking your way using your fingers.
– Slide that bottom cover toward the back corners and lift it off like a champ!
Step 4


You might need to put in a little elbow grease to pop it open, and when you do, expect a satisfying click as the top cover releases!
– Set your Playstation 4 Slim upright, making sure the PS logo is on top and the side with ‘SONY’ and ‘PS4’ is facing towards you. You’re almost there!
– With a gentle touch, use your fingers to pry up on the two corners that are looking right at you. You got this!
– Now, slide the top cover towards the back corners and lift it up. It’s like opening a treasure chest – just a bit of finesse!
Step 5


– Grab your trusty T8 screwdriver and tackle those two screws! The one on the left is a cool 31.0mm, while the right one is a neat 24.0mm. Just twist counter-clockwise and watch them come loose!
– Now, switch it up with your Phillips #1 screwdriver to unscrew the little 3.0mm screw. Give it a counter-clockwise spin and you’re all set!
Tools Used

Step 6

– Pop out those four 16mm Philips screws to free the power supply from its cozy spot.
Step 7


– Lift the metal sheet off the top of the power supply with your hands.
Step 8


– Lift the antenna off the top of the power supply by gently guiding the wire through the grooves under the metal panel with your fingers.
Step 9


– Turn the Playstation 4 Slim on its back.
– Grab your Phillips #1 screwdriver and twist out that 4.0mm screw counterclockwise.
Tools Used
Step 10


– Grab your trusty plastic opening tool and gently slip it between the power supply and console, giving it a little wiggle to create some space.
– Carefully lift the power supply and set it down on its back on the metal sheet using your hands.


Step 12


– Gently loosen and remove the safety screw measuring 31.0mm with a trusty T8 screwdriver, making sure to turn it counterclockwise. Remember, a little twist goes a long way!
Step 13


– First up, find those two wires hanging out at the bottom of the motherboard. They’re the ones that need your attention!
– Now, give those metal connections a gentle but firm grip with your fingers or tweezers, and pull straight up until they pop off. You’ve got this!
Tools Used
Step 14


– Alright, let’s flip your device over so we can get to work on the backside!
– Time to tackle those screws! Grab your trusty Phillips #1 screwdriver and unscrew 14 (or 19 if you’ve got a CUH-21xx) of those 4.0mm black screws by turning them counter-clockwise. Easy peasy!
– Next up, let’s unscrew 8 (or 7 for CUH-21xx) of the 6.0mm silver screws. Remember, it’s all about that counter-clockwise magic with your Phillips #1 screwdriver!
– Lastly, let’s get rid of 4 of those 3.0mm silver screws. Just like before, use your Phillips #1 screwdriver and spin them lefty-loosey!
Tools Used
Step 15


Chill for a sec with the CUH-21xx—those screws are already out from the last step.
– Using a Phillips #1 screwdriver, carefully unscrew and take out the two 5.0mm screws located on the side of the console by turning them counter-clockwise. You’ve got this!
Tools Used
Step 16


– Find the friendly white wire attached to the cozy corner of the motherboard’s top.
– Gently hug the metal connection with your fingertips or trusty tweezers and give it a little lift until it says ‘see ya later.’
– Unwind the wire from its tape blanket and shift it to the side using your favorite tweezers or nimble fingers.
Tools Used
Step 17

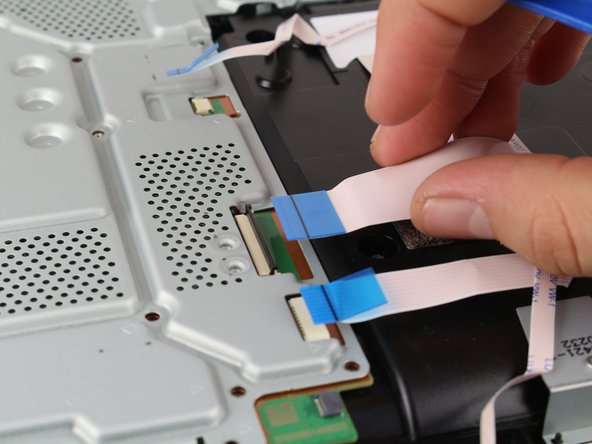

– Give those blue tabs a gentle pull to disconnect the connections.
– Lift the black clip on the biggest tab using your finger before taking it off.
– Grip the wire firmly with your fingers and give it a pull to disconnect it. If you need help, you can always schedule a repair.
Step 18


Keep an eye on those black pads clinging to the motherboard during this step. Trust me, you don’t want to lose them!
Give the plate a little shimmy to loosen it up before lifting it out.
– To free the metal plate, simply hold it by its sides, give it a little lift in an upward and outward motion. You’ve got this!
Step 19


– Grab that trusty Phillips #1 screwdriver and let’s get to work! Unscrew and pop off those two 10.0mm screws – one’s silver and the other’s black. Just turn them counter-clockwise, and they’ll come right off, no sweat!
– Now, it’s time to liberate that small metal plate! Just use your fingers to gently lift it up – it should come off with a little encouragement.
Tools Used


Step 21


Give the board a little wiggle to loosen it up before you take it out. If you need help, you can always schedule a repair
– Grab the edge of the motherboard with one or both hands, and give it a smooth pull upwards and out. If you need help, you can always schedule a repair.