How to Replace PlayStation 4 Slim Power Supply Guide
Duration: 45 minutes
Steps: 11 Steps
Ready to tackle your PS4 Slim’s power supply? Let’s get started and make it a breeze. This guide will show you how to remove or replace it like a pro. If you need help, you can always schedule a repair.
Step 1
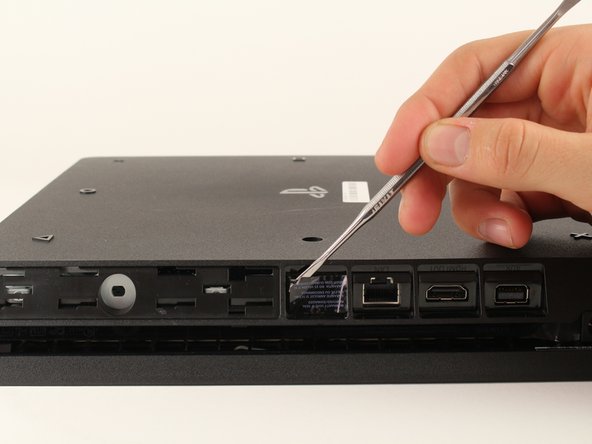
Don’t worry, peeling off that warranty sticker won’t throw your warranty out the window!
– Find that plastic warranty sticker chillin’ next to the trio of ports on the console’s side.
– Gently peel off the warranty sticker with a spudger or any similar tool.
Step 2
– Grab your trusty TR8 security Torx screwdriver and twist that exposed 5.0mm screw counter-clockwise to remove it. You’ve got this!
Step 3
You might need to use a bit of muscle to get this open, and when that bottom cover pops off, you’ll hear a satisfying click!
– Flip the Playstation 4 Slim so it’s upside down and the screw you just took out is facing you.
– Use your fingers to gently pry up the two corners in front of you.
– Slide the bottom cover towards the back and lift it off. If you need help, you can always schedule a repair.
Step 4
To open this up, you might need to give it a little push, and brace yourself for a satisfyingly loud click as the top cover comes off.
– Position your Playstation 4 Slim with the PS logo facing upwards and the side featuring ‘SONY’ and ‘PS4’ towards you.
– Gently lift the two corners closest to you using your fingers.
– Slide off the top cover towards the back corners and lift it up to remove.
Step 5
– Grab your trusty T8 screwdriver and let’s get to work! Carefully unscrew and take out the two screws—31.0mm on the left and 24.0mm on the right. Remember, it’s all about that counter-clockwise motion!
– Now, pick up your Phillips #1 screwdriver and tackle that 3.0mm screw. Just like before, give it a nice counter-clockwise twist to remove it. You’ve got this!
Tools Used
Step 6
– Get rid of those four pesky 16mm Philips screws that are playing hard to get and keeping the power supply in place.
Step 7
– Give that metal sheet on top of the power supply a little nudge and lift it off with your hands. You’ve got this!
Step 8
– Gently guide the antenna wire out from the top of the power supply by using your fingers to navigate it through the grooves beneath the metal panel. You’re doing great!
Step 9
– Time to flip your Playstation 4 Slim onto its back like a pro!
– Grab your trusty Phillips #1 screwdriver and unscrew that 4.0mm screw with a smooth counter-clockwise twist. You’ve got this!
Tools Used
Step 10
– Grab a trusty plastic opening tool and gently slide it between the power supply and console—give it a little wiggle to create some space!
– Now, with a bit of finesse, lift the power supply and place it down onto its back on the metal sheet, using your hands.
Step 11
– Gently release the power supply’s wire connection by giving it a little tug with your fingers or tweezers. You’ve got this!
– Now, let’s lift that power supply out like a champ! Grab it firmly and raise it up with your hands.


