How to Replace Samsung Galaxy Note10+ 5G Front Camera – DIY Guide
Duration: 45 minutes
Steps: 14 Steps
Get ready to give your Samsung Galaxy Note10+ 5G a brand new front-facing camera. This guide is based on steps for the non-5G Note10+, but don’t worry, it’s still super relevant. You might notice some tiny differences in the images, but they won’t affect the overall process. If you need help, you can always schedule a repair.
Step 1

Hey there, tech hero! Make sure to power off your trusty phone before you begin diving into its components. After all, we want to keep things running smoothly. If you ever need a hand, you know who to call – schedule a repair!
You might consider using a hair dryer, heat gun, or hot plate, but let’s not turn your phone into a sauna! Remember, both the display and the internal battery are a bit sensitive to heat—so keep it cool and steady. If you need help, you can always schedule a repair.
– Grab your trusty iOpener and give the left edge of the rear cover a warm hug for about a minute.
Tools Used

Step 2


If your rear cover is looking a bit worse for wear with some serious cracks, a layer of clear packing tape might just do the trick to help that suction cup stick. If you’re feeling adventurous, you could also try using some super strong tape instead of the suction cup. And if you’re really in a bind, a little superglue can go a long way in securing that suction cup to the broken cover.
Depending on how old your phone is, this might be a bit tricky. If you’re running into some trouble, don’t hesitate to apply a bit more heat to the edge and give it another go.
– Grab your trusty suction cup and stick it right on the edge of the rear cover – the closer to the edge, the better!
– Now, give that suction cup a good pull! You want to create a little gap between the cover and the frame.
– With a gentle touch, slide the point of your opening pick into that gap. You’re almost there!
Step 3


Whoa there, champ! Don’t go crazy with that opening pick – just a gentle nudge is all you need. Push it in too far, and you might give those delicate internal parts a nasty surprise. We wouldn’t want that, would we?
– Gently glide the opening pick down the left edge, making your way to the bottom left corner to cut through that sticky adhesive.
– Keep the pick snugly in the bottom left corner to stop the adhesive from sealing back up. You’ve got this!
Step 4


As you work your way around the phone, the rear cover will start to come loose – you’re making great progress!
– Go ahead and repeat the heating and cutting magic on the other three sides of your phone. You’ve got this!
– Keep an opening pick in place on each side as you move along to the next one. This little trick will help stop that pesky adhesive from sticking back together.
Step 5


Before you seal the deal, make sure to power up your device and give your repair a test run to ensure everything is working smoothly. If you need help, you can always schedule a repair
– Time to take the rear cover for a spin! Lift it straight up and give it a little wiggle to get it off.
– Alright, let’s put things back together! Follow these steps to re-install the rear cover and replace that adhesive.
– If you’re using Tesa tape to reattach things, don’t worry, we got you covered! Just follow this guide. And hey, if you’re feeling a little overwhelmed, no worries – you can always schedule a repair with us!
Step 6

– Grab your trusty Phillips screwdriver and get ready to tackle those five 4 mm screws holding the wireless charging coil in place. You’ve got this!


Step 9


– Grab the pointed end of that trusty spudger and gently pry off the wireless charging coil connector from the motherboard. You’ve got this!
Tools Used
Step 10


Alright, so the wireless charging coil is stuck on there with a little bit of glue. Nothing too crazy, just a friendly hold.
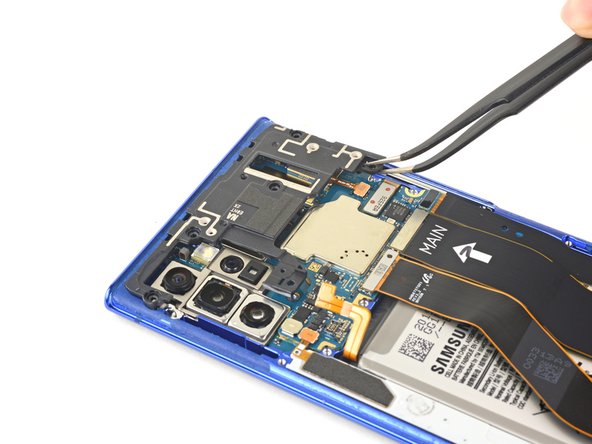
– Gently lift the metal shield so you can grab it with your fingers.
– Carefully peel the wireless charging coil away from the device.
– Take out the wireless charging coil and set it aside.
Step 11

– Let’s get started by removing the four 4mm screws that hold the top plastic cover in place – just grab your trusty Phillips screwdriver and you’re all set. If you need help, you can always schedule a repair
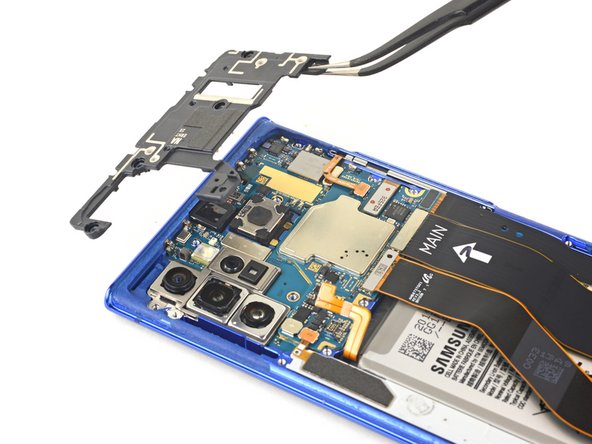

Step 13
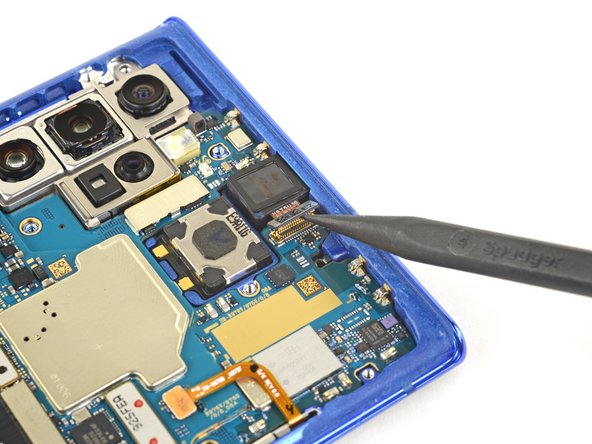

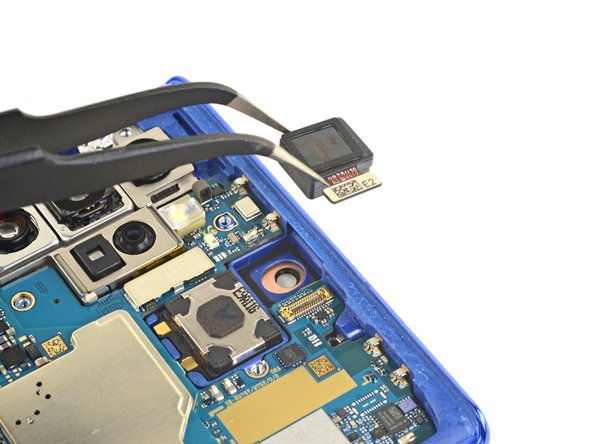
– Whoa, look at you go! Almost done! Just use the pointy end of your spudger to gently lift the front-facing camera connector straight up from the motherboard. You’re on a roll – and if you need a little help, you can always schedule a repair.
Tools Used