How to Replace Samsung Galaxy S10+ Motherboard Step-by-Step Guide
Duration: 45 minutes
Steps: 22 Steps
Heads up! Before diving in, make sure to disconnect your device from any power source to avoid any shocking surprises. Safety first, friends! If you need help, you can always schedule a repair
Get ready to tackle the adventure of replacing the motherboard for your Galaxy S10+! The trickiest part? Getting that back cover off the phone—it’s a bit of a puzzle, but you’ve got this! If you need help, you can always schedule a repair.
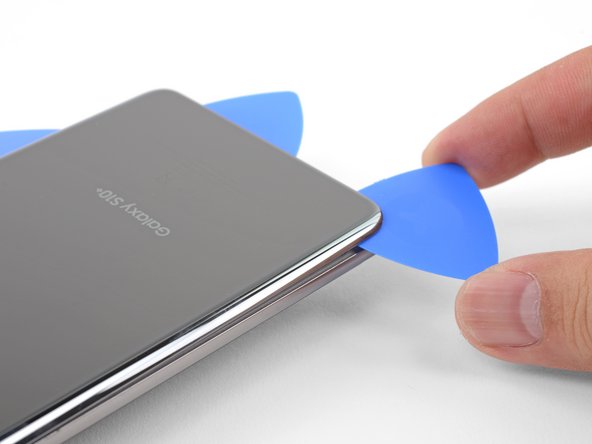
Step 1


– Pop a SIM card eject tool, small bit, or a straightened paperclip into the hole on the SIM tray at the top edge of the phone next to the plastic antenna band.
– Give it a good press to pop out the tray.
– Take out the SIM card tray.
– When putting the SIM card back, make sure it’s oriented correctly in the tray.
Tools Used

Step 2


– Make sure to unplug and power off your phone before you get started.
– Warm up an iOpener and gently place it on the right edge of the back cover for a couple of minutes.
– While you’re waiting, check out the picture of the removed back cover and make a mental note of where the adhesive is located.
Tools Used

Step 3


Because of tight tolerances, this might take a few tries, but hang in there! If you need help, you can always schedule a repair.
– Stick a suction cup on the back of your phone, aiming for the center of the right edge where the adhesive is a bit shy.
– Give that suction cup a strong, steady tug to open up a little space between the back cover and the frame.
– Slide the tip of an opening pick into that sweet gap you’ve created.
Step 4


– Rest the heated right edge of your phone on something about 0.5 inches (13 mm) thick to get the perfect angle for the opening tool.
– Steady the left edge of the phone with your fingers to keep it from sliding. Give the suction cup a nice, firm pull.
– Press the edge of the opening tool into the seam between the back cover and the frame.
– Slide the opening tool back and forth along the seam a few times.
Step 5


– Gently glide the opening pick along the edge of your phone, cutting through that pesky adhesive like a pro.
– Pop a pick into the seam to keep that adhesive from getting cozy again.
Step 6

– Give the bottom edge of your phone a cozy two-minute spa treatment with a heated iOpener.
Tools Used
Step 7


– Slip an opening pick into the right side near the bottom right corner.
– Gently glide the pick around the corner. Keep sliding along the bottom edge and the bottom left corner.
– Leave an opening pick in the seam to keep the adhesive from re-sealing.
Step 8


When you’re slicing around those corners, make sure to give them a nice, warm hug with some heat before you start. It really helps things go smoothly!
– Keep on heating and smoothly slicing around the remaining edges of your device.
Step 9


– After you’ve made your way around the phone with a slice, grab an opening pick and gently twist it at one of the edges to help ease that back cover away from the frame.
– Carefully lift the back cover. Use those trusty opening picks to slice through any stubborn leftover adhesive.
– Now, go ahead and remove that back cover.
– Here’s a pro tip: while you’re at it, this is a great moment to power on your phone and check if everything’s working like a charm before sealing the back cover back up. Just remember to shut your phone down completely before diving back into your work.
– Follow this guide to reinstall the back cover, transfer and install the camera bezel, and replace the adhesive with ease.
Step 10

– Get those nine 4 mm Phillips screws out of the way to free the top midframe from your phone!
Step 11


Alrighty then, the midframe’s still held on by some playful plastic clips around the edges. If you need help, you can always schedule a repair!
– Gently slide the spudger into the little notch on the right side of the midframe, close to the Bixby button.
– Apply a bit of pressure to release the midframe from the phone.
Tools Used

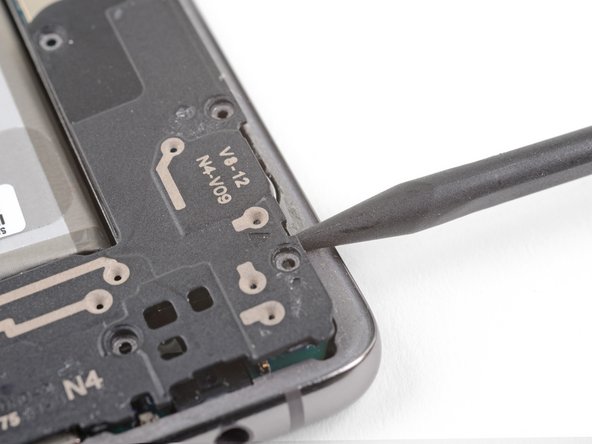
Step 12


– Slip the pointy end of a spudger into the notch on the left side of the phone, right by the power button.
– Gently pry up to free the midframe from the phone.
Tools Used

Step 14


– Slip the flat end of a spudger under the battery connector, which is hooked onto the motherboard below the rear camera.
– Pop the connector out of its socket with an upward pry.
– Gently nudge the battery’s flex cable away from the motherboard socket to steer clear of accidental contact.
Tools Used
Step 15

– Let’s get down to business! Start by unscrewing those seven 4 mm Phillips screws that are holding the lower midframe snugly to your phone. You’ve got this!
Step 16

The midframe is still held snugly in place by a few plastic clips all around the edge.
– Grab your trusty spudger and slide the tip into the notch located near the bottom right corner of the lower midframe. Keep an eye out for that little triangle marking the spot!
– Gently pry upwards to pop the midframe free from the phone. You’ve got this!
Tools Used
Step 17


– Grab that loose end of the midframe with your fingers and gently lift it upwards—it’s like giving your device a little hug!
– Give the midframe a tiny wiggle to help those stubborn edge clips let go.
– Now, carefully take out the lower midframe. Just so you know, the loudspeaker is cozy in there with it!
– When you’re ready to put the lower midframe back, just align its bottom edge with the phone’s edge, and give it a nice press to snap it back in place. Easy peasy!
Step 18


– Get ready to rock and roll! Grab your trusty spudger and gently lift and detach the display connector from its motherboard socket, chilling near the bottom right corner of your device.
Tools Used
Step 19


– Grab your trusty spudger and gently pop up and disconnect the headphone jack’s connector from the motherboard socket. If you need help, you can always schedule a repair.
Tools Used

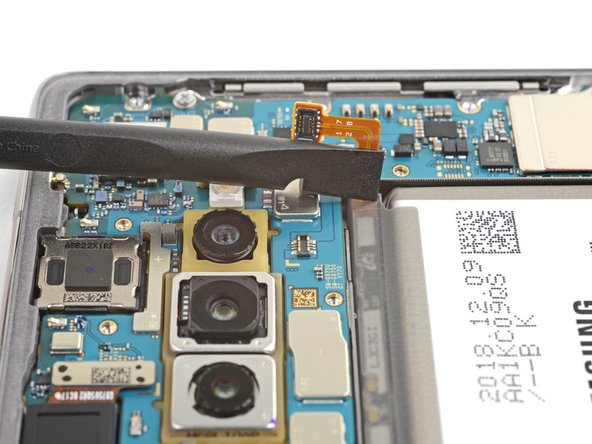
Step 21

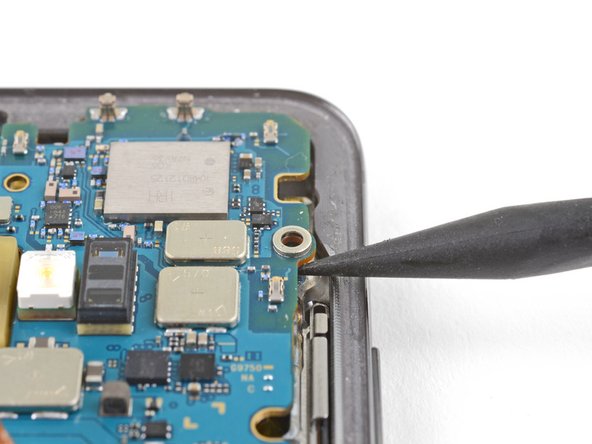
– Slide the tip of your trusty spudger under the right edge of the motherboard, just by the volume up button.
– Gently pry it up to help the motherboard break free from its snug little spot.
Tools Used
Step 22


– Get a good grip on the motherboard’s top corners using your trusty fingers.
– Gently lift the edge of the motherboard out of its cozy spot. Mind the cables – they don’t like surprises!
– With a little wiggle and a gentle pull towards the phone’s top edge, free the charging port from its snug socket.
– Once the charging port is free as a bird, bid adieu to the motherboard.
– To put the motherboard back in its happy place, make sure the charging port aligns perfectly with the phone’s bottom edge.


