How to Replace Samsung Galaxy S20 Ultra USB-C Charging Port and Daughterboard Tutorial
Duration: 45 minutes
Steps: 27 Steps
Hey there! Looks like we’ve hit a little bump in the road. No worries, we’ll get things back on track in no time. Stay positive and keep following along with the steps. If you need a hand, you can always schedule a repair with Salvation Repair. Let’s do this!
Get ready to tackle the replacement of the USB-C charging port and daughterboard on your Samsung Galaxy S20 Ultra! Just a heads up: keeping that water resistance intact after your repair will hinge on how well you reapply the adhesive. Remember, your device might lose its IP (Ingress Protection) rating, but with a little care, you can make it work! If you need help, you can always schedule a repair.
Step 1

First things first, make sure to unplug your phone and power it down before diving in.
– Chill out, pals! Pour a little heat in your iOpener and let your phone play with it on its own for 2 minutes on its bottom edge, so it can truly begin its adventure into a new back cover world! 🌍 If you need help, you can always schedule a repair
Tools Used

Step 2


– Grab a trusty suction cup and stick it firmly to the back of your device, aiming for the center of the bottom edge.
– Now, give that suction cup a good tug with confidence, creating a nice gap between the back cover and the frame.
– Take an opening pick and gently wedge it into the gap to kick off this repair party.
Step 3


– Gently glide the pick back and forth along the bottom edge to cut through that sticky adhesive like a pro.
– Keep your opening pick snugly in the seam to stop the adhesive from sealing up again.
Step 4

– Warm up your trusty iOpener and give the left edge of that back cover a cozy two-minute hug. It’s all about that gentle heat to make things easier for you!
Tools Used
Step 5


Since we’re working with some snug fits, don’t be surprised if it takes a few tries to get it just right!
– Grab a suction cup and stick it right on the back of your phone, aiming for the center of the left edge. You’ve got this!
– Now, give that suction cup a good, steady pull. You want to create a little gap between the back cover and the frame. Just think of it as a gentle nudge.
– Next up, take the tip of an opening pick and slide it into that gap. We’re making progress!
Step 6


– Now, let’s get those gears turning! Gently nudge that pick under the glass’s edge, and as you feel it catch, give it a little tilt downward. Keep that pick nicely seated and move forward to break the bond between the back cover and its adhesive home. If you need help, you can always schedule a repair!
Step 7


– Gently slide the pick towards the bottom edge of the phone to separate the back cover’s adhesive.
– Keep your pick snug under the left edge of the glass near the bottom of the device to prevent the adhesive from sticking back.
Step 8


– Pop in another pick right in the middle of the left edge of the back cover.
– Glide the pick upwards gently towards the top of the device to loosen the back cover’s sticky grip.
– Keep your pick snug under the left side of the glass close to the top of the device to stop the stickiness from sticking again.
Step 9

– Warm up your trusty iOpener and give the right edge of the back cover a cozy two-minute hug.
Tools Used
Step 10


– Alrighty, time to get your phone out of that tough spot! First, stick a suction cup right on the back, close to the middle of the right edge. Now, yank up with some serious pulling power to pop open a teeny gap between the back cover and the frame. Lastly, slip in an opening pick and start working our little buddy out! Remember, if you need help, you can always schedule a repair to keep the process a breeze!
Step 11


– Gently slide the pick towards the bottom edge of the phone to free the back cover’s adhesive.
– Keep your pick snug under the right edge of the glass near the bottom of the device to prevent the adhesive from sticking again.
Step 12


– To get started, pop another pick under the middle of the right side of the back cover.
– Gently glide the pick towards the top of your device to detach the adhesive on the back cover.
Step 13

– Get your heated iOpener ready and gently apply it to the top edge of the back cover. Let it work its magic for a cool two minutes.
Tools Used
Step 14


The glass around the corners of the back cover is gently curved and can crack easily. Take it easy during this step to keep your back cover safe and sound!
– Gently glide the pick from the right edge of your device, making your way around the top right corner like a pro.
– Keep slicing along the top edge to completely free the back cover from its adhesive grip.
Step 15


– Gently lift the back cover, taking your time. Use those handy opening picks to cut through any stubborn adhesive that’s hanging on.
– Carefully remove the back cover and set it aside.
– When putting everything back together:
Step 16


– To disconnect the wireless charging coil connector, simply get your trusty spudger and gently pry it up. Time to say goodbye to that pesky connection!
Step 17

– Grab your trusty Phillips #00 screwdriver and get ready to unscrew! Carefully remove the five screws, each measuring 3.9 mm, that are holding the loudspeaker and lower midframe in place. You’ve got this!
Step 18

– Gently slide the tip of your trusty spudger into the little notch in the upper left corner of the loudspeaker.
– Give it a gentle pry to pop those clips loose and set it free.
Step 19


– Grab your trusty tweezers or just your fingers, and gently coax the wireless charging coil away from the device. Be gentle, it’s a delicate operation!
– Now, go ahead and remove that wireless charging coil. It’s time for it to take a little break.
– Set the charging coil aside for now. Don’t worry, it will be back in action during reassembly!
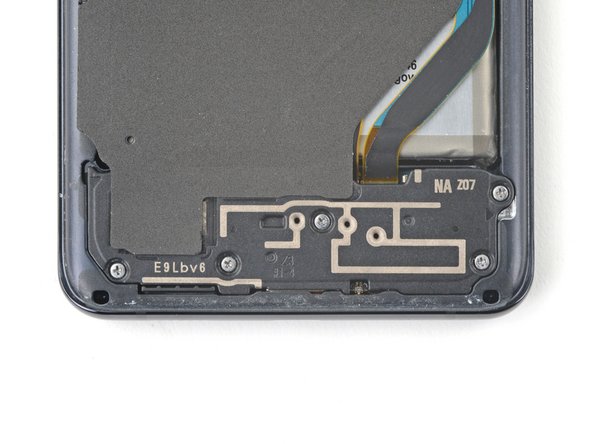
Step 20


– Get ready to unleash your inner mechanic! Grab a Phillips #00 screwdriver and tackle the five 3.9 mm-long screws holding the motherboard bracket in place. Let’s do this!
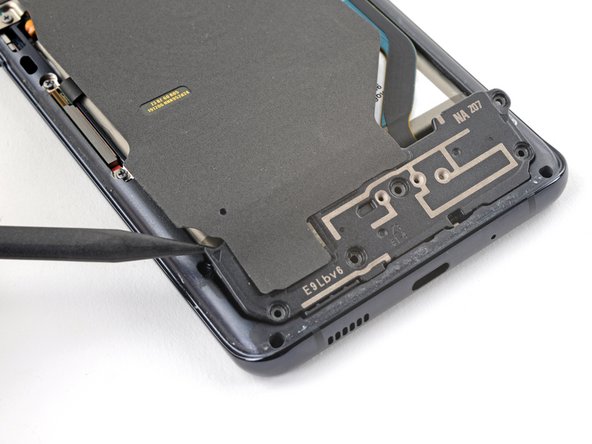
Step 21


– Grab a pair of blunt-nose tweezers and gently unclip the motherboard bracket. It’s like giving it a little hug before sending it on its way!
– Once you’ve got that bracket off, set it aside. You’ll be bringing it back into the action during reassembly, so keep it close!


Step 23


– Alright, time to work some magic! Grab a spudger and gently pry up those snazzy primary and secondary interconnect cables from the daughterboard near the bottom of your device.
– To put those connectors back in place, think of it like a puzzle. Align them carefully, press down on one end until it gives a satisfying click, then do the same on the other end. Avoid the middle to prevent any bending mishaps. We don’t want any wonky pins causing trouble!
Step 24


– Grab your trusty spudger and gently pry up those primary and secondary interconnect cables from the motherboard. You’ve got this!
Step 25


– Peel up those primary and secondary interconnect cables ever so gently.
– Now, set them both aside for safekeeping. You’ll be bringing them back into play during reassembly.
Step 26


– Grab your trusty Phillips #00 screwdriver and get ready to tackle those three 3.7 mm-long screws that are holding the USB-C port and daughterboard in place. Let’s do this!


