How to Replace Samsung Galaxy S21 5G Earpiece Speaker DIY Guide
Duration: 45 minutes
Steps: 26 Steps
Before embarking on this awesome repair journey, make sure to bring your battery level down below 25%. Let’s keep it safe and cool!
Ready to tackle that earpiece speaker replacement on your Samsung Galaxy S21? Awesome! Just a quick heads-up: make sure your battery is below 25% before diving in. This little precaution helps keep things safe and sound in case your battery gets a bit too cozy during the repair. And hey, if your battery looks like it’s been working out and is swollen, take the right steps to handle it with care. Let’s get started!
Step 1

Before diving in, make sure your phone is totally powered down. Trust us, it’s a smart move!
– Warm up your trusty iOpener and gently press it against the bottom edge of the back cover for a full two minutes. It’s like giving your device a cozy little spa treatment!
Tools Used

Step 2


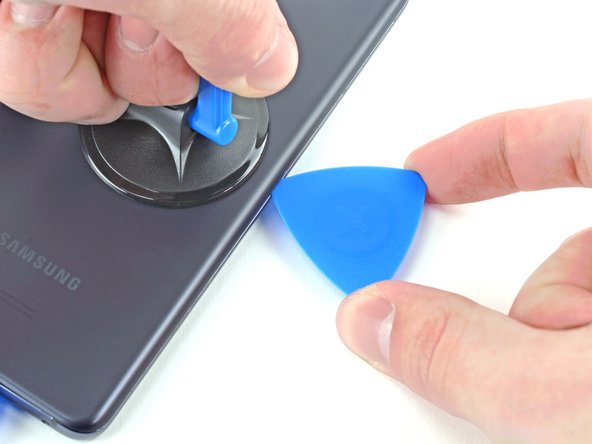
– Grab a suction cup and stick it to the back of your phone, aiming for the sweet spot near the center of the bottom edge.
– Give that suction cup a solid pull with consistent strength to pop open a little gap between the back cover and the frame.
– Slide an opening pick into that gap you just made. You’re doing great!


Step 4

– Warm up a heated iOpener and gently place it on the left edge of the back cover for two minutes.
Tools Used
Step 5


– Grab a suction cup and place it on the back of your phone, aiming for the center of the left edge—you’re doing great so far!
– Now, give that suction cup a solid, steady pull. This will help create a little breathing room between the back cover and the frame.
– With that gap opened up, gently slide an opening pick into it. You’re on the right track!
Step 6


– Now, let’s get sassy! Slither that opening pick down the left edge and give it a little twirl towards the bottom left corner. Your pick, the adhesive, and the phone will get friendly and cut ties. Once you’ve made your mark, your pick will be your new BFF, keeping those adhesive tendrils from reattaching. If you ever need help in our adventure, you can always schedule a repair!
Step 7

– Gently warm up a friendly iOpener on the right side of the back cover for around two minutes.
Tools Used
Step 8


– Start by placing a suction cup on the back of your phone, aiming for the center of the right edge. You’re doing great!
– Now, give that suction cup a firm, steady pull to open up a little gap between the back cover and the frame. Keep it up!
– Once you’ve got that gap, grab an opening pick and slide it in gently. You’re on the right track!
Step 9


– Gently move an opening pick from side to side along the right edge of the back cover to slice through the sticky stuff.
– Pop the pick in there to make sure the stickiness doesn’t lock up again.
Step 10


Feel free to apply this technique to each corner, just steer clear of the top-left where the rear-facing camera hangs out.
– Twirl the right-edge opening pick around the top-right corner of the device with a touch of flair!
Step 11


– Gently slide that top pick in as close to the camera shell as you can get, like you’re giving it a friendly nudge.
– Now, do the same with the pick on the left edge. You’re doing great!
Step 12

– Warm up that iOpener and stick it on the camera shell for a cozy two minutes.
Tools Used
Step 13


If the previous method didn’t quite do the trick, no worries! Just move on to the next step for a different approach. Otherwise, feel free to skip ahead to the following step.
– Whoa, these steps are looking to be a real piece of cake! Just rotate that back cover counterclockwise to create a teensy-tiny gap – like a secret clubhouse entrance! Then, slip in an opening pick so it’s all cozy in there. If you need help, you can always schedule a repair!
Step 14


Just a heads up, gentle touch is the name of the game here. We wouldn’t want that plastic back cover to feel left out of the fun!
– Gently slide those two trusty picks towards the camera shell, slipping them right under the corners of the back cover next to the camera shell.
– Now, give those picks a little back-and-forth dance along the bridge between the back cover and the camera shell until you’ve created a cozy gap between the camera shell and the frame.
Step 15


This camera shell is stickier than a toddler in berry juice, so don’t be surprised if you need some extra heat sessions! We’re here to help – if you need a hand, you can always schedule a repair!
– Gently slide an opening pick between the camera shell and the frame to trim away the adhesive.
Step 16


Hey, watch out for that plate on the back cover near the flash – our pick might get caught on it. No biggie, just be aware while you’re fixing your device!
– Hey there! Guess what? There’s some extra adhesive hanging out to the right of the camera that you’ll want to snip through. Easy peasy!
Step 17


– Position the tip of your opening pick right by your phone’s flash.
– Gently slide the pick in, being cautious not to disturb the flash’s plate.
– Carefully cut through the adhesive to the right of the camera.
Step 18


– Let’s get started by taking off that back cover! It’s like peeling a banana—fun and satisfying!
– When you’re putting everything back together, remember to keep it all in order!
Step 19

As you embark on this repair adventure, remember to keep a close eye on each screw and ensure that it finds its way back home to the exact spot it left. Happy fixing!
– Grab your trusty Phillips screwdriver and carefully unscrew those five 4 mm-long screws holding the motherboard bracket tight to the frame. You’ve got this!
Step 20


Hold your horses on completely taking off that bracket! It’s still got a cozy connection to the wireless charging coil.
– Kick it into high gear, pal! It’s time to snatch up that motherboard bracket and give it a little jiggle to unclip from the frame. Don’t be a wimp now, cuz!
Tools Used

Step 21


– Grab your tweezers or fingers and gently hold the motherboard bracket aside—now it’s time to get your spudger in action! Carefully pry up that battery press connector like a pro.
– Reattaching press connectors is a breeze! Just align them nicely and give one side a gentle press until you hear that satisfying click. Then, do the same on the other side. Remember, steer clear of the middle when pressing down! If things get misaligned, those little pins might bend and that’s a one-way ticket to trouble. If you need help, you can always schedule a repair.

Step 22


– As you cheer on the motherboard bracket, rock out with a spudger to gently release and high-five the wireless charging coil’s press connector.
Tools Used
Step 23


The wireless charging coil is lightly glued in place, so don’t worry, it’s not going anywhere without a little help from you!
– Gently coax the wireless charging coil away from the phone using your fingers, like you’re peeling a banana—nice and easy!
– When it’s time to put everything back together, start by securing the motherboard bracket screws first. This will help align the charging coil just right. Once that’s done, give the rest of the coil a good press down to make sure it sticks snugly in place!
Step 24
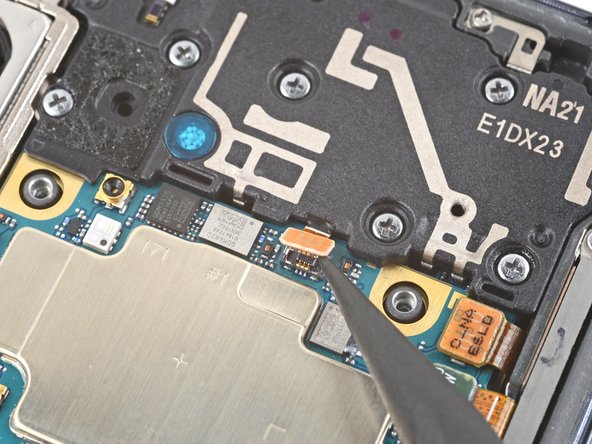

– Grab your trusty spudger and gently nudge up the earpiece speaker cable’s press connector to disconnect it. You’ve got this!
Tools Used
Step 25

– Grab your trusty Phillips screwdriver and start popping out those seven 4 mm screws that are keeping the earpiece speaker snugly attached to the motherboard. You’ve got this!
Step 26


– Get ready to rock! Insert the point of a spudger into the gap between the right-most edge of the earpiece speaker and the phone.
– Time to groove! Use the spudger to pry up and release the clips holding the earpiece speaker in place.
– Let’s jam! Use tweezers, or your fingers, to gently remove the earpiece speaker.


