How to Replace Samsung Galaxy S6 Edge+ Midframe Assembly DIY Guide
Duration: 45 minutes
Steps: 8 Steps
Hey there, tech wizard! Follow these steps carefully to avoid any hiccups in your repair. If you need help, you can always schedule a repair.
Ready to give your Samsung Galaxy S6 Edge+ a little TLC? This guide will walk you through replacing that pesky damaged midframe assembly. Not only does it house the NFC antenna, but it also cradles the wireless charging coil, so we’ll tackle those too! Just a heads up, we’ll be removing the rear glass, which means the adhesive will take a hit and will need a little love before we put it all back together. If you need help, you can always schedule a repair.
Step 1

You can also use a hair dryer, heat gun, or hot plate. Just be cautious not to overheat your phone—both the OLED display and internal battery don’t get along with too much heat.
To ensure your phone is warmed up sufficiently, don’t hesitate to warm up the iOpener multiple times. Just follow the iOpener instructions carefully to prevent overheating.
– Warm up an iOpener and press it gently against the side of the phone where the volume buttons are for about two minutes.
Tools Used

Step 2


– When the back panel feels warm and cozy, grab a suction cup and place it near the center of the phone, getting as close to the edge of the panel as you can.
– Gently pull on the suction cup to create a little gap under the rear glass, then slide an opening pick into that gap.


Step 4


– Now, just like before, heat things up and slice away on the other three sides of your phone. You’ve got this!
– Make sure to slide an opening pick under each edge to keep that pesky adhesive from sticking back together. We want to keep things open and accessible!
Step 5


– Grab your trusty opening pick and gently glide it through any stubborn adhesive that’s still hanging around.
– Carefully lift off the rear glass and set it aside.
Step 6

Feel free to pop that back cover on without swapping out the adhesive! Just make sure to clear away any big adhesive clumps that might keep it from sitting nice and flat. Once it’s on, give it a little heat and some gentle pressure to lock it in place. It might not be waterproof, but trust us, that glue is usually more than up to the task!
If you’re out of adhesive sheets, no worries! A strong double-sided tape like Tesa 61395 will do the trick just fine.
– Let’s get that back cover back on, shall we? Start by using tweezers to gently peel off any leftover adhesive from both the back cover and the chassis of your phone.
– Next up, grab some high concentration isopropyl alcohol (90% or higher) and a lint-free cloth. Give those adhesion areas a good clean, but remember to swipe in one direction only—no back and forth action here! This is key to prepping the surface for the new adhesive.
– Before we seal everything up, power on your phone and test your repair. It’s always good to check that everything is working before you dive into the next step.
– Your replacement adhesive comes as a pre-cut sheet that fits the contours of the back cover perfectly. Just a heads-up—it’s asymmetrical! So make sure the screw holes in the adhesive line up with the frame before you go ahead and apply it.
– Once the rear cover is on, press down firmly on your phone for a few minutes to help that adhesive stick like it means it. A little pressure goes a long way—try placing it under a stack of heavy books for a solid bond.
Tools Used

Step 7

– Unscrew and say goodbye to eighteen 3.2 mm screws from the midframe. They’re ready to take a break!
Step 8
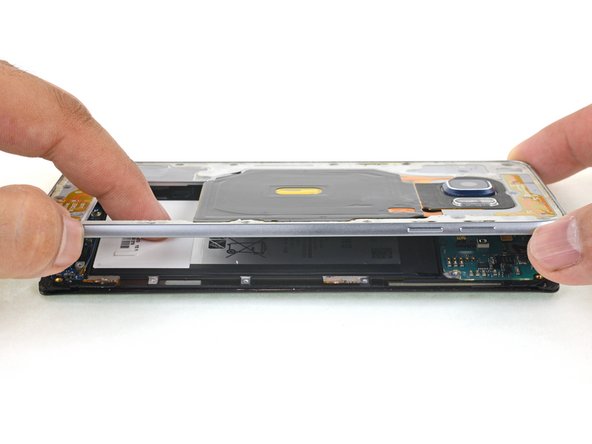


– Gently press down on the back of the battery while lifting the edges of the midframe to carefully separate it from the rest of the phone.