How to Replace Samsung Galaxy S8 Rear Camera Bezel: Step-by-Step Guide
Duration: 45 minutes
Steps: 15 Steps
Hey there! Just a heads up, this step might require a little extra patience and precision. Remember, you’ve got this! If you need help, you can always schedule a repair.
Ready to give your Samsung Galaxy S8 a fresh new look? This guide will walk you through replacing the rear camera bezel along with the camera glass. Just a heads-up: if your replacement part doesn’t come with adhesive already on it, you’ll want to grab some adhesive for the rear camera bezel. You can choose from pre-cut adhesive or some slim high-bond tape. If you need help, you can always schedule a repair.
Step 1

You can use a hair dryer, heat gun, or hot plate to help out, but watch out for overheating! The OLED display and internal battery can be sensitive to too much heat, so keep it cool while you work your magic.
Warning: Opening your device could jeopardize its waterproofing. Make sure to have replacement adhesive at the ready or be cautious of liquids if you reassemble without it.
While the adhesive does its magic, why not jump ahead and check out the next step for some prying pointers?
– Warm up that iOpener and stick it to one of the long edges of your S8 for around 2 minutes. You’ve got this!
Tools Used

Step 2


– First up, we’ll be cutting through the adhesive around the edge of the rear glass panel. Get your tools ready!
– Check out the first image to see how the adhesive is laid out on the rear case. It’s like a sticky puzzle.
– And here’s the prying pattern as seen from the outside of the phone. Easy peasy!
Step 3


– Let’s get that back panel cozy! Once it’s warmed up and feels nice to the touch, grab a suction cup and place it as close to the heated edge of the phone as possible—just steer clear of the curved part.
– Now, give that suction cup a gentle lift and slip an opening pick under the rear glass. You’ve got this!

Step 5


Take it easy so the tool doesn’t slip from the groove. If you’re finding it tough to cut, simply warm up and reapply the iOpener.
– Gently glide the opening pick along the edge of your phone to break apart that stubborn adhesive.
Tools Used
Step 6


– Hit repeat on that awesome heating and cutting technique for the remaining three sides of the phone.
– Keep those opening picks in place on each side as you move on to the next one to make sure the adhesive doesn’t try to play games and reseal.
Step 7


– Let’s slice through any remaining adhesive with the opening picks to gently open the phone a crack.
– As you put the back cover back on during reassembly, make sure to angle it just right so the fingerprint sensor cable connector slides effortlessly into place over its socket. Then, gently press down using the flat end of your spudger to snap it securely in.
– Time to bid farewell to the glass on your phone! Let’s remove it with care.
Whoa there! Make sure the orange cable with blue connector has disconnected before moving on. If that fingerprint sensor cable’s looking a bit snaggle-toothed, carefully use a spudger to disconnect it first. Remember, safety first! If you need help, you can always schedule a repair!
The fingerprint sensor cable is like a tiny lifeline connecting your phone to the rear glass by the main camera. It’s a bit of a shorty, so as you gently lift off the rear glass, it’ll happily disconnect itself. No worries, just keep an eye on it!
Tools Used

Step 8

Feel free to pop that back cover back on without the hassle of replacing the adhesive! Just make sure to clear away any big chunks of adhesive that might keep the cover from sitting snugly. Once you’re all set, give it a little heat and press down to lock it in place. While it might not be totally waterproof, the adhesive is usually more than tough enough to keep everything secure.
– Hey there, it’s time to give your device a fresh new look!
– Let’s get started by installing a new back cover:
– Simply follow this guide to reinstall the old back cover, or to install a back cover without pre-installed adhesive.
– If you need to transfer the camera bezel to your new part, no worries!
– Just follow our camera bezel replacement guide for easy steps.
– Remember, if you ever get stuck, don’t hesitate to schedule a repair for expert assistance.
Step 9

– Warm up your iOpener and give that rear camera bezel at the top of the rear glass some cozy love for at least two minutes.
Tools Used
Step 10


– Start by gently sliding an opening pick under the top edge of that rear camera bezel—it’s going to be your trusty sidekick in this adventure.
– Move that pick around the edges like a pro, helping to break free the adhesive that’s holding it down to the rear glass. You’ve got this!
Step 11
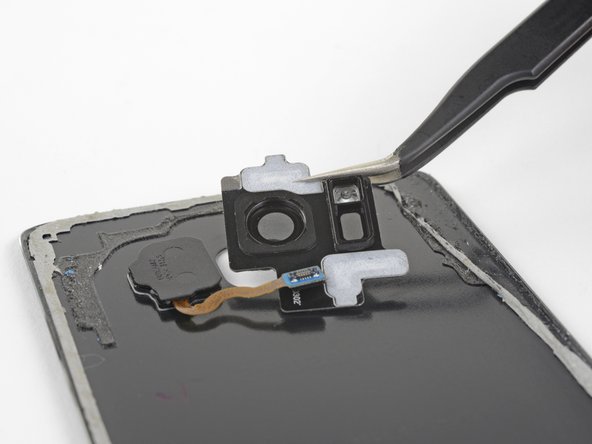
– Grab your trusty opening pick or tweezers and gently lift the camera bezel off that rear glass. It’s like waking your device up from a nap!
– If you hit a snag, don’t fret! Use the opening pick to slice through any stubborn adhesive that’s holding on tight.
Tools Used

Step 12

– Grab your trusty spudger and gently scrape off any sticky adhesive that’s holding the camera bezel to the rear glass. Let’s give that camera a bit of breathing room!
– Now, let’s make sure the surface is squeaky clean! Use some high concentration isopropyl alcohol (at least 90%) and a lint-free cloth. Remember, swipe in one direction only and resist the urge to go back and forth. This little trick will set the stage perfectly for the new adhesive.
Tools Used
Step 13


– Gently peel off the clear backing from the camera bezel adhesive strip to reveal the sticky goodness on one side.
– Carefully align the rear camera and flash cutouts on the inside of the rear glass with the matching cutouts on the adhesive strip. It’s like a puzzle!
– Position the adhesive strip on the rear glass, ensuring it stays clear of the edges of the camera and flash cutouts. No overlaps allowed!
– Use your fingers or the flat edge of a spudger to press down the adhesive so it sticks nicely to the glass. You’ve got this!
Tools Used

Step 15


– Align the rear camera bezel with the cutouts on the rear glass, then place it onto the adhesive. Ensure the side with the camera lens cover sticking out is facing the rear glass.
– Using your fingers, apply even pressure to the bezel for 30 seconds to secure the adhesive bond.
– Just before installing the rear glass and sealing the phone, peel off the black backing covering the camera glass.


