How To Replace Samsung Galaxy S9 Headphone Jack – DIY Guide
Duration: 45 minutes
Steps: 20 Steps
Hey there, repair superstar! Before you dive in, make sure to double-check everything. A little caution goes a long way, and we want you to have the best experience possible. If you need help, you can always schedule a repair!
Ready to rock that headphone jack removal on your Samsung Galaxy S9? You’ll want to have some replacement adhesive on hand to make sure your fingerprint sensor gets back in the groove when you’re all done. If you need help, you can always schedule a repair.
Step 1
The adhesive on the Samsung Galaxy S9 is tough! Use a hair dryer, heat gun, or hot plate if the iOpener isn’t cutting it. But be cautious—overheating can mess up the AMOLED display and battery. If you need help, you can always schedule a repair.
– First things first, let’s power down that phone of yours. Safety first, right?
– Now, grab your trusty heated iOpener and apply it to one of the long edges of the phone. This will help loosen up the adhesive holding that rear glass in place. Make sure to keep it there for at least two minutes to work its magic!
Tools Used
Step 2
Check out how the adhesive is arranged inside the back cover, just like in the picture!
– Get ready to tackle that back cover! In the next steps, we’ll be carefully cutting through the adhesive that’s holding it in place.
– You’ll want to slice through the adhesive in the highlighted areas:
Step 3
Got a cracked rear glass on your phone? No worries! If the suction cup won’t stick, grab some strong tape to lift it or superglue that suction cup in place and let it set. Need a hand? You can always schedule a repair.
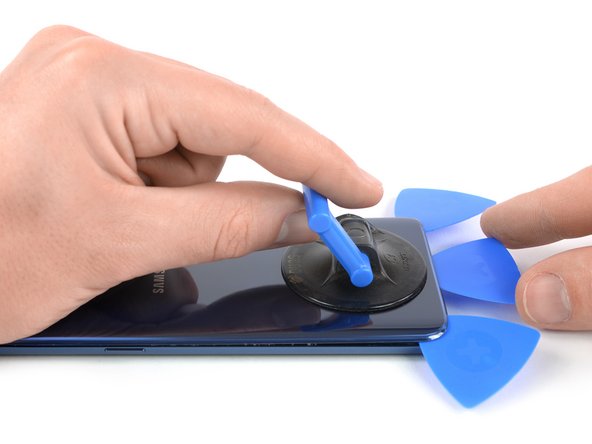
– Stick a suction cup on the back cover.
– Use the suction cup to lift the back cover’s bottom edge, creating a small gap between the cover and the frame.
– Insert an opening pick into the gap and slide it to the bottom right corner.
– Insert a second opening pick and slide it to the bottom left corner.
– Insert a third opening pick to stop the adhesive from sticking back during the rest of the removal process. If you need help, you can always schedule a repair
Step 4
– Gently glide the opening pick’s tip along the bottom left corner, making your way pleasantly up the side.
– Continue this delightful journey around the top corner with the pick, allowing it to relax there and thwart any adhesive’s reunion.
Step 5
Hold your horses! Don’t go fully opening the phone just yet; that delicate fingerprint sensor cable is still cozying up between the back cover and the motherboard.
– Gently slide the opening pick from the bottom right corner up along the side to the top. You’re doing great!
– Now, slide the pick around the corner and carefully slice through the remaining adhesive at the top of the phone. Keep it up!
Step 6
– Gently lift the rear glass on the side where the volume button hangs out. Be careful, it’s a bit shy!
– Grab your trusty spudger and use its edge to pry up and disconnect the fingerprint sensor flex cable. It’s like giving it a little nudge to say, ‘Time to take a break!’
Tools Used
Step 7
– Get ready to rock by removing the rear glass.
– When putting things back together, groove to this guide to replace the adhesive and reinstall the rear glass.
– If you’re in the mood to switch things up, jam to this guide to transfer the rear camera bezel, including the fingerprint.
Step 8
– Take out the eight 4 mm Phillips #00 screws. If you need help, you can always schedule a repair
Step 9
– Slide an opening pick under the right edge of the plastic cover that houses the NFC antenna and charging coil. You’re on the right track!
– Gently twist or pry to free the plastic clips that are holding the cover in place. Keep it up; you’re doing great!
Step 10
– Slide an opening pick beneath the left edge of that plastic cover, just like you’re sneakily slipping a note to your friend.
– Gently twist or pry to unfasten those pesky plastic clips holding the cover in place. You’re almost there!
Step 11
– Gently take off the plastic cover that holds the NFC antenna and charging coil. You’re almost there!
Step 12
– Grab your trusty spudger and gently use the flat end to lift up the battery flex cable. It’s like giving it a little nudge to say, ‘Time to disconnect!’
Tools Used
Step 13
– Pop out the two 4 mm Phillips #00 screws keeping the plastic cover snug in its spot.
Step 15
– Unscrew those five 3.5 mm Phillips #00 screws and let the adventure begin!
Step 16
– Slide an opening pick under the top edge of the loudspeaker assembly with a gentle touch.
– Use that trusty opening pick to carefully lift the loudspeaker assembly up.
Step 17
– Time to rock and roll! Remove the loudspeaker assembly.
Step 18
– To kick things off, remove that trusty ol’ 3.5 mm Phillips #00 screw. It’s all part of the fun!
Step 19
– Grab your trusty spudger and gently pop up the headphone jack flex cable. If you need help, you can always schedule a repair
Tools Used
Step 20
– Grab a trusty pair of tweezers and gently pry out that headphone jack. You’re doing great!
Tools Used


