How to Replace Samsung Galaxy S9 Rear Facing Camera Tutorial
Duration: 45 minutes
Steps: 18 Steps
Hey there! Just a friendly reminder to take your time and be careful while working on your device. If you run into any bumps along the way, don’t hesitate to reach out for help. You can always schedule a repair if you need a hand!
The Samsung Galaxy S9 is a superstar with its single rear facing camera. If its lens gets cracked or scratched, just pop in a new camera like a pro. Make sure to keep it straight and steady when fitting the replacement camera. And hey, a heads-up: changing out the rear camera might make your phone a bit less waterproof, unless you swap out that adhesive seal on the back cover too. Keep it cool and smooth!
Step 1

– Hey there! Time to get this party started by turning off your phone.
– Grab your heated iOpener and show that rear glass who’s boss by applying it along a long edge. Let the iOpener work its magic for a solid two minutes.
Tools Used

Step 2

The adhesive on the inside of the back cover is arranged just like you see in the picture.
– Next up, we’re slicing through the adhesive that’s holding the back cover in place. You’ll be cutting through the sticky spots as shown:
Step 3


If the rear glass of your phone is cracked, the suction cup might not have the best grip. No worries! You can give it a lift with some strong tape, or if you’re feeling crafty, superglue that suction cup in place and let it set. Once it’s ready, you’re all set to move forward!
– Place a trusty suction cup firmly on the back cover.
– Gently raise the bottom edge of the back cover using the suction cup to create a small gap between the cover and the frame.
– Slide a trusty opening pick into the gap you’ve created and move it towards the bottom right corner.
– Bring in a second trusty opening pick and slide it towards the bottom left corner.
– Introduce a third opening pick to make sure the adhesive doesn’t sneakily reseal as you continue with the removal process.
Step 4


– Gently slide just the tip of your trusty opening pick into the bottom left corner and glide it up the side to the top. You’re doing great!
– Once you reach the top corner, keep that pick in place to stop the adhesive from getting all clingy again. Nice work!
Step 5


Hey there! Don’t swing that phone open just yet – that teeny tiny fingerprint sensor cable still links the back cover to the motherboard. Take it easy!
– Gently slide the opening pick from the bottom right corner up along the side to the top. You’re doing great!
– Now, slide that pick around the corner and carefully slice through the remaining adhesive at the top of the phone. Almost there!
Step 6


– Gently raise the side of the back glass where the volume button hangs out.
– Take your trusty spudger and sneak it in to pop up and unplug that fingerprint sensor flex cable.
Tools Used

Step 7

– Time to say goodbye to that rear glass! Let’s get it off.
– When you’re putting everything back together, just follow this guide to replace the adhesive and securely pop that rear glass back in place.
– If you’re thinking about swapping out your rear glass, check out this guide to help you transfer the rear camera bezel and the fingerprint sensor like a pro!
Step 8

– Time to roll up those sleeves! Grab your trusty #000 Phillips screwdriver and get ready to unscrew fifteen 4mm screws. You’ve got this!
Step 9

– Gently take out the NFC coil assembly. You’ve got this!
Step 10

– Time to say goodbye to the motherboard bracket! Gently remove it and keep it safe for later. You’ve got this!
Step 11

– Gently take off the speaker cover or antenna assembly. You’ve got this!
Step 12

– Pop the battery connection loose with a spudger. It’s easier than it sounds! If you need help, you can always schedule a repair
Tools Used


Step 15


– Gently pop out the SIM card using a SIM card remover or a straightened paper clip to push the release lever.
Step 16


– Gently coax the motherboard out of its cozy spot using your trusty spudger. You’ve got this!
Tools Used

Step 18


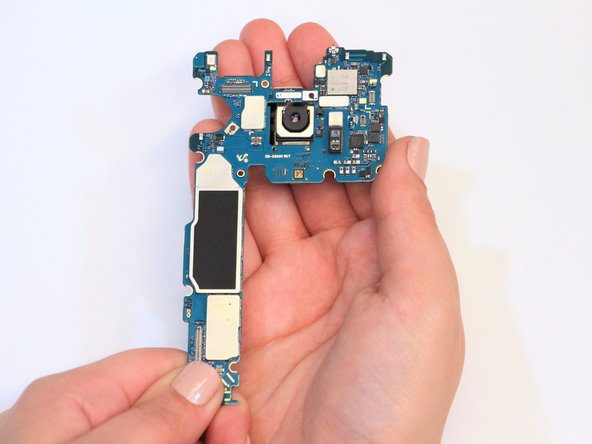
– Gently ease the camera out with your fingertips.


