How to Replace Samsung Galaxy Tab S 8.4 Battery – Guide
Duration: 45 minutes
Steps: 5 Steps
Batteries can sometimes lose their spark and stop holding a charge like they used to. If your battery refuses to charge or only lasts a few hours before calling it quits, it might be time for a new one. Don’t worry, this guide will walk you through the process of swapping out the battery in your device with ease!
Step 1
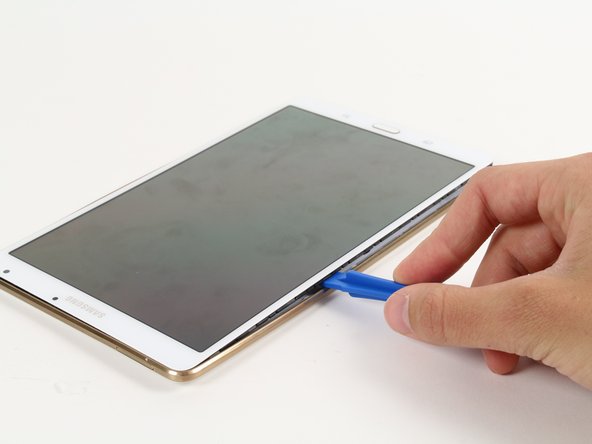
– Wedge your handy plastic opening tool right into the groove between the screen and the back cover—go ahead, it’s like slicing into a peanut butter sandwich, but gentler!
– Slide the tool downward and keep at it until you spot a little gap between the tablet and the back cover. You’re doing great—just keep it steady!
Step 2
Work your way around the edges, keeping it nice and steady, until the screen pops free from the device backing. Take your time—no rush!
If you’re tackling this back cover for the first time, heads up—it might feel like it’s glued shut. A little patience and some gentle persuasion will do the trick!
– Gently slide that nifty plastic opening tool all around the edge of your device, and with a little care, start prying the screen away from the back cover. You’ve got this!
Step 4
Handle the battery with care as it’s still hanging out with the device!
– The battery is stuck down, typically with some double-sided tape hugging the sides. Your mission, should you choose to accept it, is to gently lift the battery out by tugging on the folded white tab in the top right corner. If it’s feeling a bit too cozy, you might want to ease the adhesive’s grip by sliding a flat, thin plastic tool under the edges of the battery first. You’ve got this!
Step 5
Hey, no tugging on those wires like you’re playing tug-of-war! If it’s being stubborn, grab a plastic opening tool and gently slide it between the white connector and the board to pop it loose—no stress, no mess.
– Put your device back together by following these steps in reverse.
– Cancel: I didn’t get through this guide.
– If you need help, you can always schedule a repair.
Success!


