How to Replace Steam Deck Action Buttons ABXY Guide
Duration: 45 minutes
Steps: 25 Steps
Friendly reminder:
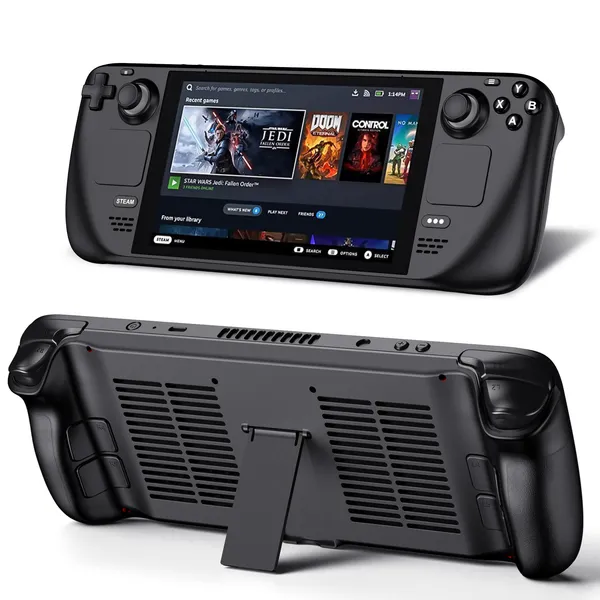
Get ready to swap out those action buttons (ABXY) and their membrane in your Steam Deck LCD! Just a quick reminder to keep it safe and sound by following those electrostatic discharge (ESD) safety steps while you work on your device. Oh, and a heads up: Valve rolled out some snazzy internal design updates for Steam Decks starting in early 2023. So, if your Steam Deck looks a bit different from the photos, no worries—the process is still the same! To find out which version you’ve got, just pop off the back cover. An original Steam Deck will flaunt a shiny metallic motherboard shield and a fan with square edges, while the refreshed version will sport a sleek black motherboard shield and a fan with those stylish curved sides. Let’s get to it!
Step 1


Fire up your Steam Deck and let that battery dip below 25% before diving into repairs. Remember, a charged lithium-ion polymer battery can be quite the troublemaker if it gets punctured accidentally!
Got a microSD card in there? Be sure to pop it out before you start opening up your Steam Deck! Trying to remove the back cover with it still in could lead to a snap—ouch!
When you’re diving into the repair, consider giving your Steam Deck a comfy rest in its case, facing downwards to keep those thumbsticks happy and avoid any wobbles.
For an extra layer of security, follow Valve’s suggestion to switch your Steam Deck into battery storage mode in the BIOS before delving into any internal fixes. Learn how to do this here.
– First things first, let’s give your Steam Deck a little break! Power it down and unplug all those pesky cables.
Step 2

As you dive into this repair, keep an eye on each screw and make sure it finds its way back home to prevent any mishaps with your Steam Deck.
Even though Phillips screwdrivers come with standard sizes, they can be a bit quirky—two drivers marked the same size might fit differently in the same screw. Go for the one that fits snugly into the screw head for the best results.
– Grab your trusty Phillips driver and let’s dive in! Start by unscrewing the eight screws that are holding the back cover in place:
– Four sturdy coarse thread screws that are 9.5 mm long
– Four sleek fine thread screws that are 5.8 mm long
Step 3


If you’re having a tough time getting your pick into that grip seam, why not give it a go from the top or bottom long edges first? Just slide that pick down towards the grip and you’re on your way!
– Slide an opening pick into the slim space between the back cover and the front shell, right along the edge of that right grip.
– Gently pry up on the back cover to pop it free from those pesky locking clips.
Step 4


Disconnecting the clips from one edge will make the rest a breeze to disconnect as well.
– Grab the back cover by the little opening you just made and gently tug it upward and away from the device to release those long edges.
– Now, go ahead and take off the back cover.
Step 5


If your Steam Deck has the snazzy new black motherboard cover, feel free to skip this step and save some time!
Try to keep that tape intact if you can; it’s like a little piece of history you can reuse! If it does tear, no worries—just grab some aluminum foil tape and cut a piece to fit. You’ll do great!
– Grab a trusty pair of tweezers and gently peel away the piece of foil tape that’s hiding the sneaky screw on the board shield. You’ve got this!
Tools Used

Step 6


Hey there! In the refreshed Steam Decks, you’ll only find the two 3.7 mm screws hanging out along the left edge. Keep an eye out for those little guys!
– Grab your trusty Phillips driver and let’s get those screws out! You’ll need to remove three screws to free the board shield:
– One screw measuring 3.4 mm – nice and easy!
– Two screws at 3.7 mm – just a little bit longer, but you’ve got this!
Step 7


Depending on how long you’ve had your Steam Deck, this shield might be a little clingy with the thermal pads below it.
– Time to rock and roll! Lift off the board shield like a champion.
– When putting things back together, make sure the fan cable is hanging out on the side of the board shield, not getting squished underneath. You got this!
Step 8


– Hold onto the battery cable by its handy pull tab and gently tug it straight out from the motherboard to unplug it. Keep it cool, you’ve got this!
Tools Used

Step 9

Hey there repair champ! Get ready to rock this repair dance with the Steam Deck. Fun fact – the right trigger will cheekily show up on your left when the Deck is chillin’ upside down. Those triggers are all about peg partying on the trigger bracket, which moonlights as a slick hinge. Double-check that trigger spring—it’s gotta be alignin’ like a boss. Test that trigger action before we high-five and move on to reassembly. You got this!
– Get ready to work some magic! Place the flat end of a spudger right on the inside edge of the trigger’s clip.
– Time to show that trigger who’s boss! Pivot the trigger clip out, away, and up from the peg to set it free.
– You’re a pro at this! When putting things back together, start with the outermost peg. Once that’s snug, push down on the trigger to lock in the innermost peg, making a satisfying ‘click’ sound.
Tools Used
Step 10


Be sure to keep an eye on the trigger spring – it has a sneaky way of wanting to wander off! It snugly fits onto a peg on the underside of the trigger, so let’s make sure it stays put.
– Take off the right trigger with care.
Step 11

– Grab your trusty Phillips driver and unscrew those three 5.2 mm screws holding down the right trigger bracket. You’ve got this!
Step 12

– First up, let’s detach that right trigger bracket. Easy peasy!
– Once you’ve got your replacement triggers, don’t forget they might need a little calibration to get them working just right. For the nitty-gritty on how to calibrate those new triggers, check out this calibration guide.
Step 13


Grab the cable using the cool blue pull tab, never the cable itself.
Step 14


As you put everything back together, just remember to keep the Steam Deck lifted off the work surface to avoid resting it on that shiny new thumbstick while you snug up those screws. You’ve got this!
– Grab your trusty Phillips driver and let’s get those three 5.2 mm screws out that are holding the thumbstick in place!
Step 15

– Let’s jazz it up a bit! Remove that right thumbstick with a flourish.
Step 16


Hold onto the cable using the blue pull tab, and give the cable itself a break!


Step 18


– If those connectors are all wrapped up in tape, grab some tweezers and gently unwrap them like a present.
– Now, it’s time to show those little locking flaps who’s boss with the spudger’s pointy end. Lift them up on the other button board ZIF connectors. Then, use your tweezers to slide those cables out like a magician performing a trick:
– Give the action buttons cable a break and disconnect it.
– Show some love to the touchpad board cable and disconnect that too.
– Last but not least, free the touchpad cable from its shackles.
Step 19


Be careful when lifting this connector—make sure to pry it up gently from the connector itself, not the surrounding housing. You’ve got this!
Hey there! If you want to keep the haptics connected to the button board, just flip the board up and over the edge of the shell to tuck it out of the way. Easy peasy!
– Gently use the pointed end of a spudger to nudge the haptics cable up and disconnect it. You’ve got this!
Tools Used
Step 20

– Grab your trusty Phillips driver and let’s tackle those screws holding the right button board in place:
– Three screws measuring 5.2 mm
– One screw measuring 3.9 mm
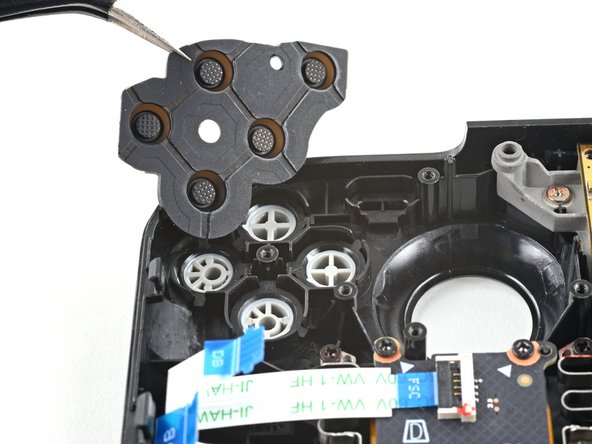
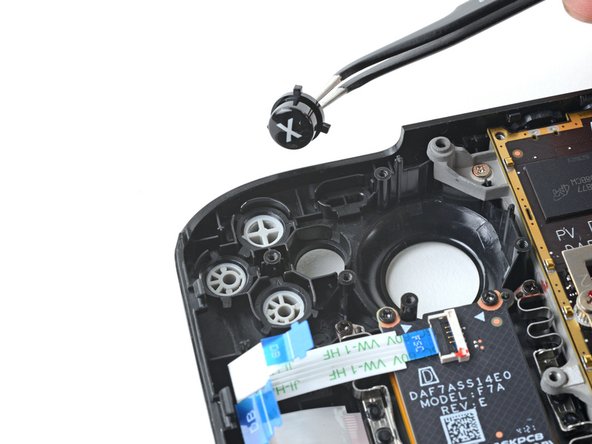
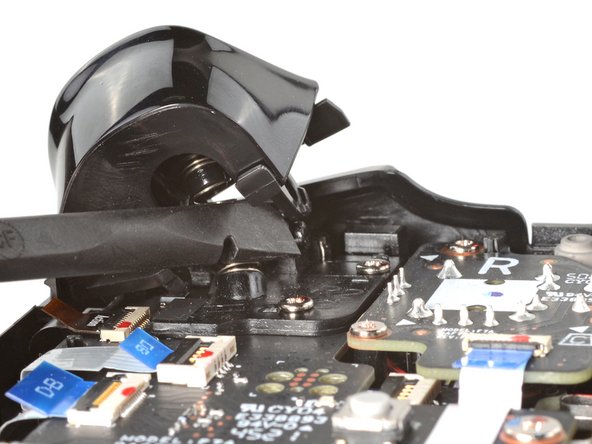
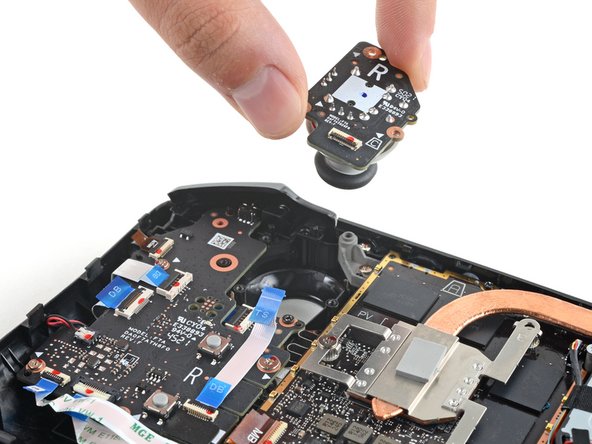
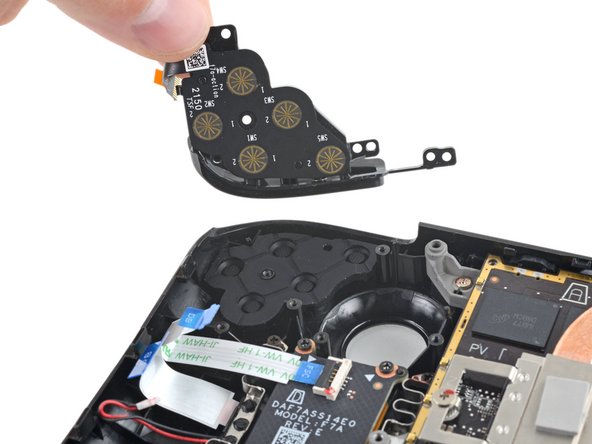
Step 21


Keep an eye on the quick access button and its membrane! Once you pop off the right button board, they might just decide to go on a little adventure of their own.
– Say goodbye to the right button board and gently remove it from its cozy spot.
Step 22

– Grab your trusty Phillips driver and gently unscrew the two 5.2 mm screws that are holding the right bumper assembly in place. Let’s get that bumper off with style!
Step 23

– Go ahead and take off that right bumper assembly! You’ve got this!