How to Replace Thermal Paste in Laptops Generic Guide
Duration: 45 minutes
Steps: 13 Steps
This guide is a handy starting point—your laptop’s specific repair steps might vary a bit from what’s here, but don’t sweat it! The overall process will still be similar. If you need help, you can always schedule a repair.
Ready to give your laptop some love? This guide will walk you through the steps to reapply thermal paste. Keep in mind, every laptop is a little different, so your process might vary slightly, but the core idea remains the same. If you’re looking to refresh thermal paste in your phone, this guide is also your go-to! Thermal paste plays a vital role in keeping our devices cool by transferring heat from the processor to the heat sink. Skipping this step when putting your laptop, tablet, phone, or PC back together can lead to overheating and potentially permanent damage. Just a quick reminder: always keep electrostatic discharge (ESD) safety procedures in mind when taking apart your device. If you need help, you can always schedule a repair.
Step 1
Make sure to power down and unplug your laptop before diving in!
– Shut the display and gently turn the whole laptop upside-down.
Step 2
– If your laptop is hiding some sneaky screws under those rubber feet, grab a spudger or an opening pick and gently pry them out. You’ve got this!
Tools Used
Step 3
As you tackle this repair, keep an eye on each screw and remember to place it back in its original spot. This little trick helps prevent any accidental damage to your laptop.
– Grab your trusty screwdriver and get ready to tackle those screws holding the back cover in place. You’ve got this!
Step 4
– Grab your trusty spudger or an opening pick and gently pry up that back cover. You’ve got this!
– Now, make your way around the entire edge of the laptop, giving it a little twist with your tool to release the back cover. Keep going, you’re almost there!
Tools Used
Step 5
– After you’ve popped all the clips loose, gently lift the back cover up and away from the laptop to set it free!
Step 6
Hey there! Make sure you don’t breeze past this step. Unplugging your laptop’s battery is super important for your safety before diving into any repair.
Battery connectors come in all shapes and sizes! Some just slide right into place, while others like to click or snap in. A few even have nifty locking mechanisms or handy pull-tabs to make your life easier. Just remember, each one has its own personality!
– Gently pry away the battery connection using the tip of a spudger or your trusty finger! You’ve got this!
Tools Used
Step 7
– Grab your trusty screwdriver and get to work removing those screws that are holding the heatsink in place on the chassis. You’ve got this!
– And when it’s time to put everything back together, just remember to follow the steps in reverse. You’re almost there!
Step 9
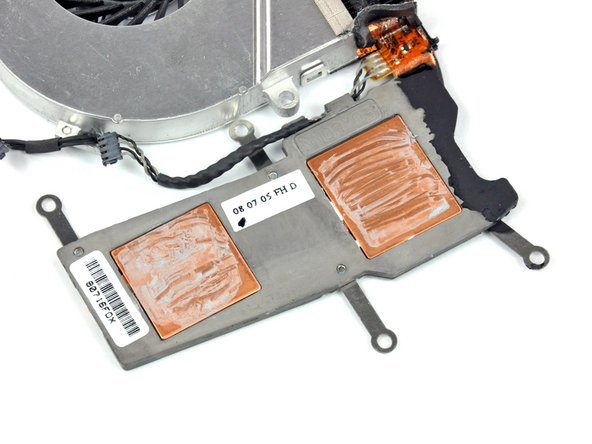
Before slapping on that fresh thermal paste, make sure to wipe away any remnants of the old stuff and clean up the processor and heat sink surfaces. It’s like giving your tech a little spa day before the big makeover!
– Grab your trusty spudger and gently use the flat end to scrape away as much of that stubborn, solidified thermal paste from the heat sink as you can. Let’s get that surface shining again!
Tools Used
Step 10
Keep your hands off that freshly cleaned heat sink surface! Even the tiniest dust speck or a pesky fingerprint can mess with the magic of thermal paste. Let’s keep things cool and efficient!
– Grab a coffee filter or a lint-free cloth and add a couple of drops of isopropyl alcohol (yep, that’s IPA, over 90% concentration) to wipe away that pesky thermal paste residue on your heat sink’s contact surface.
– Once you’ve tackled the bulk of the grime, take a fresh coffee filter or lint-free cloth and dab it with a little more IPA to banish any lingering oils or extra residue.
– Now, let that heat sink dry completely – it deserves a little time to breathe!
Tools Used


