How to Unlock Nintendo Home Console: Step-by-Step Guide
Duration: 45 minutes
Steps: 7 Steps
The Nintendo 64 is a treasure trove of legendary cartridge-era games. Unfortunately, some of these classics are locked behind regional restrictions. But don’t sweat it—unlocking your console and making it universal is a breeze! In most cases, it’s just a matter of removing the top cover. What you’ll need: Along with the essential tools, you’ll require a universal cartridge slot. You can either order one from Shapeways or 3D print it yourself using a .sti file from Thingiverse. If neither option works for you, grab a Dremel and carefully modify the existing slot. That said, for a cleaner finish or if you’re planning to resell the device, the first two methods are strongly recommended.
Step 1

– Pop off that expansion pack cover by pressing the tab and giving it a little tug. Easy peasy!
Step 2

If your system has a jumper pack, simply follow the same steps to remove it.
A small spoon works just as well as a spudger if you don’t have one on hand.
– Use a metal spudger to gently pry the expansion pack out. It should pop right out with a little leverage.
Tools Used

Step 3

– Time to dive in! Flip your device over and unscrew those six bottom-side screws marked in the example. Grab your trusty gamebit head or screwdriver and get to work—you’re doing great!
Step 4

– Let’s get started by removing the two front feet of the N64. This is the first step in giving your old console a brand new life!
Step 5

– Flip it so the top side is facing up, and gently lift off the top cover. Easy does it!
Step 6


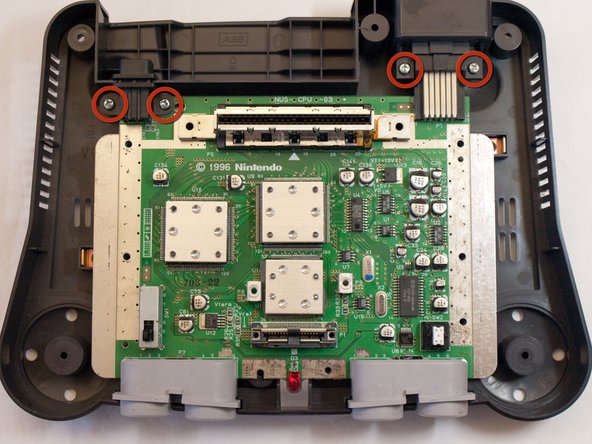
– Time to get started! Flip the top over and track down the two screws that keep the current slot in place – they’re the key to unlocking this repair.
– Now it’s time to get hands-on! Use a trusty Phillips head screwdriver to remove the screws and gently take out the slot. Easy does it!
Step 7
Make sure the fresh slot lines up perfectly with the opening at the top of the console—like peas in a pod!
– To put everything back together, just reverse these steps and you’re good to go! Your device is now ready to use.
– You did it! If you need help with anything else, you can always schedule a repair
Success!