HP Compaq 6710b Screen Replacement
Duration: 45 minutes
Steps: 16 Steps
Swap out your screen in a snap and with a smile!
Step 1

Power down your computer before removing the battery! Yanking it out while it’s still running? Not cool, and definitely not safe.
– Turn the laptop over to its backside, like you’re giving it a spa treatment.
– With both hands, squeeze those tabs while gently sliding out the battery. Easy does it!
Step 2


Make sure to power down your computer before diving in.
The screws might hang on a bit and not completely pop out of the laptop, so just make sure to twist them as far as they’ll go.
– Flip over your laptop like you’re showing it some love, back side up.
– Grab your trusty Phillips #1 screwdriver, unscrew that 5mm screw, and pop off the cover—it’s like peeling off a sticker, but way more satisfying.
– With the same screwdriver, tackle those 8mm screws. Go ahead, you’ve got this!
Tools Used

Step 3

– Flip your laptop upside down to reveal the top side, and pop it open like you’re unlocking a treasure chest.
– Gently slide the locking tabs downward, using either a trusty blue plastic opening tool or your fingernail. You’ve got this!
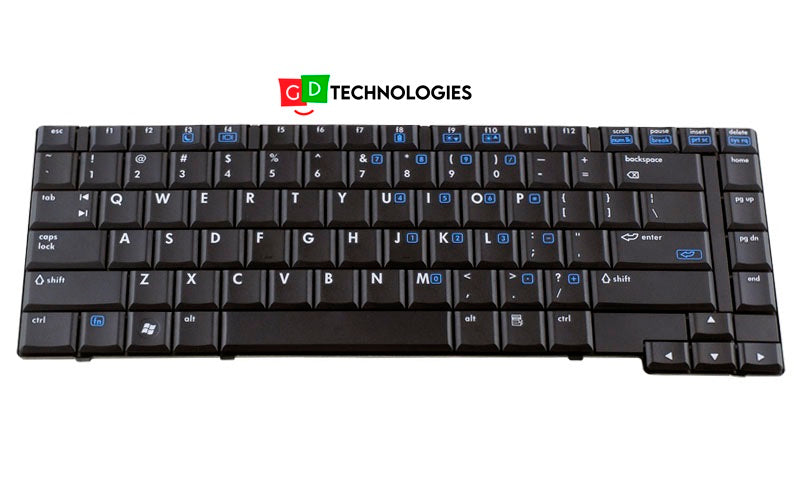
Step 4


Hey there! Just a friendly reminder: don’t completely detach the keyboard, as it’s still connected to the computer with a ribbon cable. Keep it cozy!
– With your trusty plastic prying tool in hand, gently coax the keyboard upwards towards you. It’s like giving it a little hug to help it come free!
Step 5

– Time to set that keyboard free! Pull up on both sides of the black locking tab that’s holding the connector in place.
– You did it! The keyboard should now be completely detached from the computer.
Step 6

– Gently slide your fingers under each side of the plastic lock on the ribbon cable and lift it up with care.
Step 7


– Time to get under those plastic hinge covers! Use a flathead screwdriver to gently pry them up until they pop off.
– Now, let’s tackle the power button. Carefully lift the right edge of the plastic strip covering it, and then gently pull it up until the whole strip comes free. Easy does it!
Step 8

– Grab your trusty flathead screwdriver, give the connector next to the fan a gentle wiggle on both sides, and coax it out like a pro.
Step 9

It’s a good idea to pop this screw back in right after you detach the cable. It plays a key role in keeping the hinge snugly attached to the lower part of your laptop.
– Grab your T9 Torx screwdriver and let’s get to work! Start by removing that single 7mm screw located on the left hinge. You’re doing great!
Step 10

– Grab your trusty blue plastic opening tool and gently pop off the rubber screw covers on the screen. You’ve got this—just take it one step at a time!
Step 11

– Grab your trusty T9 Torx screwdriver and let’s tackle those top four 5 mm screws together!
– Next up, let’s take care of the bottom two 6 mm screws using the same screwdriver. You’ve got this!
Step 12


Push the screwdriver tip down (by tilting the handle upward), and voilà—the screen panel comes off like a charm.
– Grab a flat head screwdriver and start lifting the plastic screen panel near one of the hinges—just slide it under and give it a little nudge!
– Keep the flathead moving along the edges of the screen, gently loosening up the plastic until it pops off. No need to rush, steady hands win the day!
Step 13


It’s a breeze to tackle both sides at once!
– Gently ease the screen away, taking your time like you’re opening a bag of your favorite snacks—careful and steady!
Step 14

– With a little finesse, gently disconnect the two cables located near the hinges. You’ve got this!
Step 15

– Grab your trusty T9 Torx screwdriver and unscrew those four 4mm screws—easy peasy, you’re totally crushing it!
Step 16


Be careful to only go far enough to reach the bottom screws, so you don’t accidentally mess up that bracket!
– To put everything back together, just work your way back through these steps in reverse. If you need help, you can always schedule a repair
– You did it!
Success!