iMac Intel 27″ Retina 5K Display iSight Camera and Microphone Cable Replacement
Duration: 45 minutes
Steps: 32 Steps
Follow this guide to swap out the iSight Camera and Microphone Cable in your iMac Intel 27″ Retina 5K Display. It’s easier than it sounds, and you’ll be back to snapping pics and chatting away in no time! If things get a bit tricky, remember that we’re here to help—just schedule a repair if you need assistance.
Step 1

– Once the hinge is free to roam, the iMac may feel a bit wobbly and awkward to work on. While you can tackle repairs with the iMac laying flat, they’ll be much swifter and smoother with the help of an iMac service wedge. Trust us, it makes a difference!
– If you’ve got your hands on the iFixit cardboard service wedge, check out these assemble-it-yourself directions to get it all set up.
Step 2


The hub on the iMac Opening Tool is designed to keep you from pushing the wheel in too far, so you can avoid those pesky accidents. If you decide to go rogue with a different tool, just remember to limit your insertion to no more than 3/8″ (9.5 mm) into the display. Going deeper could sever some antenna cables and lead to major mishaps. Stay safe and happy repairing!
– Begin your adventure on the left side of the display, right by the power button. Take that iMac Opening Tool and gently slide it into the little gap where the glass panel meets the rear case. You’ve got this!
Step 3


Always keep the handle behind the cutting wheel when pushing forward—pulling could pop the wheel right out!
– Think of the tool like a pizza cutter—just roll it along the gap, and watch it slice right through the foam adhesive, nice and steady.
– Glide the tool up the left side of the display like you’re tracing a line—smooth and easy does it!
Step 4


– Keep rolling that tool up and around the top left corner like you’re on a fun little adventure!
Step 5


– Carefully slice through the adhesive in the top-left corner of the display like a pro.
Step 6


Take your tool and glide it back and forth over the area you’ve already cut a few times. This helps loosen up as much of the adhesive as possible and gives you the best shot at a clean separation.
– Keep moving steadily along the top edge of the display—you’re doing great!
Step 7


– Gently glide the tool around the top right corner of the display, like you’re tracing a little path to success!
Step 8


– Now it’s time to get this repair rolling – literally! Carefully wheel the tool down along the right side of the display.
Step 9


Take that tool for another spin around the entire edge of the display—let’s make sure you’ve sliced through as much adhesive as you can!
– Keep pushing that trusty opening tool all the way to the bottom of the right side of the display. You’re almost there!
Step 10


Don’t push it more than 3/8″ (9.5 mm) in – going any further might cause some damage to the internals. Keep it gentle!
The opening tool has done most of the heavy lifting, but you’ll still need to coax the display away from the case with a plastic card to break the remaining adhesive bond.
– Get your iMac ready for its makeover by placing it face-up on a flat surface, like a table.
– Now, let’s get this repair party started! Begin at the top right corner of your iMac and carefully slide a plastic card between the display and the frame.
Step 11


Handle with care! Applying too much pressure could shatter the glass. Take your time and aim for a gap no bigger than about 1/4″ (6 mm).
– Carefully twist the plastic card to create a gap between the display and the frame, and trim away any leftover adhesive near the corner.
Step 12


Make sure to pause your cutting action before reaching the iSight camera in this step; otherwise, you might accidentally give it a little too much love and cause some damage.
– Glide the card gently toward the middle of the screen to slice through any leftover adhesive like a pro.
Step 13


– Place the card back in the corner and let it chill there to prevent the adhesive from making a comeback.
Step 14


– Slide a second card into the space between the display and frame at the top left corner like a pro.
Step 15


Just like the other side, take it slow and steady to help the adhesive give way, and remember to treat that display glass with care—no need to put it under too much stress!
– Gently twist the card to create a little extra wiggle room between the display and the frame.
Step 16


– Gently slide the plastic card towards the center, stopping just short of the iSight camera – you’re making great progress!
Step 17


– Time to get that card back where it belongs! Gently insert it into the top left corner, making sure it’s securely in place.
Step 18


Lift the display just a tad—it’s still connected to the iMac with some data and power cables, so let’s keep it cozy.
– Slide the cards into the corners as shown, and give them a gentle twist to nudge the display and case apart.
– If any spots feel stubborn and refuse to budge, pause the twisting and use a card to carefully slice through the adhesive in that area.
– Now, start lifting the top of the display away from the frame.
Step 19


Carefully lift the display up, just enough to get a good look at the connections – about 8 inches should do the trick. Be gentle, you don’t want to stretch those cables and put stress on their connections.
– While keeping the display lifted with one hand, use your other hand to gently disconnect the display power cable.
Step 20


Handle this connection with care—it’s a bit fragile! When removing the display data cable connector, aim straight for the top of the iMac and gently pull it out of its socket.
– Gently lift the metal retaining bracket on the display data cable—it’s like opening a tiny treasure chest.
– Carefully unplug the display data cable and set it free like a bird taking flight!
Step 21


Right now, there’s still a strip of adhesive hanging out at the bottom of the display, acting like a hinge to keep it snug against the frame. To loosen this sticky situation, just give the display a gentle up-and-down wiggle a few times.
– Raise the display to a nearly upright angle, just like you’re giving it a little pep talk!
– Carefully peel away as much of the adhesive as you can by gripping it at the edges, then gently pull or roll it toward the center like you’re wrapping up a cozy burrito.
Step 22


Please take extra care to avoid touching the leads of the capacitor or any exposed solder joints on the back of the power supply (highlighted in red).
– If you’re still struggling with those pesky bits of adhesive, grab a plastic card and gently work your magic to slice through any remaining strips. You’re doing great!
Step 23


Handle the display with care—it’s a big, heavy, and fragile piece of glass. Be gentle when lifting it, and try not to grab it by the corners. We want you to get through this repair with a shiny new screen, not a broken one!
– Gently lift the display away from the frame and set it aside on a soft, flat surface—treat it like the treasure it is!
– If the adhesive resists, try lifting from one side gradually to peel it away—it’s all about patience and finesse.
– Once the adhesive is removed, it’s a one-way ticket—it won’t stick the display back in place. When you’re done with your repair, use this guide to replace the adhesive strips that keep the display snugly attached to the rear enclosure. You’ve got this!
Step 24

When swapping out the display panel, don’t forget to check if you need to move over any extra components from the old panel to the shiny new one. Take a good look at the back of your old display and the replacement display side by side. Make a note of any cables, sensors, or foam cushioning that might be missing from the new display. You’ve got this!
– Before you dive in, if there’s a sneaky wire or cable hiding under some adhesive tape, make sure to peel that tape off first—it’s the polite thing to do!
– If you find a cable that’s stuck to the chassis with some stubborn glue, give it a little warmth with a heated iOpener or a hair dryer to loosen things up. After that, slide an opening pick underneath that cable like a pro to free it up. Just remember, no tugging on those delicate connectors—they’re more fragile than they look!
– Now, grab an opening pick and gently slide it under those foam cushion pieces to separate them from the display. Carefully pull them off, and if they need a little help sticking to the new display, a bit of double-sided tape will do the trick.
Step 25


– Gently grab your trusty spudger and use its tip to pop the fan cable connector out of its socket on the logic board—easy peasy, like a pro!
Tools Used

Step 26

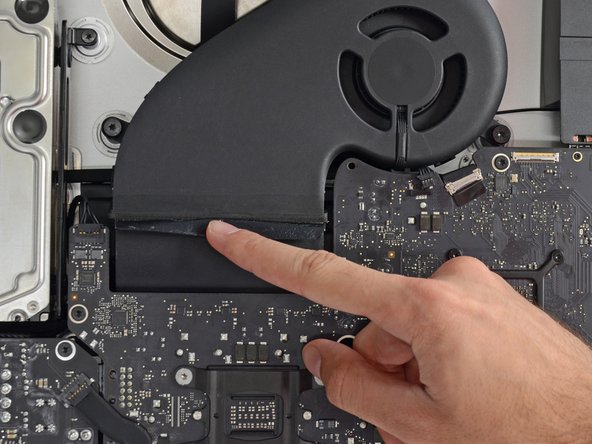
– Gently use your fingers to peel back the black tape connecting the fan to the exhaust duct just a bit. Take your time, and remember, we’re in this together!
– Keep the tape stuck to the exhaust duct; we just need to reveal the join to set the fan free. You’ve got this!
Step 27

– Grab your trusty T10 Torx screwdriver and get ready to unscrew! Remove the three 12.4 mm screws that are keeping the fan in place.
Step 28


– Time to get that fan out of there! Remove the fan from the iMac – it’s the first step towards a cooler, quieter machine.
Step 29

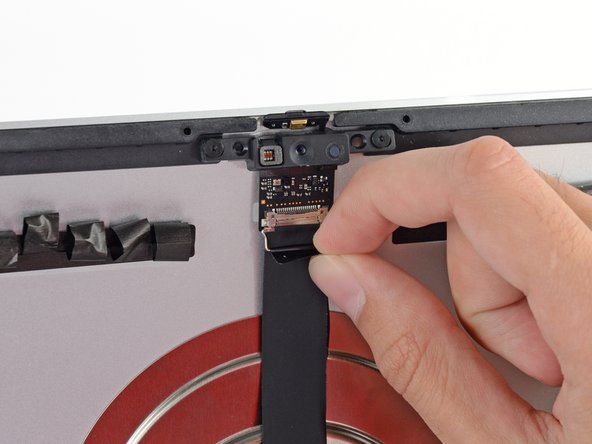
– Gently flip down the metal retaining bracket on the iSight camera cable. Keep it light and easy; you’re doing great!
Step 30
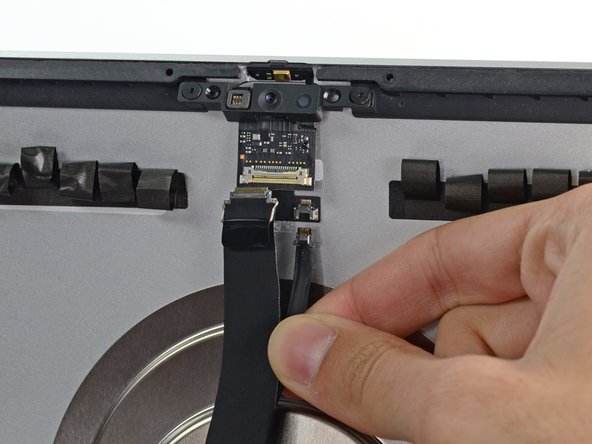

Handle these delicate connectors with care—they’re fragile! Gently tug the two connectors straight down to pop them out of their sockets without a hitch.
Just a friendly reminder to disconnect only the iSight connector—don’t worry about the microphone connector because it’s on a different branch of the cable. You’ve got this!
– Gently unplug the iSight camera cable from its home on the camera board—it’s ready for a little breather!
– Carefully detach the microphone cable from its snug socket—you’re doing awesome!
Step 31

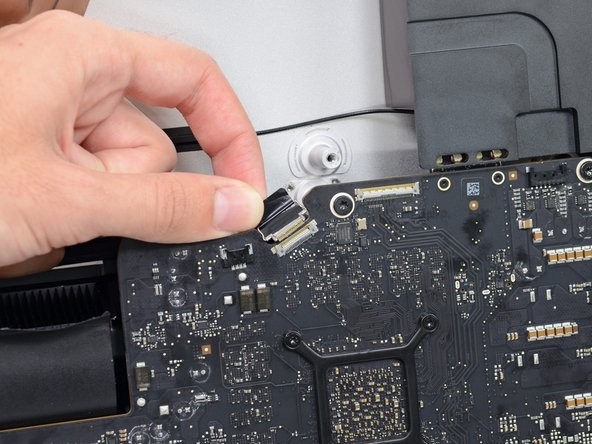
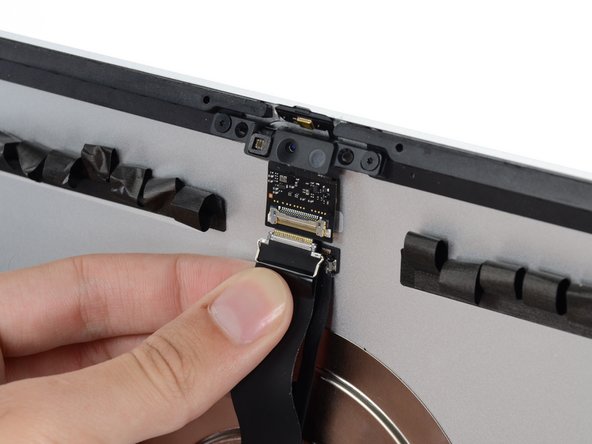
This connection is a bit on the fragile side, so handle it with care! Gently pull the camera cable connector straight out of its socket, aiming toward the top of the iMac.
– Time to set that iSight camera cable free! Flip up the metal retaining bracket to get started.
– Gently slide the iSight camera cable out of its socket on the logic board – you’re making great progress!
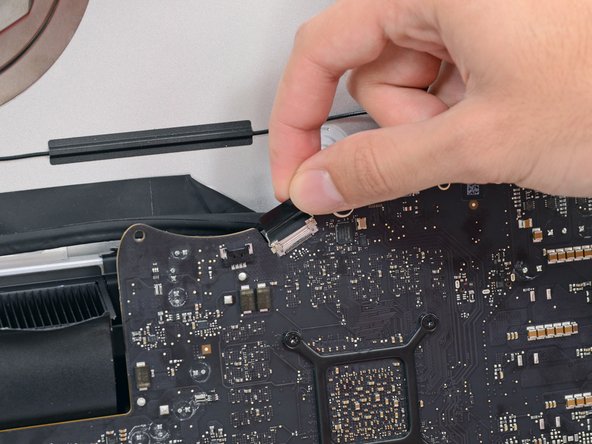
Step 32
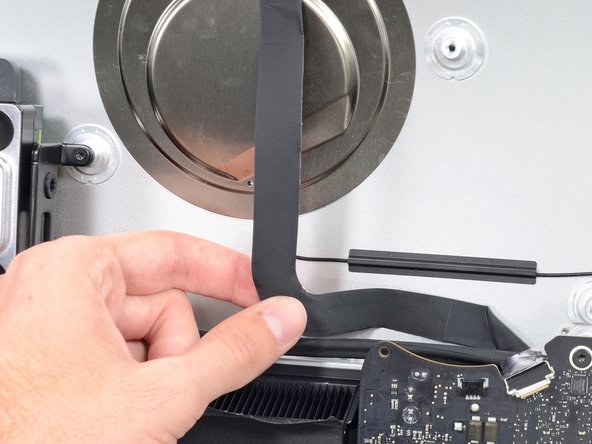
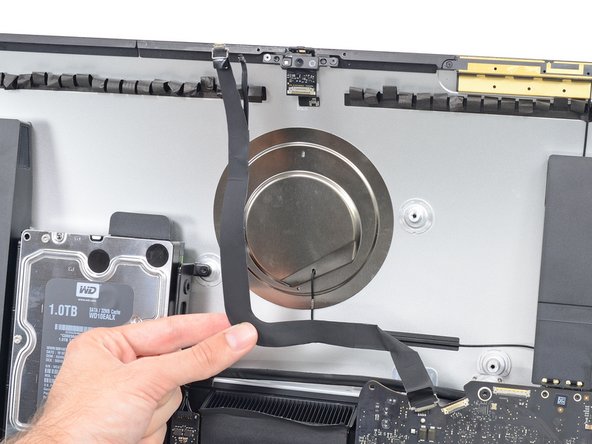

If you’re finding it tough to lift the cable due to the sticky adhesive, grab a spudger to give it a little nudge and help it come loose.
– To put your device back together, just retrace your steps and don’t forget to use our handy Adhesive Strips Guide to get that display glass securely back on.
– Got some e-waste? Don’t throw it away! Take it to an R2 or e-Stewards certified recycler for a responsible recycling option.
– Things not going as planned? No sweat! Check out some basic troubleshooting or reach out to our Answers community for a little extra help.
– If you’re feeling stuck, remember that we’re here for you. If you need assistance, you can always schedule a repair.
Tools Used
Success!