iPad 3 4G Teardown
Duration: 45 minutes
Steps: 28 Steps
Is it the New iPad? The iPad HD? The iPad 3? Honestly, who’s counting? What matters is it’s here, and we’re diving into the iPad 3 4G teardown. Stay in the loop by following the latest updates.
Step 1


- Luke made a quick trip to the Telstra store in Melbourne, Australia and snagged the iPad 3, so we could dive right into taking it apart.
- Big shoutout to Macfixit Australia for letting us use their space to break down this device!
- Tech Specs:
- Dual-core Apple A5X processor
- 9.7 inch LCD with backlit in-plane switching LED and a sharp 2048×1536 Retina display
- Quad-core graphics processor
- Available with 16, 32, or 64 GB of flash memory
- 5 MP HD rear camera
Step 2

- Alright, it's showtime! What does our teardown pro need to take apart the latest iPad at the crack of dawn on the other side of the globe?
- Even though we're based in the U.S. and the iPad 3 made its grand entrance in Australia, we're pretty sure it’ll still play nice.
- So, what’s on the list? A Pro Tech Toolkit, a can of Red Bull for that extra boost, and—naturally—the iPad 3 itself.
Step 3


- Looks like we jumped the gun. The 4G LTE on the iPad 3 doesn’t actually work down under in Australia.
- Wait a second, which iPad are we dealing with? iPad 2 3G? iPad 3 4G? Or maybe iPad N (N+1)G?
- Good news: the model number is unique, unlike some of Apple’s other devices. This one’s model number is A1430.
Step 4


- So, here’s a peek at the back of the new 'new iPad'. Can you guess what it reminds us of?
- The 5 MP iSight camera is a huge upgrade. It features autofocus, face detection, 1080p HD video recording, and video stabilization. A big jump from last year's 0.7 MP camera, right?
- The 2048×1536 Retina display isn’t exactly jaw-dropping when the iPad is off, but let’s be real, we didn’t travel halfway around the world just to play Punch a Hipster.
Step 5


- A little heat, some guitar picks, and a trusty plastic opening tool will do wonders when it comes to easing that front panel off. It's like a quick workout for your device—nothing too strenuous, but just enough to get things moving.
Step 6

- Just like the previous model, disassembling the new iPad is quite a challenge. The glass is firmly glued to the case, which makes typical repairs and battery swaps a tough nut to crack.
- On launch day, Apple is expected to move around 1 million units, and this tricky design choice is bound to have a notable impact on the environment.
- We've covered the challenges of Apple's hard-to-repair iPad design in detail over at Salvation Repair. Check it out if you're curious!
- Ever completely wrecked a textbook? With iBooks, you can now avoid that disaster!
- Yes, the iPad can be repaired—but it’s a bit of a stretch.
Step 7


- For those tough displays, make sure you bring out the big guns—heavy-duty suction cups are your best friends here.
- Guess what? The first legit, owned iPad 3 has made history as the first ever opened iPad... anywhere!
- Surprise! The new iPad has a face, and it's not exactly thrilled. Sound familiar?
Step 8


- Quick shoutout from us here at Salvation Repair!
- We’re not just about breaking things down—we also offer parts and a whole bunch of tools to help you fix them back up.
- Like this all-in-one electronics toolkit we used to take apart the new iPad. Trust us, it’s worth having around and pays off the moment you put it to work!
- We stock Mac parts & upgrades, iPhone screen repair components, kits to tackle the notorious Xbox Red Ring of Death, and much more.
- Your support helps us keep building free, step-by-step repair guides for everything under the sun.
Step 9


- Alright, the display is tightly attached to the case, but no worries – we're pros at handling screws, so this will be a breeze.
- Instead of admiring the sharp 264 pixels per inch on this fresh device, we're going to lift out the well-loved display. Why? Because that's how we do things around here.
- As we gently lift the LCD, it's like we can almost hear the 3,145,728 pixels saying their goodbyes as they make their exit from the iPad 3.
Step 10


- Now it's time to cut the umbilical cord connecting the display and touchscreen—let's set them free!
- Just a heads-up: as shown in our sneak-peek video, the display connectors for the iPad 2 and iPad 3 are different, so their displays aren’t interchangeable... at least for now.
Step 11


- The model numbers located on the back of the 9.7 inch LCD suggest that we’ve got ourselves a Samsung LCD here!
- Next to those numbers, there are three intriguing matrix barcodes. They might be a curious puzzle for the teardown pro, but beware! What do they really do? Our hunch: they might just crash your iPhone or magically transform it into an iPad... so scan with caution!
Step 12


- To keep that logic board snug as a bug, grab those connectors and screws! They're your best buddies in this repair journey.
- We may not have a knack for poetry, but with our trusty spudger and screwdriver, we're all about making repairs happen like pros.
Tools Used

Step 13


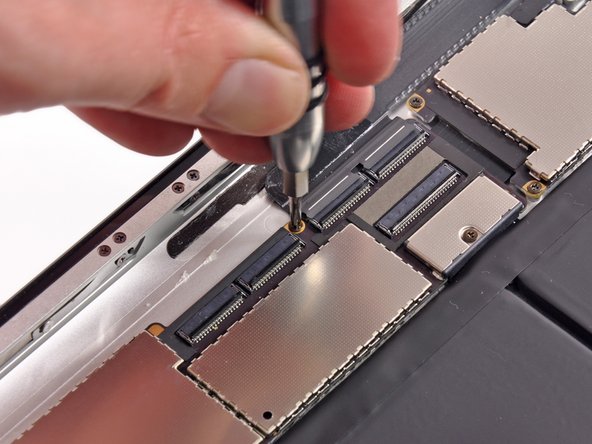
- Alright, iPad, it's time to part ways with your logic board. Gently now.
- Thanks, Siri... Wait, Siri? Are you there? (cue silence)
Step 14


- Logic board is out and ready for inspection!
- With a sprinkle of leftover pixie dust from our iPhone 4S teardown, we'll carefully lift off the EMI shields to get a clear view of the logic board underneath.
Step 15

- Let’s talk chips! Here’s a quick rundown of the cool components on the non-A5X side of the logic board:
- Texas Instruments CD3240 driver device
- Broadcom BCM4330 802.11a/b/g/n MAC/baseband/radio with built-in Bluetooth 4.0+HS and FM transceiver
- 2 x 4Gb Elpida LP DDR2 chips making up 1 GB DRAM in separate packages, arranged in a 64-bit setup
- Fairchild FDMC 6683
- Broadcom BCM5973 I/O controller
- Broadcom BCM5974 microprocessor
- Apple 338S0987 (Cirrus Logic audio codec)
Step 16

- We've got one more note from our fabulous sponsor.
- We also create software designed to help folks learn new skills. Dozuki makes it a breeze to whip up colorful how-to guides.
- Dozuki is perfect for:
- A whole lot more: Dozuki shines in any scenario where you want to tap into expert knowledge to teach practical skills.
- Standardized work instructions: elevate quality by outlining how to tackle tasks, one step at a time.
- Creating product support sites: make your customers adore you by guiding them on how to achieve amazing things.
- Training and e-learning software: we've harnessed Dozuki to educate over ten million people on repairing electronics.
- Online community platform: cultivate a treasure trove of expert knowledge with Answers, the Q&A engine that powers the popular iFixit Answers.
Step 17

- ...and check out the salsa on the other side of the non-A5X end:
- Qualcomm PM8028 Power Management IC
- Qualcomm RTR8600 multi-band/mode RF transceiver for 3G and 4GLTE bands
- Toshiba Y0A0000 Memory MCP
- Triquint TQM7M5013 quad-band linear power amplifier module
- Avago A5904
- Skyworks SKY77468-17 front-end module
Step 18


- A little spudger magic reveals the A5X processor looking sharp and ready to impress.
- Just like its sibling, the A5, the A5X boasts a 1 GHz dual-core CPU. The 'X' in its name comes from the upgraded GPU, which Apple says is even more powerful than Nvidia's Tegra 3.
- This particular chip was born in the first week of 2012. Looks like our iPad is here to witness the beginnings of something big.
- Feeling lost? No worries, there’s always an app to help you out!
Tools Used
Step 19

- Let's dive into a brand-new side of the logic board:
- A huge shoutout to Chipworks for helping us spot these chips!
- Apple A5X processor - a powerhouse!
- Apple 343S0561 - This IC appears to be a snazzier version of the 343S052 we spotted in the iPad 2, and it's in charge of power management.
- The NAND, model number THGVX1G7D2GLA08, is a 16 GB 24 nm MLC Flash from Toshiba - nice and speedy!
- Qualcomm MDM9600 - your 3G and 4G wireless connection buddy.
- Skyworks 77469 - keeping things connected!
- Avago A7792 - adding some extra flair!
Step 20

- Alright, let's kick things off with a little surprise: the A5X cover has been successfully removed! 🎉
- Now, peeking underneath the cover, we spot the A5X processor flip chip snugly mounted on the carrier PWB. It's like finding treasure!
- Given there's thermal paste beneath and a thermal pad resting on top, it's pretty safe to say that the A5X cover is acting like a heat sink for the CPU. Cool, right?
- By the way, the A5X has some impressive dimensions—12.82 mm x 12.71 mm (162 mm²), which makes it 36% bigger than the A5. Talk about an upgrade!
Step 21


- Just like most tablets, the iPad 3 is basically a big ol' battery. Let's get to work! With a little help from our trusty spudger, we can pop that battery out for a closer look.
- The iPad 2 came with a solid 25 watt-hour Li-ion battery, but the iPad 3 raises the stakes with an impressive 42.5 watt-hours. That's some serious juice!
- With its 3.7 volts and an estimated 10 hours of use (9 if you're using cellular data), the iPad 3's battery performance is on par with the iPad 2. We suspect those extra 17.5 watt-hours are hard at work keeping the new RAM and upgraded GPU running smoothly.
- The battery features three cells, each measuring about 12.5 cm x 6.5 cm x 4 mm. For comparison, the iPad 2's battery cells were a tad smaller at 10.8 cm x 6.3 cm x 2.7 mm.
Tools Used
Step 22


- Each individual cell shows a rating of 3.78 volts and 14.60 watt-hours. They come tagged with some cool matrix barcodes and neat inscriptions like 741-0065-A P11GG9-01-F01TS. Nice touch!
- The energy density here matches up pretty closely with the iPad 2 battery—about 0.0014 watt-hour per cubic millimeter.
- Apple boosted the size of each cell by roughly 70%, which explains the jump from 25 to 42 watt-hours.
- Apple says the new iPad uses an eco-friendly 'Recyclable aluminum and glass enclosure.' While the materials themselves can be recycled, the sealed unit makes battery removal tricky. Steve Skurnac, president of SIMS Recycling Solutions, points out that from a recycler's perspective, hazardous parts like batteries should be easy to separate or remove.
Step 23


- As we dive into the teardown, we're left with just the shell of a once-mighty iPad.
- Being the curious explorers we are, let’s keep digging into this aluminum marvel... first up is the dock connector.
- The dock connector appears to sport the same pin layout as the iPad 2, but we still need to figure out if these dock connectors can swap out.
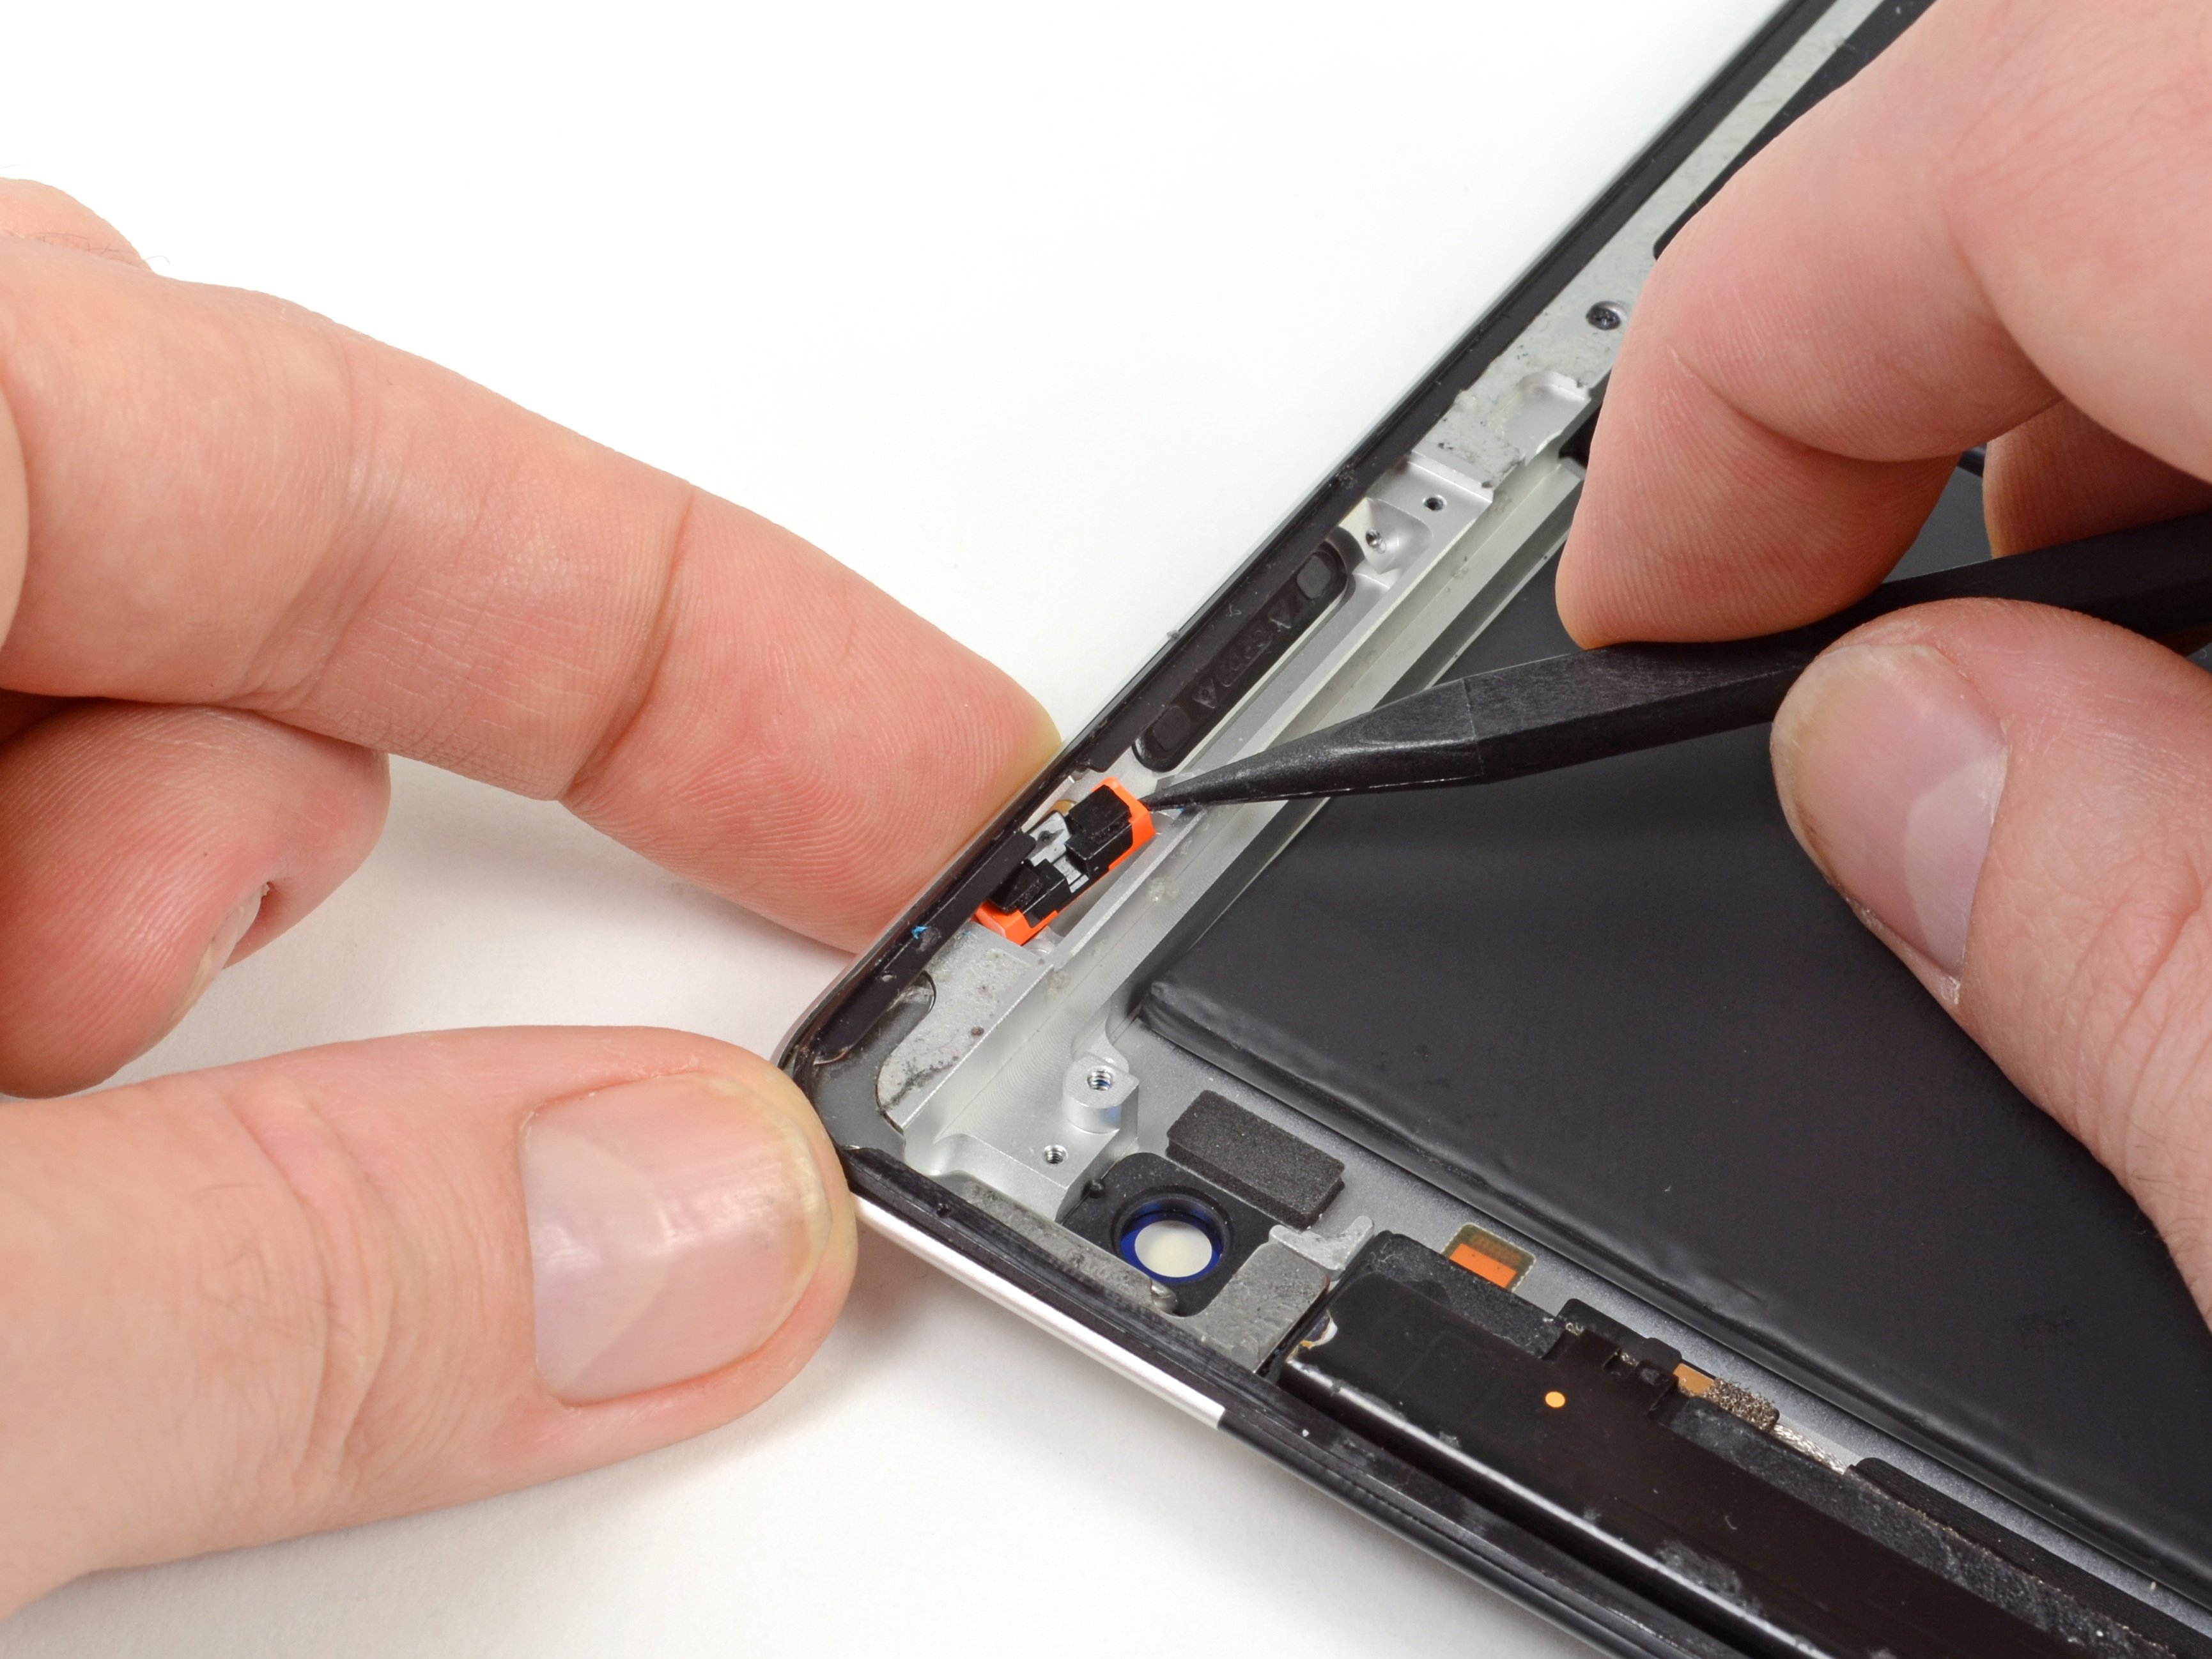
- Oh, those pesky screws! Time to send them packing so we can free the antenna without any fuss.
Step 24


Hey there, former Amp'd Mobile fans! Just a heads up, this iPad can only rock with AT&T and Verizon networks. Keep that in mind as you get ready to enjoy your device!
- Step aside, ribbon cable! Time to check out that micro-SIM card slot.
- Just like the other iPads with micro-SIM cards, the iPad 3 4G features a user-accessible micro-SIM card slot that you can pop out using a SIM card eject tool.
Step 25


- Look at that! The headphone jack and one of the many wireless antennas are coming out together like best buddies. What a surprise!
- Hey there! Nice to see you, iSight camera. Welcome to the party!
- UPDATE: Chipworks has discovered that the main camera is rocking the same image sensor as the iPhone 4: the Omnivision OV5650, featuring a 1.75 um pixel pitch and a 5 MP back illuminated CMOS Image Sensor. Pretty neat, right?
- And let's not forget the secondary image sensor, which is also from Omnivision, the OV297AA. It packs a punch with 0.3 MP and a 3.0 um pixel pitch CMOS Image Sensor.
- What specs do we have here? A 5 element lens, an IR filter, and auto exposure? Oh iSight, you're making us blush with those features!
Step 26


- Carefully remove other small components like the front-facing camera and antenna.
- Whether you're catching up on video calls or checking your look, the front-facing camera has got your back for all your casual photo and video moments.
Step 27


- Look at this lineup of buttons and switches! It’s quite the collection—buttons in every shape and switches of every kind. What a setup!
- Next up, it’s time to tackle the speaker assembly. Say goodbye to those speakers!
Step 28


- iPad 3 Repairability Score: 2 out of 10 (10 means super easy to fix)
- Once you get that front panel off, the LCD slides right out without much fuss.
- Good news—the battery isn’t soldered onto the logic board, so swapping it out is a bit less of a headache.
- Just like the iPad 2, the front panel is glued down tight, making it tricky to remove without risking a cracked screen.
- There’s a crazy amount of adhesive holding everything in place, including that battery which really doesn’t like getting poked.
- The LCD sticks to the front panel with foam tape, so be extra careful or you might end up with a shattered front panel during disassembly.
- You won’t be able to unplug the front panel’s connector until the LCD is out of the way.