iPad 6 Wi-Fi LCD Replacement
Duration: 45 minutes
Steps: 35 Steps
Exercise caution while you set up the battery blocker to keep things under control.
Time to swap out that sad, broken LCD on your iPad 6! First things first, be super careful when you’re isolating the battery with a battery blocker. Those battery contacts are delicate little things and can easily get damaged, which could lead to some serious issues with the logic board. If you decide to skip the battery isolation, just remember to steer clear of metal tools unless absolutely necessary (like for those pesky screws) to avoid any battery shorts or harm to those sensitive circuit components. If you need help, you can always schedule a repair!
Step 1
– Warm up your iOpener and give it a cozy two-minute hug on the left edge of your device.
Tools Used
Step 2
– While the adhesive works its magic, keep an eye on these sensitive spots where prying can be a bit tricky:
Step 3
In the next few steps, we’re going to show you the Anti-Clamp, our nifty little creation that makes getting into your device a breeze. If you’re not using the Anti-Clamp, just hop down three steps for a different method. We’ve got your back either way!
– Pull the blue handle backward to set the Anti-Clamp’s arms free.
– Pop something under your iPad to keep it level between the suction cups.
– Plop those suction cups smack in the middle of the left edge—one up top, one down low.
– Hold the bottom of the Anti-Clamp steady and give a good press down on the top cup to get that suction going.
Step 4
– Give that blue handle a gentle tug forward to secure those arms in place.
– Twist the handle in a delightful 360-degree spin or until the cups start to stretch a bit.
– Keep an eye on those suction cups! They should be in perfect harmony. If they start to wobble out of sync, loosen them just a tad and align those arms back together.
Step 5
– Take a breather for a minute to let that adhesive loosen up and create a little gap for you.
– If your screen’s feeling a bit chilly, grab a hair dryer and warm up the left edge of the iPad.
– Once the Anti-Clamp has done its magic and there’s a nice gap, slide an opening pick under the digitizer.
– Feel free to skip the next step!
Step 6
Have a severely cracked display? No problem! Try covering it with some clear packing tape to give the suction cup a better grip. If you don’t have a suction cup, fear not – strong tape works just as well. And if all else fails, a little superglue can do the trick. Salvation Repair is here to help – if you need assistance, you can always schedule a repair.
– When the screen feels cozy and warm, grab a suction handle and stick it on the left edge of the screen, right where it’s closest to the edge.
– Gently lift the screen with that suction handle to make a little gap between the digitizer and the frame.
– Slide an opening pick into that gap you just created between the digitizer and the frame.
Tools Used
Step 7
Hey, no sweat if you spot the opening pick through the digitizer—just pull it out gently. The LCD screen should be fine, but heads up: you might leave some stubborn adhesive behind. If you need help, you can always schedule a repair.
– Pop in a second opening pick right where you made that gap.
– Gently slide the pick down towards the bottom-left corner of your device to break free the adhesive.
– Keep that pick in the bottom-left corner to stop the adhesive from sticking back together.
Step 8
– If your opening pick is feeling a bit clingy in the adhesive, just give it a little ‘roll’ along the side of the iPad to keep that adhesive separating like a pro!
Step 9
– Gently slide the first opening pick up towards the top-left corner of your device to break that stubborn adhesive seal.
– Once you’ve made some progress, keep that pick in the top-left corner to stop the adhesive from playing tricks and sealing back up!
Step 10
– Warm up the iOpener and gently place it on the top edge of the device for a couple of minutes.
Tools Used
Step 11
– Gently glide the pick around the top-left corner of your device to break free the adhesive. You’re doing great!
Step 12
Steer clear of sliding the pick over the front camera to avoid lens damage. The next steps will show you how to ace this.
– Gently glide the opening pick along the upper edge of your device, making sure to pause right before you get to the front camera. You’ve got this!
Step 13
– Gently pull the pick out until just the tip is nestled between the digitizer and the frame.
– Slide the pick above the front camera to break the adhesive free.
– Keep that pick cozy near the right side of the front camera before moving forward.
Step 14
– Gently reposition the pick and smoothly slide it towards the upper-right corner of the device to completely detach the top adhesive.
– Keep the pick snug in the upper-right corner to avoid the adhesive from sealing back up.
Step 15
– Grab your trusty iOpener, give it a nice warm-up, and place it on the right side of your device for a solid two minutes.
Tools Used
Step 16
– Swivel that pick around the top-right corner like you’re unlocking the secrets of your device, separating that sticky adhesive with the finesse of a tech ninja.
Step 17
The display cables hang out around the midpoint of the iPad. Ease up once you get three inches from the bottom. If you need help, you can always schedule a repair.
– Slide in a cool new opening pick and glide it towards the sweet spot in the middle of the iPad’s right edge.
Step 18
– Warm up that iOpener and give the bottom edge of your device a toasty two-minute treatment.
Tools Used
Step 19
– Gently slide the bottom-left pick into the corner to break that adhesive seal like a pro.
– Keep the pick snugly in the bottom-left corner while you gear up for the next step.
Step 20
– Pop a new opening pick into that little gap you just made at the bottom edge of your iPad.
– Gently slide the pick over the antenna, but stop right before you reach the home button.
– Keep the pick to the left of the home button before you move on to the next step.
Step 21
Just a friendly reminder: only slide that pick in about 1 mm to keep the right antenna safe and sound!
– Get that opening pick ready for action! Gently slide it into the gap you just made.
– Time to slide the pick underneath the home button, heading towards the bottom-right corner. Be sure to wiggle it in with precision, ensuring only the tip slips in between the digitizer and the frame.
Step 22
– Pop that pick back in and glide it over to the home button like a pro to fully loosen up the bottom sticky stuff.
– Let that pick chill out to the right of the home button before moving on.
Step 23
– Warm up an iOpener and lay it on the right side of your gadget for a cool two minutes.
Tools Used
Step 24
Take it slow and easy on this step. Make sure the adhesive is warm and pliable. Use a pick to ensure all the adhesive is separated. If it feels tough, don’t hesitate to pause for a reheat!
If it feels like you’re meeting the Hulk in resistance, give the edges a warm-up and slide your opening pick around them with a bit more gusto.
– Give those two opening picks a twist at the left corners of your iPad to pop the digitizer up just a tad, breaking free from the last clingy bits of adhesive. Keep it groovy!
Step 25
– Gently lift the left edge of the digitizer to help peel away the adhesive along the right edge of the iPad. Keep it steady and take your time; you’ve got this!
Step 26
– Gently support the digitizer and slide an opening pick between the two display cables to break the final bit of adhesive. If you need help, you can always schedule a repair.
Step 27
– Once you’ve sliced through all the adhesive, swing that digitizer open like a book and rest it beside the iPad.
– When putting it all back together, wipe away any leftover adhesive on the frame—and on the digitizer if you’re reusing it—with some isopropyl alcohol. Swap the old adhesive with new adhesive strips or pre-cut adhesive cards.
– Be careful with those display cables while reassembling. Ensure they’re folded nicely underneath the LCD screen to avoid any damage.
Step 28
– Peel away any tape that’s hiding those sneaky LCD screws!
Step 29
– Time to get your screwdriver ready! Unscrew those four Phillips #00 4.3 mm screws that are holding the LCD in place. You’ve got this!
Step 30
Hey there repair pros! Remember, when handling the LCD, don’t go for the grand exit just yet. It’s still besties with the iPad through some cables at the home button party. Just gently raise it from the front-facing camera side. You got this!
– To kick things off, grab the flat end of a spudger to gently nudge the LCD out of its cozy spot. Keep an eye out for any clingy glue around the screw holes that might need a little trim with a knife.
– Now, treat the iPad LCD like a cool, glossy magazine – give it a flip near the camera just like you’re turning the page of a book. Roll it over to the home button side of the rear case.
– Next up, lay the LCD down on its face so you can easily get to the display cables. Time to dive in!
Tools Used
Step 31
Hey there, take a peek at these cool snapshots revealing the battery connector under the logic board. Use them as a guide as you gently detach the battery.
Check it out – the battery connector sports these neat cantilever springs on the logic board, pressing against the battery contact pads. Both the board and battery are firmly secured, so slide in something thin and flexible between the contact points to separate the battery.
Step 32
To keep things safe and sound, grab a battery isolation pick to gently disconnect the battery. It’s a smart move to avoid any unexpected surprises!
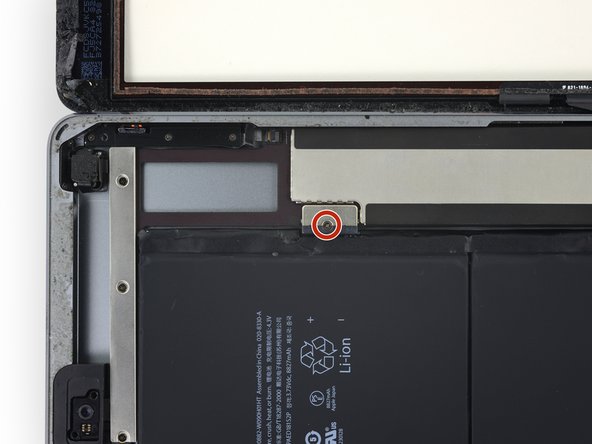
– First things first, grab that trusty 2.3 mm Phillips #000 screwdriver and take out the lone screw that’s holding the battery connector snugly to the logic board.
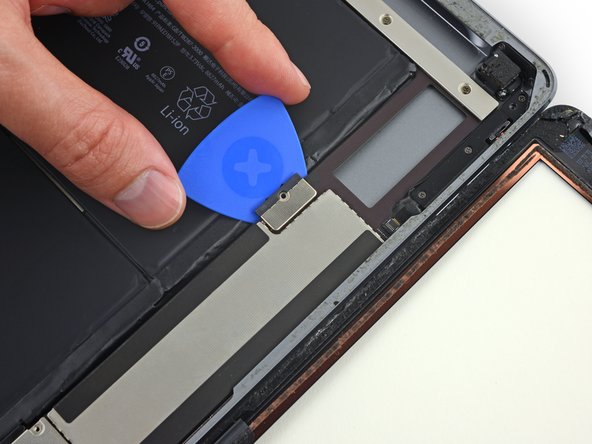
– Next up, slide the battery blocker right under the battery connector of the logic board, angling it at about 35 degrees. It’s like giving it a little hug!
– Keep that battery blocker in place while you tackle the rest of the repair. You’ve got this!
Tools Used
Step 33
– Time to get your screwdriver ready! Unscrew those three 1.4 mm Phillips #000 screws holding the display cable bracket in place. You’ve got this!
Step 34
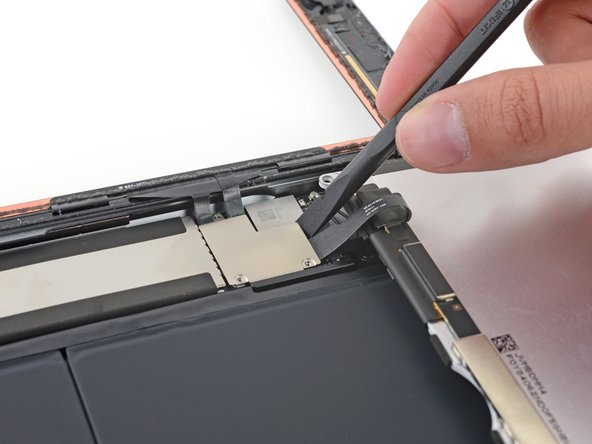
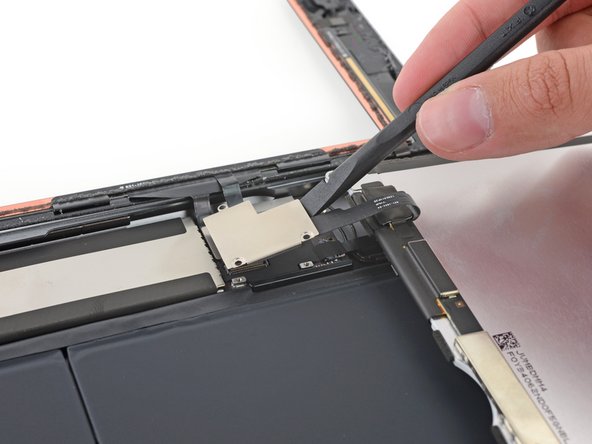
Hey there! Just a quick heads-up: the display cable connector is snugly stuck to the bottom of the bracket. So, when you’re using that spudger, be careful not to push it too far under the bracket, or you might accidentally give the connector a little too much love and damage it. Stay cool and take your time!
– Grab your spudger and carefully lift that display cable bracket up from the logic board. Easy does it!
Tools Used
Step 35
– Time to bid farewell to the LCD – gently remove it with a smile.


