iPad 9 LTE Screen Digitizer Replacement
Duration: 45 minutes
Steps: 55 Steps
To keep your Touch ID working like a charm, remember that the home button's Touch ID sensor is tightly connected to the logic board. So, when you're swapping out the front panel assembly, make sure to carefully transfer and securely glue the original home button back in place. You've got this!
Ready to tackle the challenge of swapping out the screen digitizer on your iPad 9 LTE? This guide is here to help you every step of the way! Just a heads up, the screen digitizer includes the front glass and digitizer only—it doesn’t come with the LCD panel. Remember, this guide is tailored specifically for the LTE version, so if you're working on the Wi-Fi model, you might want to check out the other guide. Now, about that home button's Touch ID sensor—it's paired to the logic board, so to keep your Touch ID magic alive, you'll need to carefully transfer and glue the original home button onto your new front panel assembly. When you’re isolating the battery with a battery blocker, exercise caution! Those battery contacts can be a bit delicate, and you wouldn’t want to cause any irreversible damage. If you decide to skip isolating the battery, just avoid using metal tools unless absolutely necessary (like when you’re unscrewing) to steer clear of shorting the battery and messing up sensitive circuit parts. A quick note: some images in this guide might be from a different model and could have slight visual differences, but don’t worry—they won’t throw you off track during the repair process!
Step 1

Before you dive in, make sure to power off your iPad completely. Safety first!
- Warm up an iOpener and stick it on the left side of the iPad for a solid two minutes to get things nice and toasty.
Tools Used

Step 2


- While waiting for the adhesive to loosen, take a moment to keep an eye on these areas – they're a little more delicate when it comes to prying:
- Front camera
- Ambient light sensors
- Antennas
- Display cables
Step 3


In the next three steps, we're introducing the Anti-Clamp, your new best buddy for opening things up with ease! If you're not rocking the Anti-Clamp, no worries! Just jump ahead three steps for another method that works like a charm.
Want to master the Anti-Clamp? Check out our handy guide for all the deets!
If your iPad's surface feels slicker than a banana peel, grab some tape to give it a little extra grip for the Anti-Clamp. You're gonna nail this!
- Grab that blue handle and give it a little tug backward to free the Anti-Clamp's arms.
- Set your iPad on something to keep it nice and level between the suction cups—this helps everything stay in place.
- Pop the suction cups onto the left edge of your iPad—one goes up top, and the other down below. It's like a high five for your tablet!
- Keep the bottom of the Anti-Clamp steady, then press the top suction cup down firmly to make sure it's sticking like it should.
Step 4


- Gently pull the blue handle forward to lock the arms in place.
- Twist the handle 360 degrees clockwise (or until you see those cups stretching!).
- Make sure the suction cups stay nice and aligned. If they start to slip out of line, just loosen them a little and adjust the arms back into place.
Step 5


Turn no more than half a twist at a time, then chill for a minute. Let the Anti-Clamp and a little patience do the heavy lifting!
For detailed tips on how to effectively wield a hair dryer, be sure to check out this guide.
If the Anti-Clamp isn't giving you the gap you need, no worries! Just warm up the area a bit more and give that handle a half turn clockwise.
- Give it about a minute so the adhesive can loosen up and create a little gap to get started.
- If the screen isn't warming up enough, try using a hair dryer along the left edge of the iPad to heat things up.
- Once the Anti-Clamp opens a decent gap, slide an opening pick under the digitizer to begin prying.
- Go ahead and skip the next step.
Step 6


- First things first, warm up that screen until it’s cozy to the touch! Once it's nice and toasty, grab a suction handle and stick it on the left edge of the screen, right up close to the border.
- Now, give the screen a gentle lift with the suction handle to create a tiny gap between the digitizer and the frame. Just a little lift will do the trick!
- Time to slide in an opening pick into that nifty gap you just created between the digitizer and the frame. You're doing great!
If your screen is looking a little worse for wear with a major crack, try covering it with clear packing tape to help the suction cup stick better. If that doesn't quite do the trick, super-strong tape can take the place of the suction cup. And, if you're really in a bind, a bit of superglue might be your best friend to hold the suction cup onto the cracked screen.
Tools Used


Step 7


No need to fret if you spot the opening pick peeking through the digitizer — just give it a gentle pull and remove it. The LCD screen should come through unscathed, though you might leave behind some sticky adhesive that's a bit of a hassle to clean up.
- Pop a second opening pick into the little gap you just made.
- Slide that pick down toward the bottom-left corner to loosen up the adhesive.
- Keep the pick wedged in the bottom-left corner so the adhesive doesn’t sneak back together.
Step 8


- If your opening pick gets stuck in the adhesive, try 'rolling' it gently along the edge of the iPad to keep the separation groove moving smoothly.
Step 9


- Gently glide the first opening pick up to the top-left corner of your iPad to break free that pesky adhesive.
- Keep that pick in the top-left corner to make sure the adhesive doesn't get any funny ideas about re-sealing.
Step 10

- Warm up an iOpener and stick it onto the top edge of the iPad for a solid two minutes to soften things up.
Tools Used
Step 11


Be gentle when inserting the pick—only go up to 7mm to keep that ambient light sensor safe and sound.
- Gently twirl the pick around the top-left corner of the iPad to break free the adhesive. Keep it smooth and steady, and you'll be on your way to a successful repair in no time!
Step 12


Be careful not to slide the pick over the front camera! You don’t want to risk scratching that lens. We’ll guide you through the steps to make sure it stays safe and sound.
- Gently glide the opening pick along the top edge of your iPad, making sure to stop just shy of the front camera. We’re almost there!
Step 13


- Gently pull the pick out until just the tip is nestled between the digitizer and the frame.
- Carefully slide the pick above the front camera to break free the adhesive.
- Keep that pick close to the right side of the front camera as you move forward.
Step 14


- Slide the pick back in and glide it up to the top-right corner to fully cut through the top adhesive.
- Keep the pick lodged in that corner to stop the adhesive from sticking back together.
Step 15

- Warm up an iOpener and place it on the right edge of the iPad for two minutes. Let's get that device ready for some TLC!
Tools Used
Step 16


Careful now—only slide the pick in up to 4 mm to keep that ambient light sensor safe and sound!
- Gently rotate the pick around the top-right corner of the iPad to break the adhesive seal. Take your time, it’s like peeling a sticker but with more finesse!
Step 17


The display cables hang out around the halfway mark from the bottom of your iPad. Just a friendly tip: stop sliding once you're about three inches away from the bottom. You've got this!
- Grab a new opening pick and gently slide it right into the middle of your iPad's right edge. You're doing great!
Step 18

- Warm up your iOpener and give it a cozy two-minute rest on the bottom edge of your iPad. This helps soften things up and get ready for the next step!
Tools Used
Step 19


Be careful not to spin the pick too much around the corner—otherwise, you might accidentally harm the antenna.
Check out the third image to spot the bottom-left antenna tucked just beneath the digitizer.
- Gently slide the bottom-left pick to the corner to loosen the adhesive.
- Keep the pick in place at the corner before moving on to the next step.
Step 20


Gently slide the pick toward the home button, not away from it. Going the other way might mess with the antenna, and nobody wants that!
If you find yourself needing to slide the pick over this area again, no worries—just remove it, then pop it back in at the bottom-left corner and give it another go!
- Pop a new opening pick into the gap you just made along the bottom edge of the iPad.
- Gently slide the pick over the antenna, stopping right before you hit the home button.
- Leave the pick resting just to the left of the home button before moving on.
Step 21


- Slide your opening pick into the gap you've made. You're doing great!
- Now, gently glide the pick underneath the home button and move it towards the bottom-right corner. Just the tip of the pick should be between the digitizer and the frame – careful not to go too deep!
Step 22


Make sure to slide the pick gently towards the home button and resist the urge to go the other way – your antenna will thank you for it!
If you need to glide the pick over this spot again, just pull it out and pop it back in at the bottom-right corner. Easy peasy!
- Slide that pick back in and shimmy it over towards the home button to fully break free the bottom adhesive—you're almost there!
- Just let the pick hang out to the right of the home button before you move on to the next step.
Step 23

- Warm up your iOpener and give it a cozy two-minute hug on the right edge of the iPad.
Tools Used
Step 24


Take it easy with this step! Make sure the adhesive is nice and warm, and that you've carefully separated all of it with your trusty opening pick. If things get tricky, don’t hesitate to pause and give it another heat-up!
If you hit a stubborn spot, give those edges another quick heat and gently wiggle your opening pick along them to ease things open.
- Gently twist the two opening picks at the left corners of the iPad to carefully lift the digitizer, loosening the last bits of adhesive holding it down.
Step 25


- Gently raise the left edge of the digitizer to peel away the adhesive on the right side of the iPad. You're getting closer to a smooth repair!
Step 26


Heads up! Gently wiggle your opening pick around those two display cables to avoid any accidental damage.
- As you hold the digitizer in place, gently slide an opening pick between the two display cables to carefully break the last of the adhesive's grip.
Step 27


- Once you've carefully peeled away all the adhesive, open up the digitizer like a book and lay it flat next to the iPad, making sure it's nice and parallel.
- When putting everything back together, give the frame (and the digitizer, if you're reusing it) a good clean with some isopropyl alcohol to get rid of any leftover adhesive. Then, replace the old sticky stuff with our adhesive strips or pre-cut adhesive cards for a fresh start.
- Keep an eye on the display cables as you reassemble the iPad. Fold them neatly under the LCD screen to keep them safe and prevent any damage.
Step 28


- Grab your tweezers or just use your fingers to gently peel away any tape that's hiding the LCD screws. Easy does it!
Tools Used

Step 29


- Grab your trusty Phillips #00 screwdriver and carefully take out the four 4.2 mm screws holding the LCD screen in place.
Tools Used

Step 30


The LCD is just hanging out a little with the frame – it’s not stuck on there too hard. A little gentle nudging should do the trick.
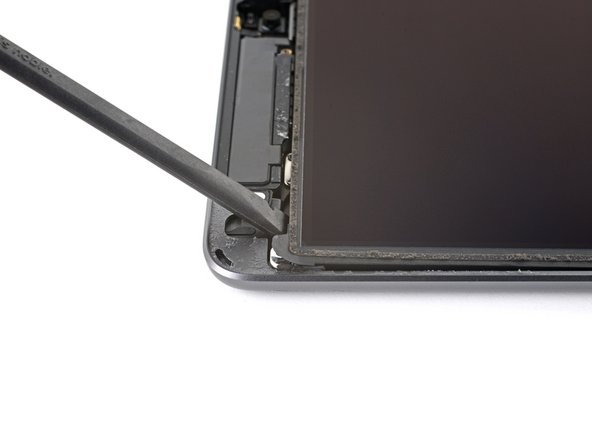
- Slide your spudger gently between the frame and the top-right corner of the LCD.
- Work the spudger slowly to loosen the adhesive without rushing.
Tools Used

Step 31

- Go ahead and do the same thing for the top-left corner of the LCD. You’ve got this!
Step 32


Be careful not to take out the LCD completely just yet – it's still hanging on by a flex cable, so keep it connected for now.
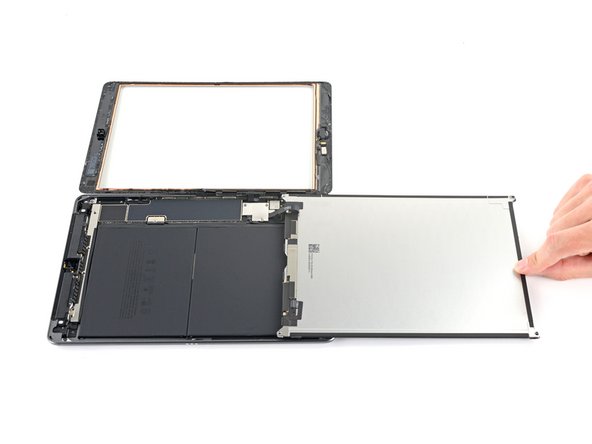
- Grab your trusty spudger and gently wiggle the flat end to coax the LCD out of its snug little home—just enough so you can snag it with your fingers.
- Now, give that LCD a little flip like you're turning the page of a captivating book, lifting it near the camera and flipping it over the home button end of the frame.
- Rest that LCD on a clean, soft, lint-free surface so you can easily access those display cables for the next steps.
Tools Used
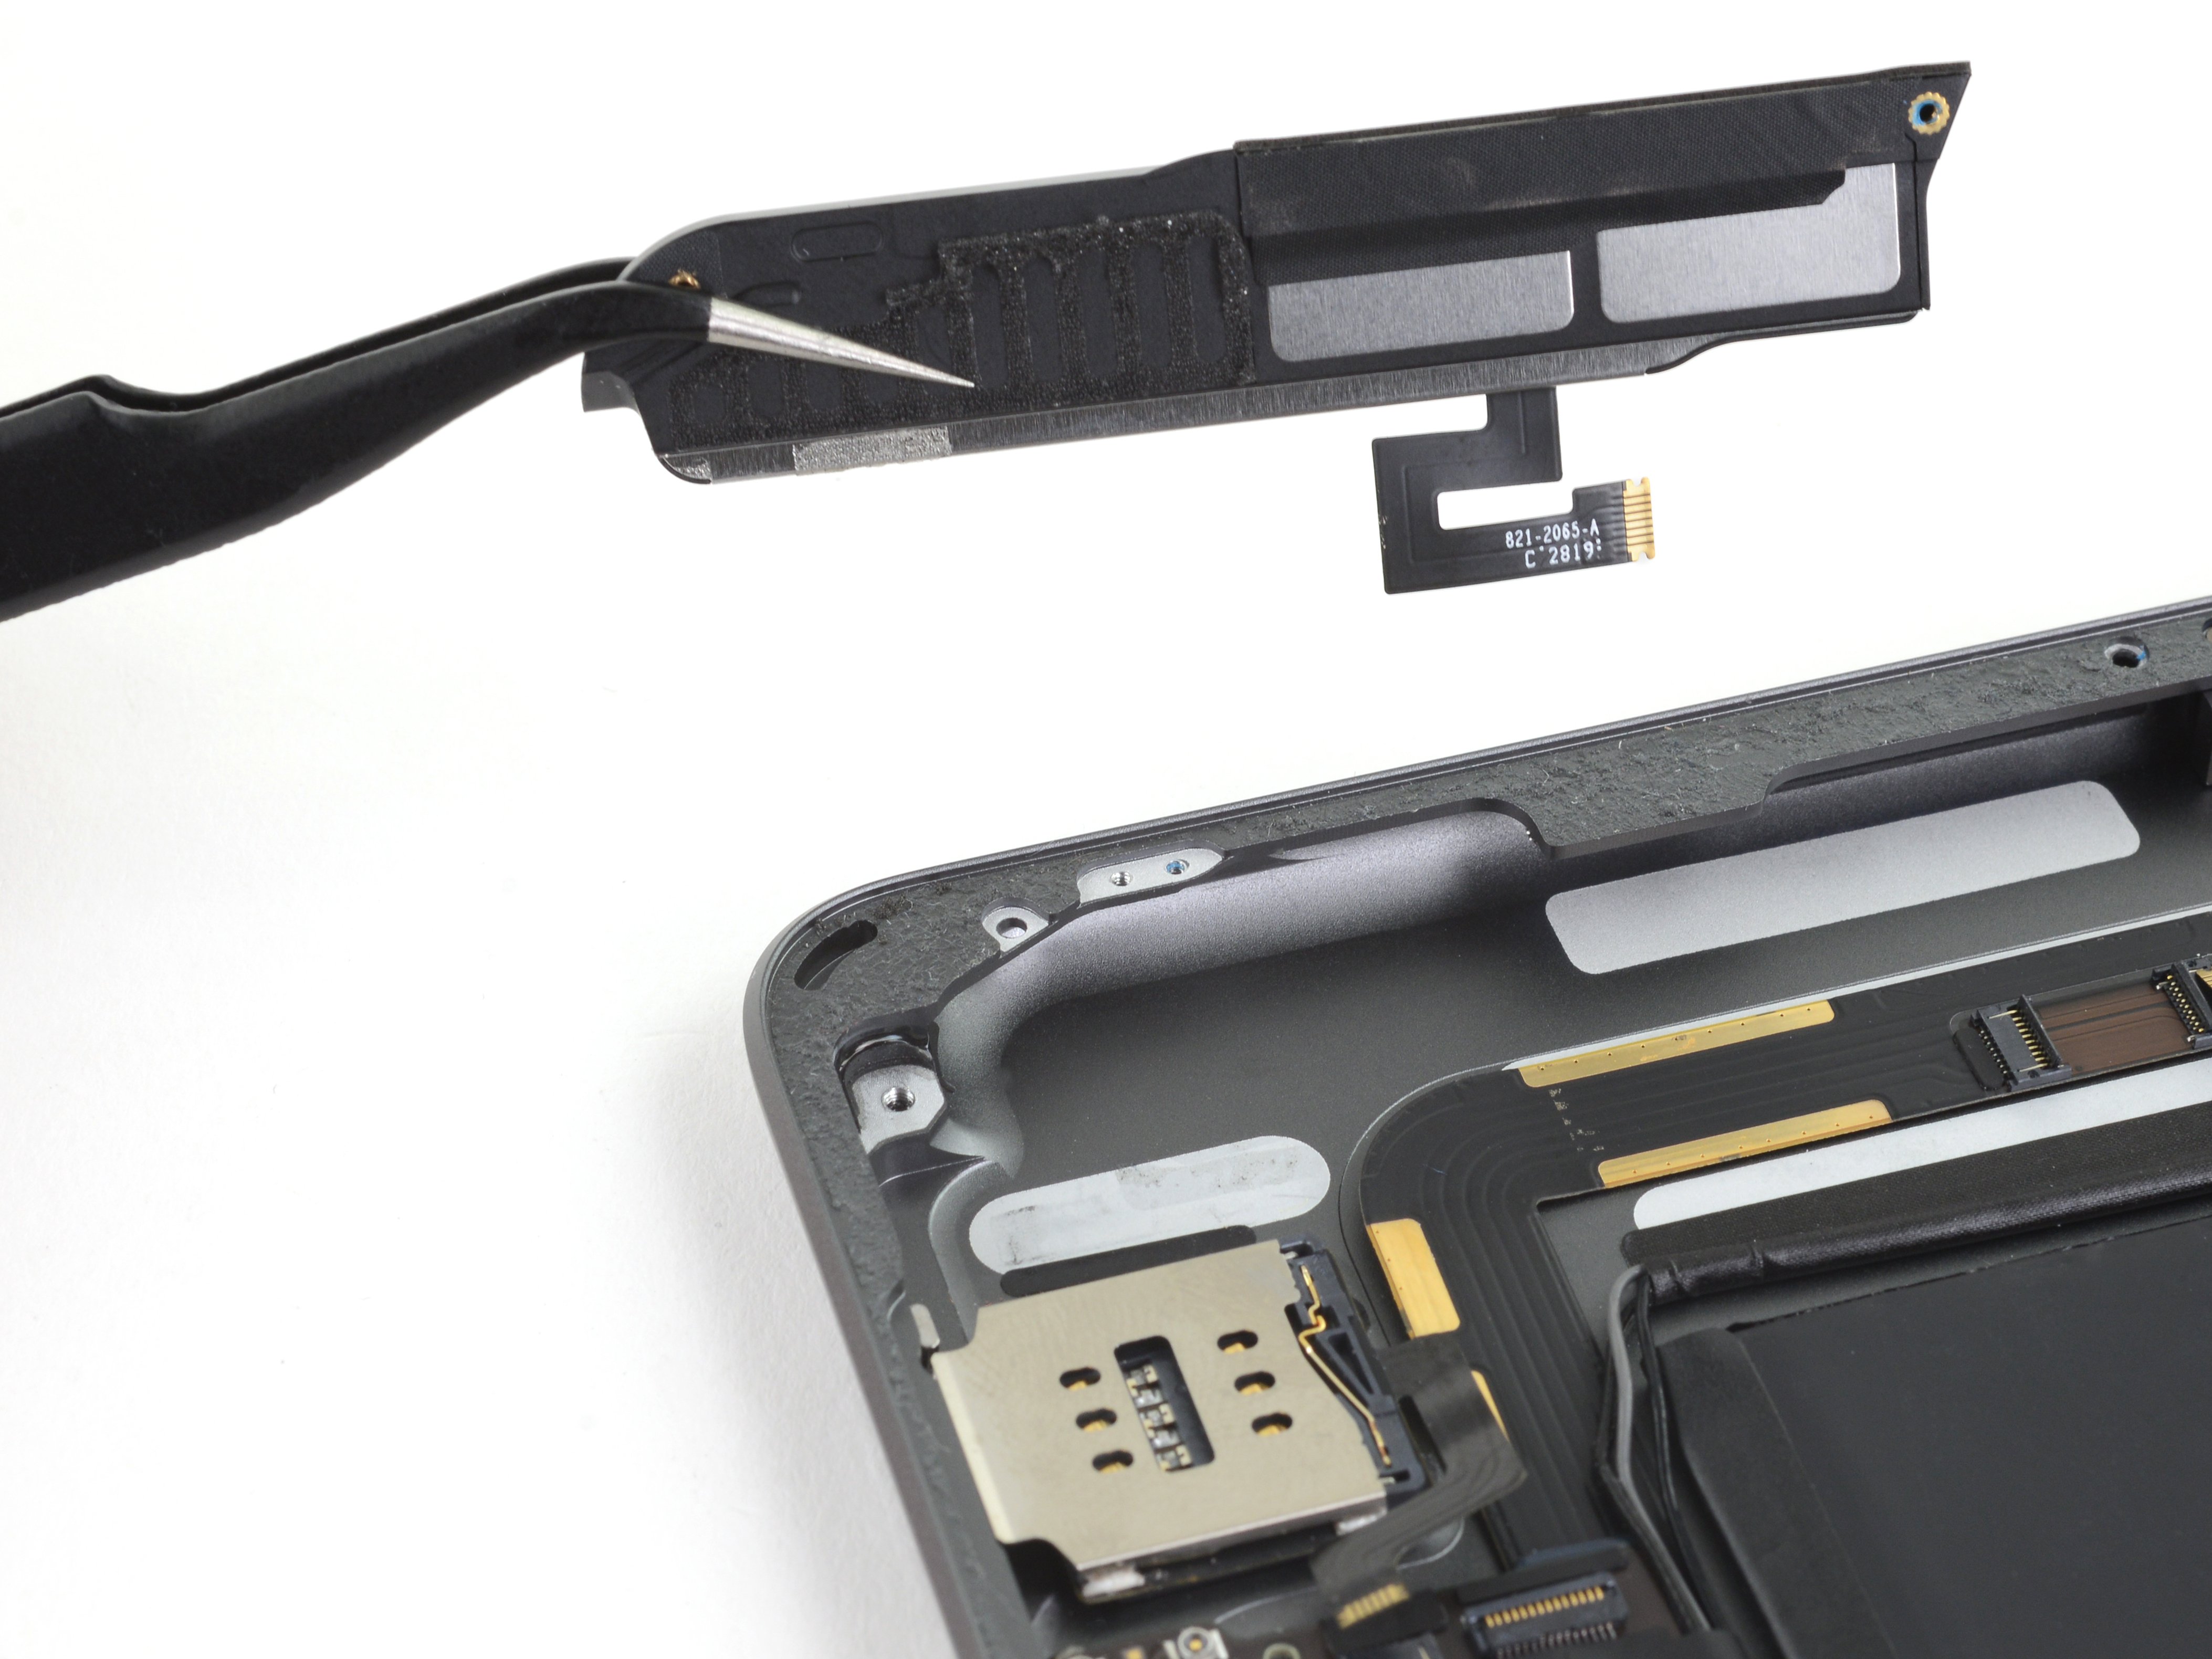
Step 33


- Grab your trusty Phillips screwdriver and go ahead and unscrew that 2.3 mm-long screw that's keeping the battery connector snug on the logic board. You've got this!
Step 34


Check out these pics to see what the battery connector looks like tucked under the logic board. Keep these handy as a guide while you carefully unplug the battery.
Heads up: the battery connector uses cantilever springs on the logic board that press against the battery’s contact pads. Since both the logic board and battery are glued down, you’ll want to gently slide a thin, flexible tool between the contacts to pop the battery free without any drama.
Step 35


Take it easy when you're using a battery blocker to isolate the battery. Those little contacts can be sneaky and bend or break pretty easily, causing some serious damage. Handle with care!
Make sure the iFixit logo on the battery blocker is facing up like a proud flag!
Be gentle when sliding the battery blocker under the connector—no need to muscle it in there! If you're having a tough time, a playing card can work wonders to disconnect the battery instead.
The battery blocker or playing card should glide smoothly underneath the logic board without any hiccups. Once it's in place, it should be resting at a cool 15-degree angle, just chilling.
- Gently slide the battery blocker under the logic board's battery connector at a cool 35-degree angle. You've got this!
- Keep that handy battery blocker in position while you tackle the next steps.
Tools Used

Step 36


- Grab your trusty Phillips screwdriver and let's get to work! Carefully unscrew those three little 1.4 mm-long screws that are holding the display cable bracket in place. You've got this!
Step 37


- Take off the display cable bracket with care.
Step 38


- Grab that trusty spudger and gently lift up on the flat end to disconnect the LCD cable press connector. Easy peasy!
- When you're ready to snap those press connectors back in, make sure to line them up just right! Press down on one side until you hear that satisfying click, then do the same on the other side. Remember, no need to push down in the center! If things go a little off-kilter, those tiny pins might bend, and we definitely don’t want that. Keep it smooth and steady!
Tools Used
Step 39


- Gently detach the LCD and lay it down screen-side on a clean, soft, lint-free surface. You're doing great!
Step 40


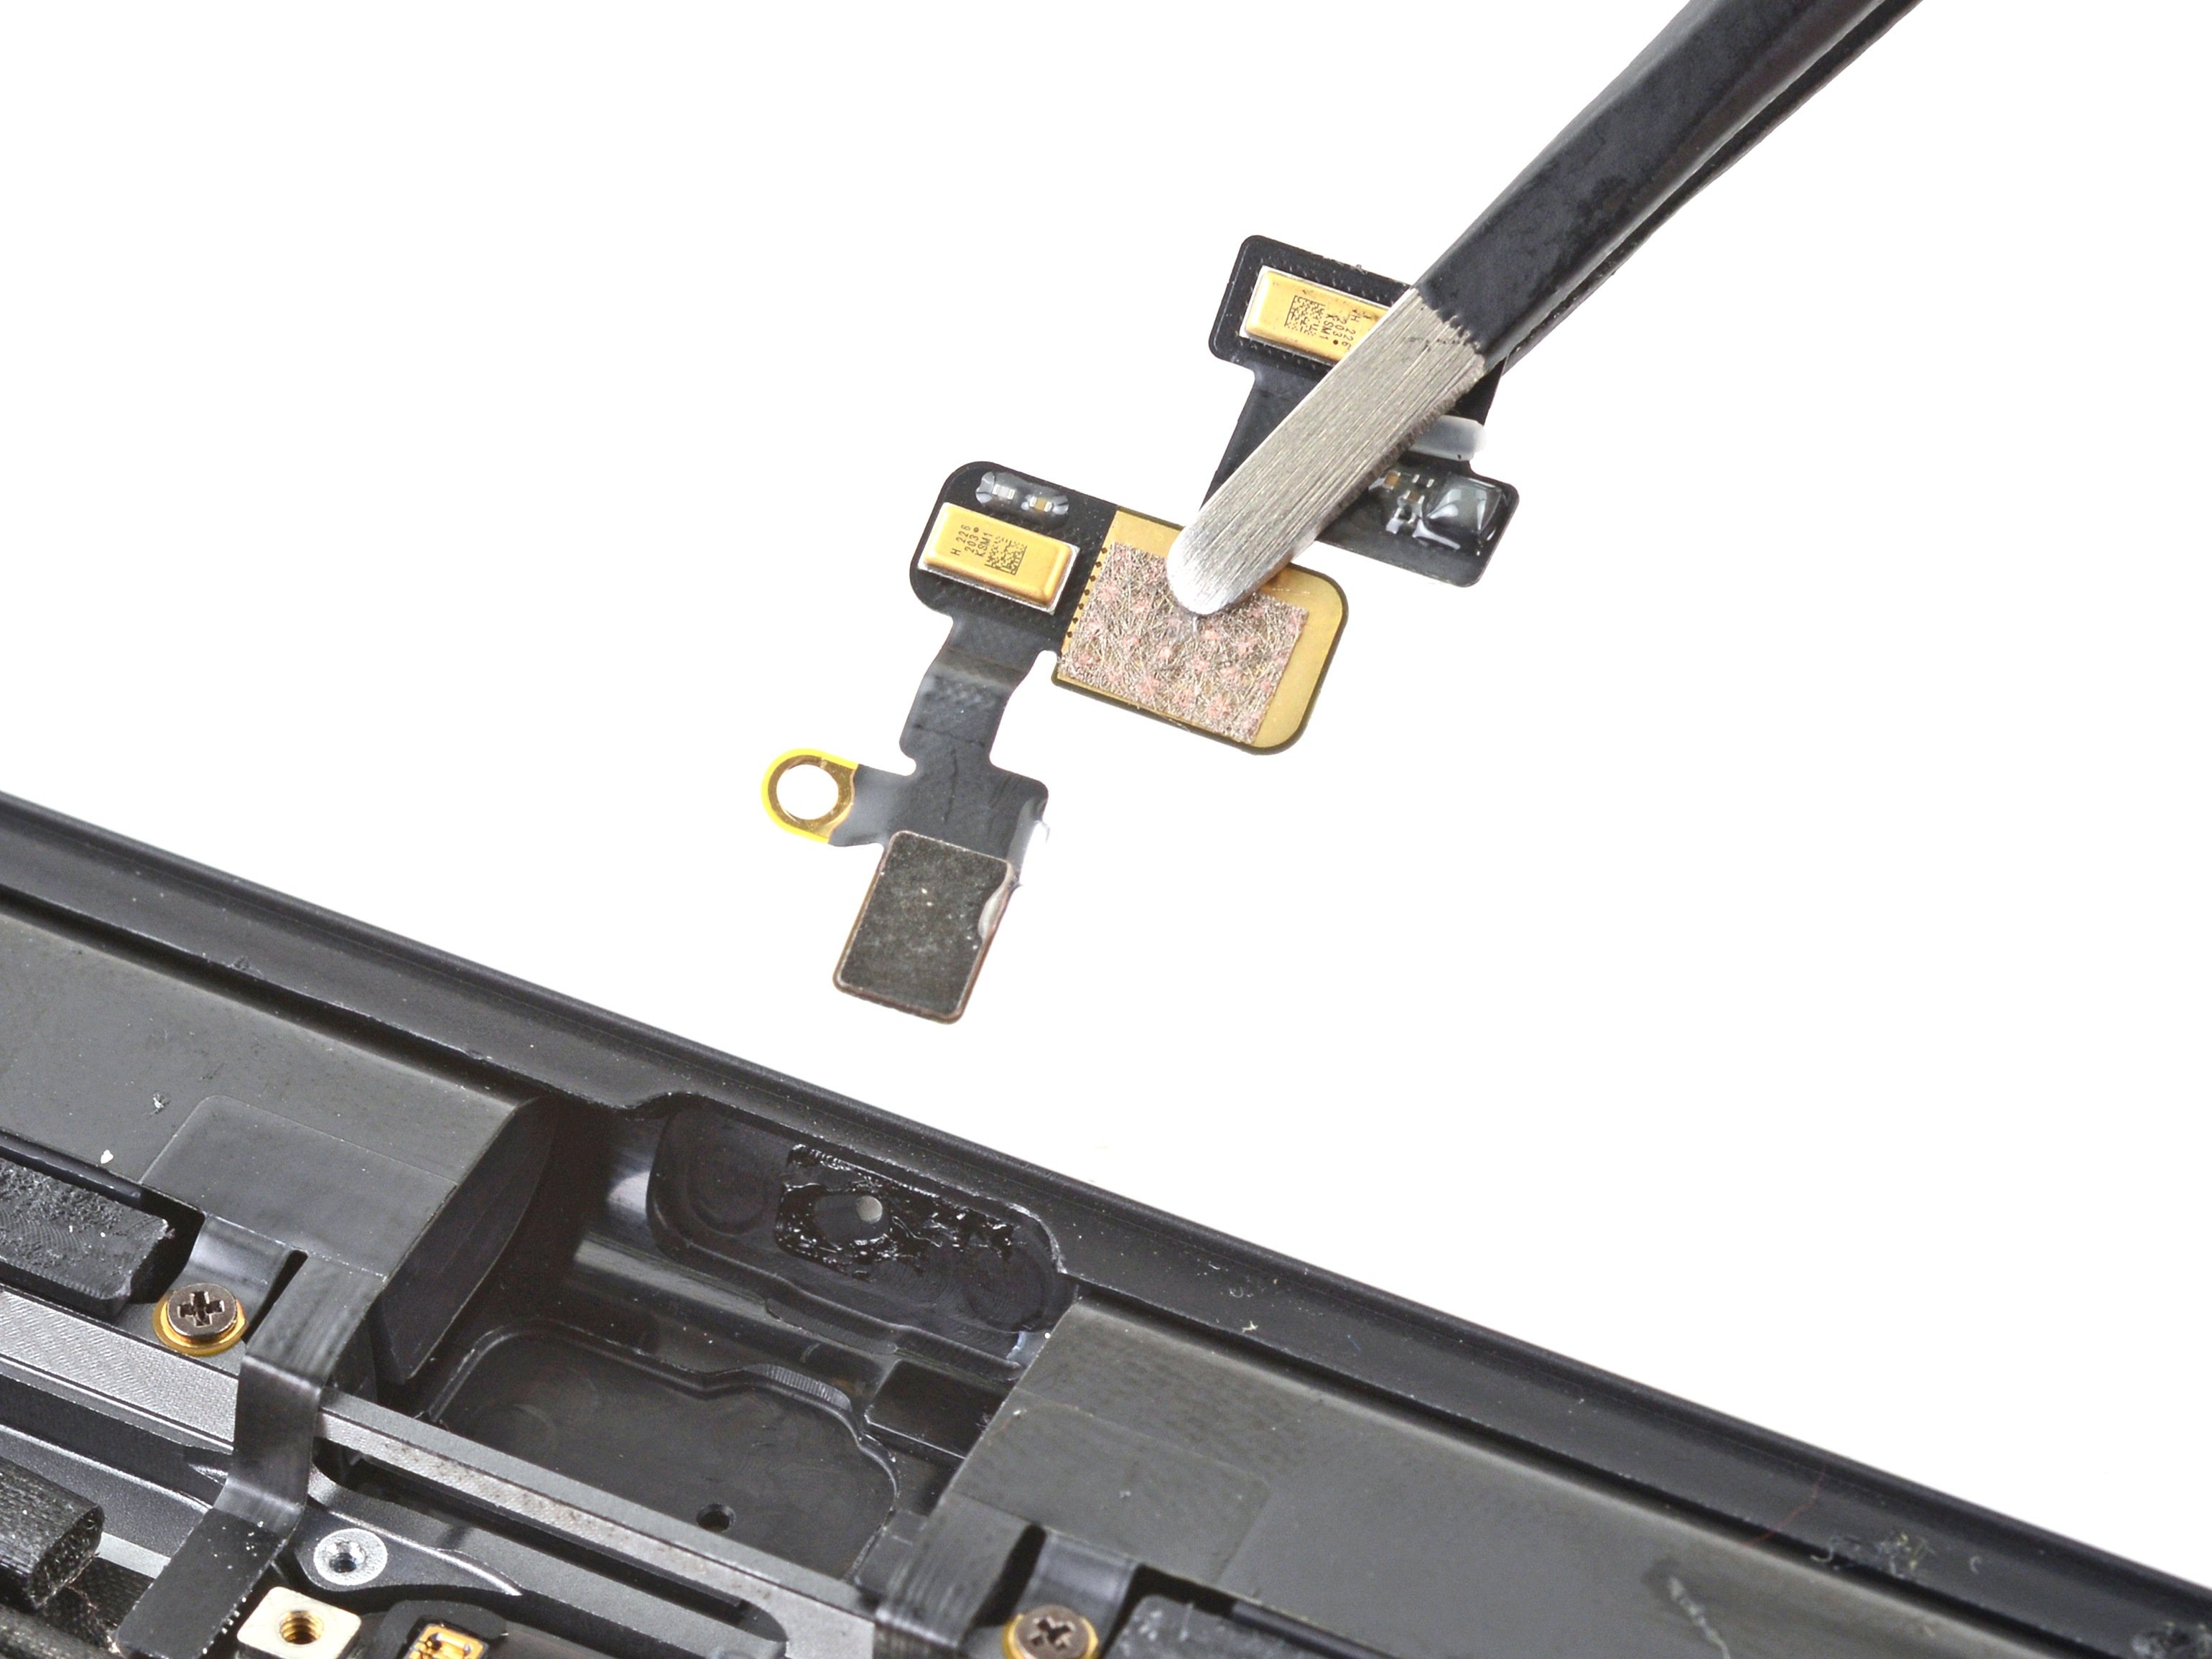
- Grab your tweezers and gently lift off the tape that’s covering the home button cable’s ZIF connector.
Tools Used
Step 41


- Grab your trusty spudger, an opening tool, or even your fingernail, and gently lift the small, hinged locking flap on the home button cable ZIF connector. You're doing great!
Tools Used
Step 42


- Grab your tweezers and gently pull the home button ribbon cable straight out of the ZIF connector. Easy does it!
Tools Used
Step 43


Be gentle and only pry on the connectors themselves—avoid tugging on the logic board socket to keep your iPad happy and safe.
- Grab your trusty spudger and gently slide that flat end under the two digitizer cable press connectors. Give it a little pry and disconnect them like a pro!
Tools Used
Step 44


Be super gentle and avoid poking or ripping the home button ribbon cable—it’s a delicate little dude!
- Carefully slide the flat end of your spudger under the buffer block located near the bottom-right corner of the iPad to gently lift it up.
- Take the buffer block off and set it aside.
Tools Used
Step 45


The home button cable is held down with a little bit of gentle adhesive, nothing too sticky to handle.
- Grab your trusty tweezers and gently lift the home button cable away from the frame like a pro!
Tools Used
Step 46


Grab an opening pick and slice through any leftover adhesive that might still be holding the front panel assembly to the frame. Think of it as freeing your device from a sticky situation!
Watch out! Without proper insulation, those digitizer areas might accidentally connect with other components, leading to some touch input hiccups. Let's keep those connections friendly!
The insulation is a bit of a stealthy hero—it’s invisible to the naked eye and unlike the foam dust barrier strips you might find on many iPads. Keep an eye out for it!
- Take off the front panel assembly carefully.
- If your new display starts acting up with 'ghost' or 'phantom' touches, don’t panic! Simply add a super thin layer of insulating tape, like Kapton (polyimide) tape, to the marked spots on the back of the panel. Replacement digitizers already have the right insulation, so usually no extra tape is needed.
- When putting things back together, before installing the display, make sure to scrape off any leftover adhesive from the iPad and wipe down the sticky areas with high-concentration isopropyl alcohol (90% or above) and a lint-free cloth. This gets the surface ready for new adhesive and helps it stick like a charm.
- Give your iPad a test run to check all functions, then apply the pre-cut adhesive strips to the back of the display following the display adhesive application guide before sealing it up tight.
Step 47


The home button cable is held in place with a bit of gentle adhesive.
- Gently use your fingers to lift the home button cable away from the back of the front panel.
Step 48


If that adhesive is playing hard to get, don’t yank the pick! Warm up the home button cable gently with an iOpener or a hair dryer to loosen things up and make peeling easier.
- Slide an opening pick gently under the home button cable to start separating it from the front panel.
- Carefully push the pick forward to slice through the adhesive holding the home button cable in place.
- Keep sliding the pick forward until you reach the home button bracket.
Tools Used
Step 49


- Gently slide an opening pick under the top edge of the home button cable to carefully lift the metal contact away from the home button bracket.
Step 50

- Warm up an iOpener and place it on the home button bracket for thirty seconds to get things nice and toasty.
Tools Used
Step 51


If you bend or warp the home button bracket, your home button might lose its delightful clickiness when you put everything back together. So, handle it with care and keep that clicky charm alive!
If the home button bracket starts to bend while you're trying to pop it off, don't sweat it! Just dab a few drops of high-concentration (90% or higher) isopropyl alcohol on the bracket mounts to help it along its way.
- Grab your trusty opening tool and gently nudge the home button bracket away from the front panel. You've got this!
Step 52


- Take off the home button bracket carefully.
- When putting it back, make sure to use a strong glue like E6000 to firmly stick it to the front panel assembly.
Step 53


Take it easy and apply pressure gently. That adhesive is holding onto a delicate gasket that’s super easy to rip.
- Gently press the home button from the front side of the panel with your finger to loosen the adhesive holding it down.
Step 54


- Gently take out the home button assembly, like you're unwrapping a present!
- When putting everything back together, don't forget to move the home button gasket to the new front panel or home button assembly. It's like giving your home button a cozy new home!
- If the new panel is missing that spacer ring, no worries! Just transfer your old spacer over to keep everything snug.
- If you can, power up your iPad and give your repair a quick test before sealing it all up with fresh adhesive. It's a great way to celebrate your handiwork!
Step 55

- Put your device back together by reversing these steps.
- Remember to drop off your e-waste at an R2 or e-Stewards certified recycler.
- If things didn’t quite work out, try some basic troubleshooting, or feel free to schedule a repair with us for a hand.