iPad Ambient Light Sensor Replacement Guide: Step-by-Step DIY
Duration: 45 minutes
Steps: 11 Steps
Hey there, repair champion! Before you dive into this project, make sure you’re working in a well-lit space. We want you to see every detail! And don’t forget to gather all your tools – a little preparation goes a long way. If you find yourself stuck or in need of a helping hand, feel free to schedule a repair. You’ve got this!
Get ready to tackle that pesky broken ambient light sensor with this handy guide! It’s time to roll up your sleeves and dive into the repair adventure. If you need help along the way, you can always schedule a repair.
Step 1


Put on those safety glasses to keep your peepers protected, and watch out for that LCD screen – it’s more delicate than it looks!
– If your display glass has taken a hit, let’s keep it from shattering further and avoid any accidental ouchies while you tackle this repair. Grab some tape and cover that glass up!
– Apply overlapping strips of clear packing tape across the iPad’s display until it’s fully shielded. Think of it as a protective hug for your device!
– Now, do your best to follow the rest of the guide as it flows. Just a heads-up: once the glass starts cracking, it might decide to keep on going. You might need to get a metal prying tool to help scoop out the pieces. You’ve got this!
Step 2


– There are 14 metal clips keeping the display assembly snug as a bug, as you can see on the left. When you start prying in the next steps, try your best to wiggle around these clips without slicing through them with your trusty opening tool. You’ve got this!
Step 3


– Slide a metal spudger into the gap between the top edge of the display assembly and the rear panel assembly. It’s like giving your device a gentle nudge!
– Now, give that spudger a little twist away from you to pop those tabs loose along the top edge of the display. It’s a small victory!
– To keep those tabs from getting shy and snapping back, slide in a second metal spudger right where the first one is. Teamwork makes the dream work!
Tools Used

Step 4


Pry with care and a gentle touch—if it starts to resist, take a breather and try another spot.
– Grab your trusty spudger and gently glide it along the right edge of your iPad. We’re getting into the groove!
– The front panel is snugly held in place by some metal clips at the top, bottom, and left sides. The right side, however, is all about those plastic tabs that slide into little recesses on the backplate.
– Once those clips are free, lift the left side of the front panel up and give it a little slide to the left to pop those tabs out of the aluminum backplate. You’re doing great!

Step 6

– Alright, let’s get into it! In the next few steps, you’ll be disconnecting the three cables that connect the display assembly to the logic board. These cables are responsible for the following components:
Step 7


Just a friendly reminder: make sure you’re lifting the retaining flap and not the socket itself. You’ve got this!
– Grab a plastic opening tool and gently lift up those little retaining flaps that are keeping the digitizer ribbon cables snugly in place on the logic board.
– Once those flaps are up, just pull the digitizer ribbon cables straight out of their cozy sockets.
Step 8

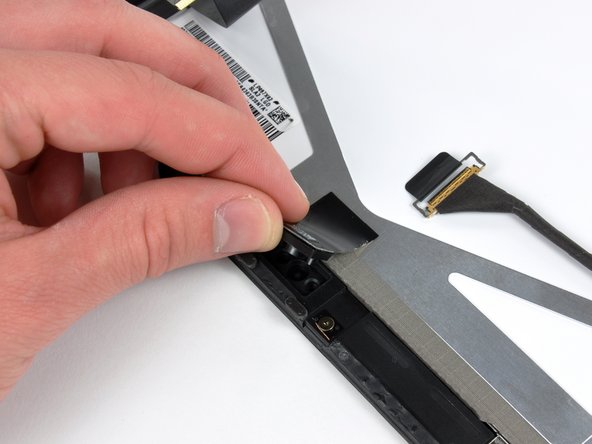
– Grab your trusty plastic opening tool and give the ambient light sensor connector a gentle nudge upward to pop it out of its cozy little socket. You’ve got this!
Step 9


Gently slide the connector away from the logic board, keeping it parallel to the board’s surface. You’ve got this!
– First, let’s disconnect that display data cable from the main board! Just give the metal retainer a little flip up using its black plastic pull tab.
– Now, gently pull the cable connector away from its socket. You’ve got this!

Step 11


Just a friendly reminder: be gentle with that ambient light sensor! Avoid creasing it below the top section, as the adhesive part might just decide to break away. Keep it cool and take your time!
If you’re giving the LCD a second chance, there’s no need to detach the ambient light sensor from its cozy spot on the back of the LCD.
– Grab a plastic opening tool and gently nudge the ambient light sensor board away from the sticky adhesive holding it to the display frame. Take your time—it’s a delicate dance!
– Once you’ve made some space, carefully peel the ambient light sensor away from the LCD. It’s like unwrapping a surprise!
– If you need to, go ahead and attach the plastic view window to your shiny new ambient light sensor before you pop it back in. Let’s make it look great!