iPad Mini CDMA Battery Replacement
Duration: 45 minutes
Steps: 73 Steps
Get ready to bring your device back to life! This guide will take you through the steps to swap out that old battery for a fresh one. Let’s power things up together!
Step 1


For carousel microwaves: double-check that the plate spins without any hiccups. If your iOpener gets stuck, it might overheat and cause a burn, so keep an eye on it!
Before diving into the fun, give your microwave a little TLC! A quick clean will ensure that any stubborn gunk on the bottom doesn't hitch a ride on the iOpener. Trust us, your future self will thank you.
- Pop the iOpener right in the center of the microwave like it's the star of the show.
Tools Used

Step 2

Keep an eye on that iOpener during your repair! If it gets too hot, it could burst, and nobody wants that. Aim to keep it below 100˚C (212˚F) for safety.
If your iOpener looks a bit puffy, steer clear! It's not a balloon.
When the middle of the iOpener is still too hot to handle, hang tight and let it cool down a bit more before giving it another heat-up. A perfectly warmed iOpener should keep the good vibes for about 10 minutes.
Microwave wattage varies, so you might need to adjust the heating time a bit. The iOpener is ready when it’s just a tad too hot to hold comfortably.
- Give that iOpener a cozy thirty-second spa session in the microwave!
- As you tackle this repair adventure, keep an eye on your iOpener. If it starts to cool down, pop it back in the microwave for another thirty seconds to keep the warmth flowing.
Tools Used
Step 3

Careful now! The iOpener gets super toasty, so handle it with care. If it's feeling a bit too hot to handle, grab an oven mitt for a cozy grip!
- Carefully take the iOpener out of the microwave by grabbing one of the two flat ends—steer clear of the hot middle!
Tools Used
Step 4


Watch out! The iOpener is going to be super toasty, so make sure to grab it by the end tabs only. Safety first, friends!
No microwave? No problem! Just heat your iOpener by carefully dipping it in boiling water instead.
- Grab a pot or pan and fill it with enough water to completely dunk your iOpener.
- Bring that water to a rolling boil and then turn off the heat – safety first!
- Carefully drop your iOpener into the hot water for 2-3 minutes, ensuring it’s fully submerged and ready to work its magic.
- Using tongs, fish out the warmed iOpener from the hot water.
- Give the iOpener a good towel dry – we want it nice and cozy!
- And voilà, your iOpener is all set for action! If you ever need to warm it up again, just repeat the boiling water step for another 2-3 minutes. If you find yourself in a pickle, don't hesitate to schedule a repair!
Tools Used
Step 5


Put on those safety glasses to keep your peepers safe, and remember to treat that LCD screen with the gentle care it deserves!
This will help keep those pesky glass shards in check while also giving your display some extra support when you're prying and lifting it up.
- If your screen glass is cracked, tape it up to keep those shards from spreading and protect your fingers while you work.
- Cover the entire display with overlapping strips of clear packing tape until it's fully shielded.
- Follow the rest of the guide as best as you can. Just a heads-up: once the glass is broken, it might keep cracking as you go, so you may need to carefully pry out the glass pieces with a metal tool.
Step 6

- Grab the iOpener by the tab and place it on the left side of the iPad, just next to the home button assembly.
- Let it chill there for about five minutes to warm up and loosen the adhesive under the glass.
Tools Used
Step 7


Lift the glass just enough to slide in an opening pick—go too high and you might just crack that lovely screen.
- Gently set a suction cup about halfway up the warmed side of your device.
- With one hand pressing down on the iPad, give a little tug on the suction cup to create a tiny gap between the front panel glass and the rear case.
- Make sure the suction cup is snugly pressed against the screen for a solid grip.
Step 8


Keep the opening pick shallow—no deeper than the black bezel along the display edge. Going too deep might cause some LCD drama you don't want to deal with.
- Keep the glass lifted with the suction cup while gently sliding the tip of an opening pick into the space between the glass and iPad body.
- Pop the suction cup's plastic nub to break the vacuum seal, then lift the suction cup off the display assembly.
Step 9

Keep it cool—don’t overheat the iOpener while working. Make sure to chill for at least ten minutes before giving it another warm-up.
- Warm up the iOpener again and place it back on.
- Give it a few minutes to soften up the left edge of your iPad.
Tools Used
Step 10


If the picks start to resist sliding under the glass like a stubborn cat, pause and warm up that spot again. Forcing them might crack the glass, and nobody wants that drama!
- Grab a second opening pick and slide it down along the edge of your iPad, just like a pro! This will help you gently lift the adhesive as you go. You're doing great!
Step 11


- Slide the opening pick down the edge of the display to loosen the adhesive.
- If the pick gets stuck, try gently rocking it along the iPad’s side to keep the adhesive release moving.
Step 12


- Grab that first pick you slid in and gently nudge it up towards the top corner of the iPad.
- If you catch a glimpse of the pick's tip peeking through the front glass, no need to fret—just ease the pick out a tad. Chances are, all is well, but it’s best to be careful as that adhesive can be a real pain to clean off the LCD later!
Step 13

Take it easy with the iOpener—don’t let it get too hot under the collar during the repair. Give it a cool-down period of at least 10 minutes before you heat it up again.
If you have a bendy iOpener, feel free to give it a little flex to warm up both the upper left corner and the top edge at the same time.
- Warm up the iOpener and set it on the upper edge of the iPad, right above the front-facing camera.
Tools Used
Step 14


- Gently slide the opening pick around the top left corner of your iPad to loosen that stubborn adhesive and make some room to work your magic.
Step 15


Watch out for that front-facing camera! Sliding the opening pick too close can leave adhesive on the lens or even mess with the camera itself. Follow the steps below to keep that camera safe and sound, no worries!
The third image gives you a peek at the location of the front-facing camera and its housing in the iPad.
- Gently slide the opening pick along the top edge of the iPad, making sure to stop right before you reach the camera.
Step 16


- Gently pull the pick out a bit, then carefully glide the very tip along the top edge where the front-facing camera hangs out.
Step 17


Grab a second pick and slide it in next to the camera, right where your first pick was hanging out. Gently glide it back to the corner to ensure any last bits of adhesive are totally severed.
- Keep that opening pick hanging out just a bit past the front-facing camera—don't let it wander off!
- Leave the second pick right where it is to stop the corner adhesive from sneakily sticking back together as it cools down.
Step 18


- Gently push the pick a little deeper into the iPad, then slide it away from the camera heading toward the corner.
Step 19

- Keep the three picks tucked in the corners of the iPad to stop the front panel adhesive from sticking back together.
- Warm up the iOpener again and set it along the long side of the iPad where the volume and lock buttons hang out.
Tools Used
Step 20


- Gently guide that top right opening pick around the corner to free up the top edge of the glass completely. You're doing great!
- Keep that pick right there to prevent the adhesive from sticking back together, and grab a fresh pick for the next part of the adventure.
Step 21


- Pop in a fresh opening pick and glide it toward the center of the right edge of your iPad, gently loosening that adhesive as you go.
Step 22


- Keep sliding that pick down the right side of your iPad, letting go of that adhesive like it’s no big deal!
Step 23

Heads up! Give your iOpener a chill break—wait at least ten minutes between heat-ups to keep it happy.
- Keep those opening picks in place and give the iOpener another warm-up.
- Plop the reheated iOpener on the home button side of the iPad and let it chill there for a few minutes to loosen up that stubborn adhesive under the glass.
Tools Used
Step 24


Heads up! There’s a bunch of stuff to watch out for under the lower bezel, so take a good look at the third image before diving in.
- Gently slide the lower left pick into the lower left corner to carefully slice through the adhesive there.
- Once you've made the cut, leave the pick in place. No need to pry further or take the pick out just yet!
- Now, let’s navigate the next steps together to avoid any mishaps with sensitive components. Remember, only apply heat and pry where we guide you.
- Watch out for the antennas!
- Be cautious around the home button cavity.
- And don't forget about the digitizer cable!
Step 25


Just a friendly reminder: slide that pick from the outer edge towards the center of your iPad. Avoid pushing it back towards the outer edge, as it might cause some trouble for the antenna. You've got this!
Keep that pick right where it is from the last step to stop the adhesive from snapping back together.
If you have to slide the pick over the lower part more than once, just pull it out, start again from the outer edge, and glide it back in smoothly.
- Grab a fresh pick and carefully slide it along the left antenna, stopping just before you reach the home button.
- Keep the pick right where it is before moving on to the next step.
Step 26


Pause about an inch before the right edge to keep the digitizer cable safe and sound.
Remember, only slide the pick toward the iPad’s center when it’s fully inserted; otherwise, you might give the antenna under the glass an unwanted poke.
- Slide the tip of one last pick in alongside the previous one and gently tuck it under the home button.
- Push the pick in just a bit further and carefully maneuver it back toward the home button.
Step 27

Warm up and pop that iOpener back onto the top bezel of your iPad to keep things nice and toasty.
Tools Used
Step 28


Take your time here. Make sure the adhesive is nice and soft, and you’ve carefully gone over every part with your opening pick. If you feel the need, don’t hesitate to stop and give it another round of heat.
If you hit a point where things are really sticking, don’t force it! Leave the picks in place, reheat, and give the iOpener some love on the problem spots. Then, gently run a pick through the tough area again.
- At the top of the iPad, right across from the home button, you'll find a pick nestled in each corner. Give those picks a gentle twist to lift the glass just a tad, helping to break the last bit of adhesive along all four edges. You're doing great!
Tools Used
Step 29


- Carefully and slowly lift to loosen the adhesive along the bottom edge without rushing it.
Step 30


- Now that you've freed all the sticky stuff, gently swing open the front glass like you're flipping through a book and lay it down on your workspace.
- If you're planning to reuse the front panel assembly when putting everything back together, don't forget to swap out the display adhesive. Check out our display adhesive application guide for tips on how to reapply that adhesive and seal up your device like a pro!
Step 31


- The front-facing camera housing might get a little cozy with the front panel. Gently peel it up and pop it back over the camera to keep it safe and sound.
- Give the camera housing a little wiggle on one edge to lift it off the sticky stuff and carefully remove it from the front panel.
- Place the front-facing camera housing back into its snug spot in the rear case. You're almost there!
Step 32


A couple of tiny foam tape pieces are hanging out over the top and bottom right-hand screws that keep the LCD snug against the rear case.
- Grab your trusty tweezers and carefully lift up that rectangular piece of foam tape hiding the top right LCD screw. It's like a little treasure hunt!
- Now, let's tackle the triangular tape that's keeping the lower right LCD screw under wraps. Peel it away and reveal the hidden gem!
Tools Used

Step 33


The screw for the top left LCD might be hiding behind some adhesive tape from the front panel. Time to uncover it!
- If there's tape hanging around, grab the flat end of your trusty spudger and gently lift the tape up and away. This will reveal the elusive LCD screw hiding underneath, ready for your repair magic!
Tools Used

Step 34

- Let's kick things off by unscrewing those four 3.9 mm Phillips #000 screws that are holding the LCD snugly to the rear case. You've got this!
Step 35


- Grab your trusty tweezers and gently peel back that little piece of tape securing the LCD frame to the right speaker. It’s a small step, but it’s going to make the next one smoother!
Tools Used
Step 36


Heads up! Keep those tweezers away from the LCD to avoid any accidental display damage.
You'll find a slim strip of foam tape on the LCD frame that's keeping a secret—it's hiding a piece of tape that connects the LCD to the panel below. Time to channel your inner detective: carefully break and peel back some of that foam tape to unveil the hidden tape beneath. You've got this!
- Grab your trusty thin tweezers and gently lift the edge of the foam tape hugging the top of the LCD.
- Carefully use the tweezers to peel back the foam tape, revealing the top of the LCD underneath.
Tools Used
Step 37


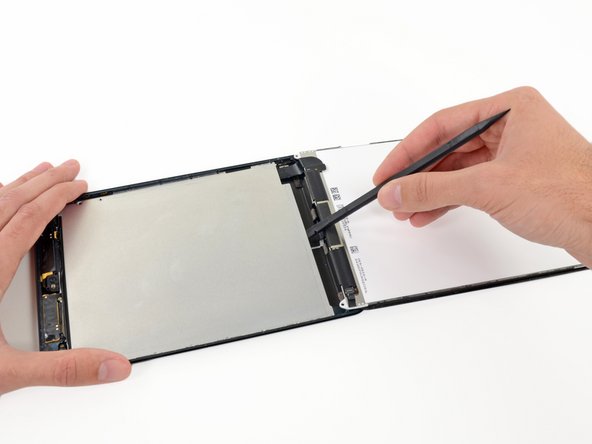
- Gently slip the tip of your spudger between the LCD frame and the tape sitting on top of the LCD.
- Carefully slide the spudger along the gap between the LCD frame and the tape, peeling the tape away from the frame.
Tools Used
Step 38


The LCD is snugly glued to the metal shield plate behind it along the top, left, and right edges. To gently loosen this adhesive, grab a guitar pick and slide it back and forth a few millimeters to the left and right. It's like giving your LCD a little dance!
- Slide a guitar pick into the space between the LCD and rear case, aiming for the top left side of the LCD.
- Gently bend the pick away from the iPad just enough to widen the gap between the LCD and rear case.
Step 39


- Slide a guitar pick into three more spots along the left edge of the LCD, bending it over at each point to gently nudge the LCD over toward the right side of the rear case.
Step 40


Keep at it! Go back and forth between this step and the last one a few times until the LCD can shimmy left and right like it’s ready to dance.
- Next, move to the right side of the LCD. Gently slide the guitar pick along the edge in a few spots to nudge the LCD back to the left. Easy does it!
Step 41


Make sure to slide the spudger between the LCD frame and the backing plate—don’t sneak it under the plate! Lifting the plate the wrong way can cause damage since it’s screwed down tight to the rear case beneath the LCD.
Next up, grab your spudger and gently slide it between the LCD and the metal backing plate. This will help you separate the LCD from the adhesive underneath, so it’s all smooth sailing from here!
- Carefully slide the flat end of your trusty spudger between the LCD frame and the metal backing plate. Gentle does it!
Tools Used
Step 42


If the spudger is making the corner of the LCD pop up a bit, no worries! Just grab that guitar pick and give it another go to loosen up the adhesive even more.
The aim here is to gently break the bond of the adhesive, not to forcefully lift the LCD. So, keep that spudger's pointed tip nice and low to avoid any bending mishaps with the LCD. You've got this!
- Starting from the top right corner, gently slide the spudger between the LCD frame and the metal backing plate to loosen the adhesive as you go.
Tools Used
Step 43


- Go ahead and do the same thing along the top edge of the LCD—consistency is key!
- Slide the flat end of your trusty spudger between the LCD frame and the metal backing plate, then gently wiggle it across the top to loosen that adhesive without any drama.
Tools Used
Step 44


By now, the LCD should be coming loose from its sticky situation. If it’s still hanging on for dear life, gently slide the spudger back in on the right side or top to help it let go completely.
- Now, let's tackle the left side of the LCD. Grab your trusty spudger and gently slide the flat end between the LCD and the shield plate. Push it in as far as it will go, and give yourself a little pat on the back. You're on the right track!
Tools Used
Step 45

- Gently lift the LCD a couple of inches away from the rear case to make sure it’s not stuck to any adhesive.
Step 46


Two generous strips of tape are holding the LCD snugly to the speakers. Let's get ready to peel them off with care!
- With one hand securely holding the LCD, slide the flat end of your trusty spudger into the little space between the tape and the left speaker.
- Gently coax the LCD away from the speakers as you rotate the spudger outward to peel the tape off the speaker. You're doing great!
Tools Used
Step 47


- Slide the flat end of your trusty spudger into the little gap between the right speaker and the LCD tape. It's like finding a secret passage!
- As you gently pull the LCD away from the speakers, give that spudger a little twist outward. This will widen the gap and help release the tape from the speaker. You're doing great!
Tools Used
Step 48


Hold up! Don’t try to yank the LCD off the iPad just yet—it’s still hanging on by its data cable.
- Gently flip the LCD over and let it chill on top of the front panel glass.
Step 49

- Time to get down to business! First things first, let's tackle those screws holding the LCD shield plate snugly against the rear case of your iPad:
- Grab your trusty screwdriver and remove two 2.6 mm Phillips #00 screws.
- Next up, you'll need to unscrew a whopping thirteen 1.7 mm Phillips #00 screws.
- And just for good measure, keep an eye out for one extra 1.7 mm Phillips #00 screw that might be hiding on some devices.
Step 50

- Slide the flat end of your trusty spudger right under the middle of that LCD shield plate, starting from the bottom of your iPad.
- Gently pry up with the spudger to release the plate from the sides of the rear case. You've got this!
Tools Used
Step 51

- Take off the LCD shield plate from your iPad with confidence! You've got this.
Step 52

Make sure you don't swap these three screws with any others, especially the ones that hold the LCD shield plate to the back of your iPad. Using even slightly longer screws could strip the screw holes and lead to some serious damage to the logic board. Let's keep everything safe and sound!
- Unscrew the three tiny 1.3 mm Phillips #00 screws holding the connector shield onto the logic board. Keep track of these little guys—they’re easy to misplace!
Step 53

- Grab your trusty tweezers and gently lift off the connector shield from the iPad. You've got this!
Tools Used
Step 54


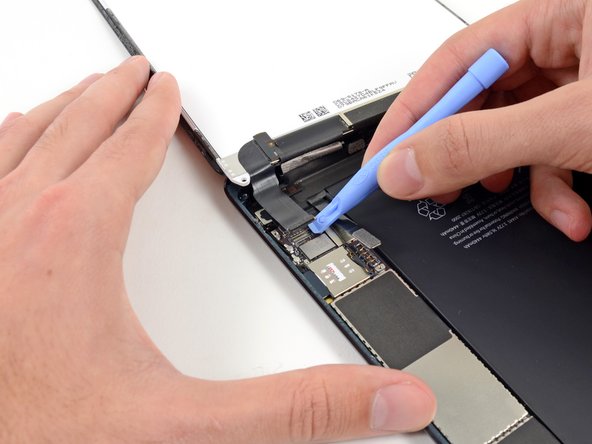
Take it easy and make sure to gently lift the battery connector without putting pressure on the socket. If you accidentally pry on the logic board socket, you could end up breaking the connector completely. Keep it cool and steady!
- Grab a plastic opening tool and carefully lift the battery connector straight up from its spot on the logic board—think gentle ninja moves, not wrestling!
Step 55

Hey there! When you're getting in there, be careful not to pry against the big IC next to the connector—it's a delicate little fella and could break! Instead, gently work your way in from the side of the connector, just like the picture shows. You've got this!
- Gently slide a plastic opening tool under the LCD connector to pop it out from the logic board socket—think of it like a tiny dance move for your device’s parts.
Step 56


Try giving the spudger a little twist to gently widen the gap and help peel the LCD away from the tape.
- The LCD is still attached to the iPad by two sturdy strips of adhesive tape that stretch from the inside of the rear case to the bottom frame of the front LCD.
- With one hand supporting the LCD, carefully slide the flat end of a spudger between the LCD and the tape on the right side of the iPad.
- Gently push the spudger outward to separate the tape while lifting the LCD slightly to release it from the adhesive.
Tools Used
Step 57


- Keep holding the LCD up with one hand, then slide over to the iPad's left side and do the same tape-separating move as before.
- Take the flat end of your spudger, slip it between the LCD frame and the tape, then carefully slide it outward while gently lifting the LCD up.
Tools Used
Step 58


- Carefully lift and take off the iPad Mini's LCD—time to see what's underneath!
Step 59


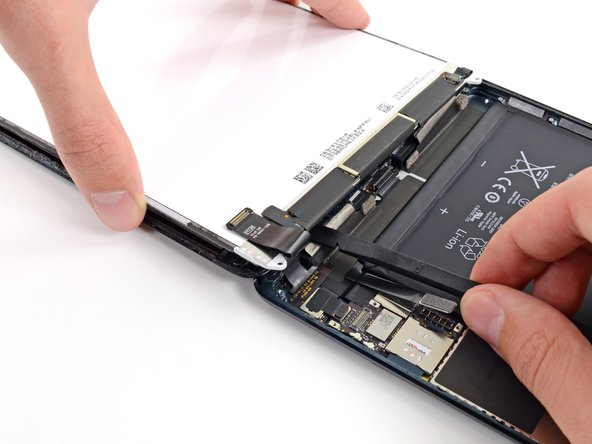
Be super careful when prying on the digitizer connector—go easy and make sure not to touch the socket at all! Both the socket and connector are pretty delicate, and if you happen to mess one up, your digitizer might just throw a tantrum and stop working. So, take your time and be gentle!
- Carefully lift the digitizer connector out of its cozy little home on the logic board. It's like giving it a gentle nudge to say, 'Time to come out!'
- To keep everything happy and stress-free, try prying from the short edge of the connector instead of the long edge, as shown in these pictures. It’s all about the right angle!
Step 60


- Carefully lift the digitizer cable board away from the back case.
Step 61


- Gently lift and peel off the front panel from your iPad to get things rolling.
Step 62

Take it easy with the iOpener—don’t let it get too hot! Give it at least two minutes to cool down before heating it again, and never nuke it for more than a minute.
- Pop that iOpener in the microwave for a quick one-minute heat-up! 🕒
- Once it's nice and warm, place it right in the center of the back of your iPad. Let it chill there for about 90 seconds to melt away that stubborn battery adhesive.
- Now, shift the iOpener over to the right side of the back of your iPad (that’s the side away from the rear-facing camera), and let it hang out for another 90 seconds.
- If the iOpener cools down too much during this process, just give it another minute in the microwave to warm it back up.
Tools Used
Step 63


As you embark on this adventure, you'll be gently sliding thin plastic cards between the battery and the rear case of your iPad to free it from the adhesive holding it snugly in place. Remember to keep those cards nice and flat to avoid any accidental bending of the battery, which could lead to some not-so-fun situations with harmful chemicals. Stay cool and steady, you've got this!
If you're feeling some major resistance, no worries! Just give that iOpener another heat-up and try the last step again. It's all about letting that adhesive have a little more time to chill and soften up.
- Turn the iPad back over and carefully slide a plastic card in between the top left corner of the battery and the rear case to gently pry them apart.
Tools Used

Step 64


- Give that card a little extra push! Break up as much of the adhesive holding that battery in place as you can. You've got this!
Step 65


- Slide the plastic card back in, tucking it neatly under the top right corner of the battery.
Step 66


- Now, gently push the card in a bit deeper to loosen up even more of that stubborn adhesive lurking behind the battery.
- Keep that card right where it is to stop the adhesive from getting all clingy again.
Step 67


- Slide a second plastic card under the lower-left corner of the battery and give it a little nudge.
Step 68


- Gently slide the card in a bit more to loosen up the stubborn adhesive holding the battery to the rear case.
Step 69


- Pop out the card and slide it back in snugly, right under the bottom right corner of the battery. You've got this!
Step 70


- Gently nudge the card further under the battery, making sure it slides in nice and smooth.
Step 71


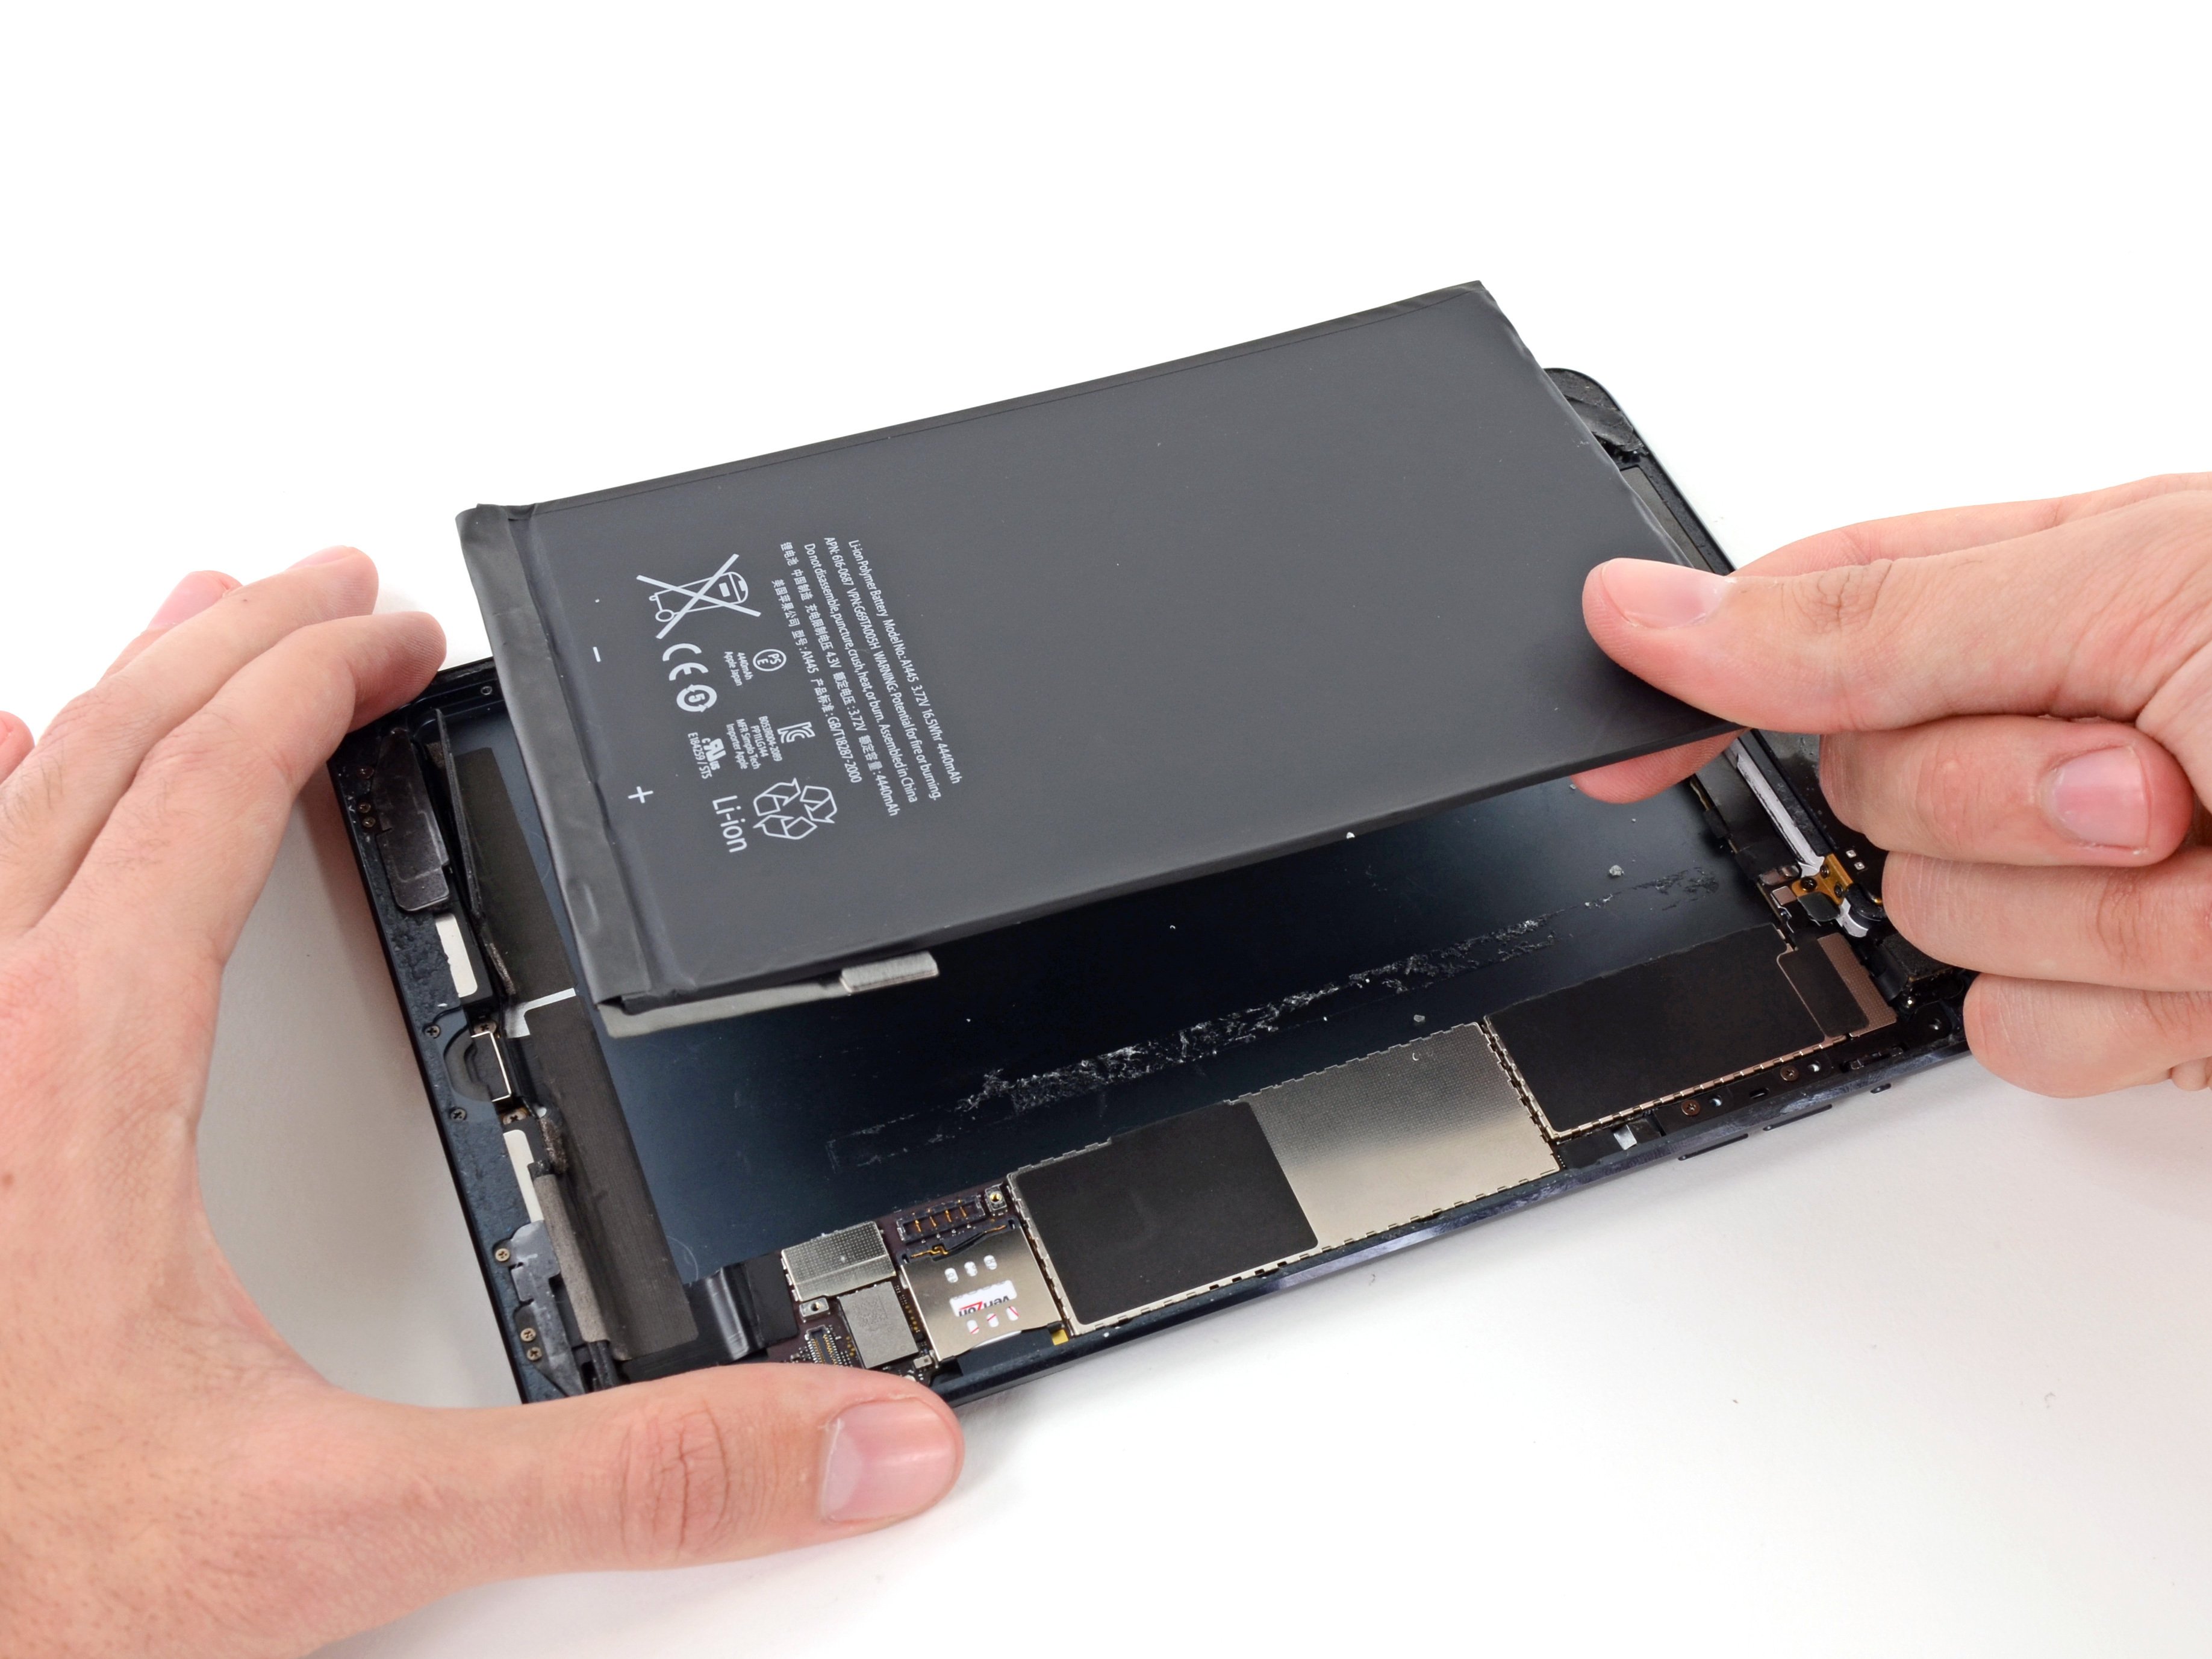
- Grab both cards and gently lift the right side of the battery up about two inches away from the rear case.
- Peel it back slowly, keeping the battery as straight as you can to avoid any surprises.
Step 72

- Gently lift the right side of the battery with one hand while sliding a plastic card underneath to slice through any stubborn adhesive sticking the battery to the rear case.
Step 73


- To put your device back together, just retrace your steps in reverse order—easy peasy! If you hit a snag, remember, you can always schedule a repair for a helping hand.