iPad Pro 12.9″ 3rd Gen Logic Board Replacement
Duration: 45 minutes
Steps: 62 Steps
Replacing this part on your own? Say goodbye to Face ID! But hey, if you need help, just schedule a repair and we’ve got your back!
Ready to replace the logic board in your iPad Pro 12.9" 3rd Gen? Here's the scoop: the logic board is connected to the front camera assembly. So, if you go ahead and swap out the logic board on its own, say goodbye to Face ID. This guide is based on the WiFi + Cellular version (Model A2014), so if your model differs slightly, don't worry – just a few minor visual tweaks, but the steps stay the same. Some of the photos in this guide show the battery connector blocked with two card strips. While this method works, it's much more reliable to fully discharge the battery first. Just keep moving through the steps, and if you need help, you can always schedule a repair.
Step 1
Make sure to fully drain your iPad's battery before diving into this repair. A battery that's still charged can be a bit unpredictable and might even catch fire if it gets damaged. Safety first!
- Disconnect any cables and power off your iPad completely.
Step 2
You can use a hair dryer, heat gun, or hot plate, but take it easy—overheating the iPad is a no-go since the screen and battery are pretty sensitive to heat.
Step 3
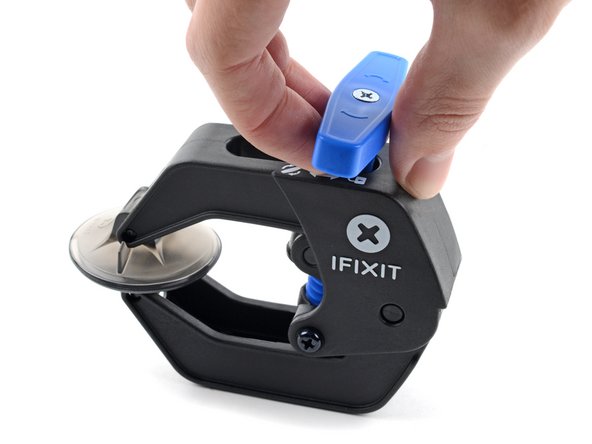
The next three steps walk you through using the Anti-Clamp—our clever little sidekick that makes opening your device a breeze. Not using the Anti-Clamp? No worries, just skip ahead three steps for another way to open it up.
For the full scoop on how to handle the Anti-Clamp like a pro, check out this guide.
If your iPad’s surface feels a bit too slick for the Anti-Clamp to grip, slap on some tape to give it a better hold.
- Give the blue handle a little tug backward to unlock the Anti-Clamp’s arms and set the stage.
- Rest your iPad on a soft object, making sure it sits nice and level between the suction cups. Precision matters!
- Place one suction cup on the top and the other on the bottom, right near the middle of the right edge. They're like buddies working together.
- Now, keep the bottom of the Anti-Clamp steady and give the top suction cup a good press. Watch the magic happen as it sticks!
Step 4
- Pull the blue handle forward to lock the arms in place.
- Give the handle a nice 360-degree twist (clockwise, of course!) or until the suction cups start to stretch.
- Double check that the suction cups stay nice and lined up. If they start slipping out of place, just loosen them a bit and give the arms a little realignment.
Step 5
Take it slow and steady—no need to rush. Give each turn just half a spin, and take a one-minute breather in between. Let the Anti-Clamp and some patience do the heavy lifting for you.
For detailed instructions on how to use a hair dryer, check out this guide.
If the Anti-Clamp isn't giving you enough space, just add a little more heat to that spot and give the handle a half-turn clockwise. You'll get there!
- Take a breather for about a minute to give the adhesive some time to let go and create a little gap for you.
- If the screen's not warming up enough, feel free to give the right edge of your iPad a quick blast with a hair dryer to help it along.
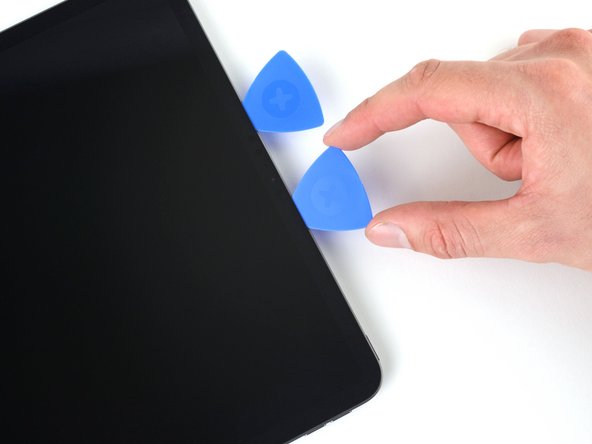
- Once the Anti-Clamp has created a nice enough gap, gently slide an opening pick underneath the screen.
- Feel free to skip the next step—you're doing great!
Step 6
The big screen is super delicate—just make a tiny gap just wide enough to slip in your opening pick.
Keep the pick insertion shallow, no deeper than 5 mm, to keep the screen safe and sound.
If your screen is severely cracked, try sticking a layer of clear packing tape over it to give the suction cup something to grip onto. If you don't have a suction cup, strong tape can do the trick as well. And if you're in a pinch, a little superglue can help you attach the suction cup directly to the cracked screen.
If you're struggling to create a gap, just heat up your iOpener and reapply it to the right edge for another two minutes. Sometimes patience is the key!
- Stick a suction handle onto the screen, aiming for the center of the right edge—precision is key!
- Give the suction handle a firm, steady tug upwards to gently pop open a little gap between the frame and screen.
- Slide an opening pick into that gap to keep things moving smoothly.
Tools Used
Step 7
There are two 2 cm-long magnets along the right edge of the screen. Keep your opening pick to no more than 2 mm deep in these areas to avoid any screen damage—go easy here!
For all other areas, feel free to go up to 5 mm deep with your pick. Just make sure you're not overdoing it!
- The first magnet starts its gig about 3 cm down from the top edge of your iPad.
- The second magnet kicks in around 3 cm up from the bottom edge of your iPad.
Step 8
Gently angle your pick downward and slide it in up to 2mm near the magnet cutouts. Everywhere else, aim for 5mm. Stay steady, you’ve got this!
- Gently slide your opening pick down the right side of the screen to break that adhesive seal.
- Once you’ve made some progress, leave the pick snug in the bottom right corner to keep things in place as you move on.
Step 9
- Gently slide your opening pick around the bottom right corner of the screen to loosen the adhesive.
- Keep your pick lodged in that corner to stop the adhesive from snapping back together.
Step 10
- Place a warm iOpener on the bottom edge of the screen and let it chill there for two minutes.
Tools Used
Step 11
Keep your opening pick insertion shallow—no deeper than 5 mm—to keep things smooth and safe!
- Gently slide a second opening pick under the bottom right corner of the screen.
- Carefully move your pick over to the bottom left corner to loosen the adhesive holding the bottom in place.
Step 12
- Gently glide your opening pick around the bottom left corner of the screen.
- Once it's in place, leave the pick there to stop the adhesive from sealing back up.
Step 13
- Place a warm iOpener along the left edge of the screen for two minutes to get things nice and toasty.
Tools Used
Step 14
Heads up! There are three spots along the left edge of the screen where the adhesive gets super thin. Keep your opening pick insertion to no more than 2 mm here to avoid any screen mishaps.
Elsewhere, you can go a bit deeper, but don’t push your pick in more than 5 mm.
- The upper cutout starts 4 cm down from the top of the frame and stretches 3 cm long.
- The middle cutout kicks off 12 cm from the top and spans 3 cm.
- The bottom cutout sits 4 cm from the bottom of the frame, also measuring 3 cm long.
Step 15
- Slide a third opening pick under the bottom left corner of the screen.
- Carefully glide your pick up to the top left corner to cut through the left adhesive, making sure to steer clear of the cutouts you spotted earlier.
- Keep the pick wedged in the top left corner before moving on to the next step.
Step 16
- Gently slide your opening pick around the top left corner of the screen, like you're tracing a secret path!
- Leave your pick snug in the top left corner, just enough to keep that adhesive from sneaking back into place. You've got this!
Step 17
- Gently heat up your iOpener and apply it to the top edge of the screen for a solid two minutes. This'll help loosen things up before you dive into the repair. Patience is key!
Tools Used
Step 18
Be gentle with that pick! Only go about 5 mm deep to keep the screen safe and sound.
- While the top edge adhesive is softening, keep these tips in mind:
- There are two ambient light sensors tucked away near the corners. Be careful not to push your pick more than 1mm into this area.
- The front-facing camera and extra sensors are right in the middle of the top edge. Avoid inserting your pick here — there's barely 1mm of adhesive, and you don’t want to risk damaging those delicate components.
Step 19
Careful not to slide any further, or you might accidentally mess up the camera’s sensors!
- Gently slide your opening pick about 9 cm toward the top right edge, stopping just before you reach the camera assembly.
- Keep your pick in place before moving on to the next step.
Step 20
- Pop a new opening pick on the opposite side of the camera assembly, about 4 cm away from the last one.
- Slide your pick toward the top right corner to carefully cut through the leftover adhesive.
Step 21
Heads up! Don’t yank the screen off completely since it’s still connected to the frame with a bunch of cables.
If the screen feels a bit stuck, gently slide your opening picks around the edges to loosen any leftover adhesive. Keep an eye on those sensitive spots we pointed out earlier!
- Hold onto two opposite corners of the screen and gently lift it away from the frame.
- Slide the screen down and to the right until the ribbon cable near the top edge peeks out.
Step 22
Keep a close eye on every single screw throughout this guide and make sure each one goes back exactly where it started. No screw left behind!
- Grab your Phillips screwdriver and take out the two screws holding the upper cable shield in place:
- When you're putting it back together, this is a great moment to power on your iPad and make sure everything’s working smoothly before sealing it up. Remember to shut it down again before moving on.
- One screw measuring 2.0 mm in length
- One screw measuring 1.8 mm in length
Step 23
- Carefully grab the upper cable shield with tweezers or your fingers and pull it off.
Step 24
When snapping press connectors back in, line up one side carefully and press down until you hear a click, then do the same on the other side. Avoid pressing the middle — a misaligned connector can bend pins and cause some serious damage.
- Gently use the spudger's tip to lift and disconnect that upper sensors press connector. You're doing great!
Tools Used
Step 25
Hold up on yanking the screen—those display cables are hanging in there!
Take it easy so you don’t put any stress on the display cables.
- Grab the right edge of the screen and swing it open like you're flipping through a cool book.
- Gently lay the screen down over the left edge of the iPad.
Step 26
- Grab your Phillips screwdriver and loosen the five screws holding down the display cable bracket:
- Four screws measuring 1.1 mm in length
- One screw that's a bit longer at 2.0 mm
Step 27
- Grab your trusty tweezers or just use your fingers to carefully pop off the display cable bracket.
Step 28
- Grab your trusty spudger and gently pry up the SIM card reader cable press connector to unplug it. Easy does it!
Tools Used
Step 29
The SIM card reader cable is gently stuck to the battery, so take your time peeling it away.
- Gently use tweezers or just your fingers to lift the SIM card reader cable off the battery connector. Easy does it!
Step 30
- Grab a Phillips screwdriver and carefully unscrew the 1.7 mm-long screw that’s holding the battery connector to the logic board. Take your time, it’s not in a rush!
Step 31
- Grab your trusty spudger and gently pry up to disconnect those two top display cable press connectors with a bit of flair.
Tools Used
Step 32
- Grab your trusty spudger and carefully lift those bottom display cable press connectors off their pins. You've got this!
Tools Used
Step 33
- Carefully take off the screen.
Step 34
A strip of metal tape is hiding three screws that hold the logic board cover in place.
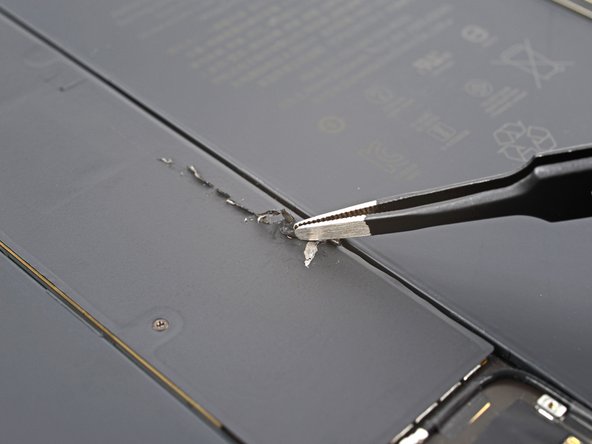
- Grab an opening tool and gently lift the metal tape off the logic board. Once you’ve loosened it enough, use your trusty tweezers to pull it away. Easy does it!
Step 35
- Gently lift the tape from around the screw areas using tweezers. It's like peeling off a sticker, but for your device.
Step 36
- Grab a Phillips screwdriver and get ready to unscrew the eight screws holding the logic board cover in place:
- Five screws, each 2.0 mm long
- Three screws, each 1.1 mm long
Step 37
- Gently lift and peel off the logic board cover to get it out of the way.
Step 38
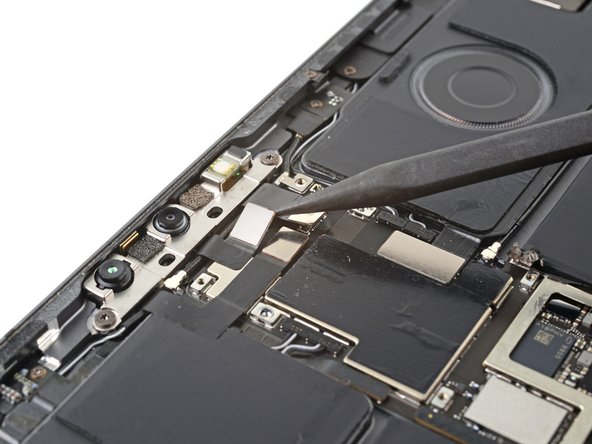
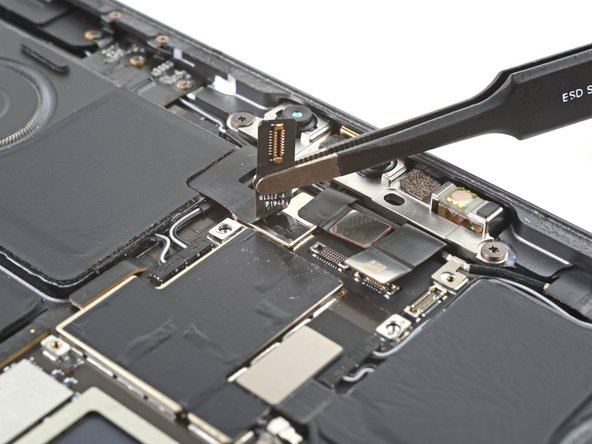
- Grab your trusty spudger and gently pry up the front camera assembly cable connectors to disconnect them. Easy does it!
Tools Used
Step 39
The left front camera cable is gently stuck to the logic board. A little coaxing and it should come free without any fuss!
- Gently lift the left cable off the logic board using tweezers or just your fingers—easy does it!
Step 40
The middle front camera cable is gently stuck to the logic board. Just a little bit of love is all it takes to free it up!
- Gently use tweezers or your fingers to lift the middle cable off the logic board. Take it slow and steady, you’ve got this!
Step 41
- Grab a T-3 screwdriver and unscrew the two 2.2 mm screws holding the front camera assembly in place. You got this!
Step 42
The front camera is glued down tight with some heat-proof epoxy, so take it slow and steady to keep everything around it safe and sound.
This step might need a bit of elbow grease, so be ready to apply some pressure.
- Slide the flat end of your trusty spudger right under the front camera, snug between the middle and right cables.
- Give that spudger a little twist to gently break apart the epoxy holding the front camera in place.
- Carefully lift out the front camera like a pro.
- When putting everything back together, use your spudger to scrape away any leftover epoxy before reinstalling the front camera.
Tools Used
Step 43
- Grab your Phillips screwdriver and twist out the 2.0 mm screw holding the bottom speaker bracket to the logic board. Easy does it!
Step 44
- Grab your tweezers or just use your fingers to gently lift off that bottom speaker bracket.
Step 45
Gently pry up underneath the cables, aiming to get as close to the connector head as you can for the smoothest move.
- Gently use the tip of a spudger to lift and unplug the four speaker connectors at the bottom—careful does it!
Tools Used
Step 46
- Grab a spudger and gently pry up to unplug the Smart Connector press connector located at the bottom of the logic board.
Tools Used
Step 47
Gently lift up beneath the cables, aiming to get as close to the connector head as you can.
- Gently use the end of a spudger to lift and detach the four top speaker connectors.
Tools Used
Step 48
- Grab a spudger and gently wiggle it under the rear camera cable press connector to lift and disconnect it. Take your time – this step doesn't need a rush, just a steady hand!
Tools Used
Step 49
- Grab a spudger and gently pry up the top microphone press connector to disconnect it. Easy does it!
Tools Used
Step 50
- Grab your trusty spudger and carefully wedge its point right next to the coaxial connector to gently pry up and unplug that 5G mmWave antenna.
Tools Used
Step 51
Be gentle with this cable! Try not to bend it too much – it could snap, and we don’t want that.
- Grab your trusty spudger and gently lift up the top antenna press connector to disconnect it. Nice and easy, no rush!
Tools Used
Step 52
Keep the bending to a minimum on this cable—too much flexing could lead to a break. Treat it gently and it’ll stay in good shape!
- Grab your trusty spudger and gently pry up that bottom antenna press connector to disconnect it—easy does it!
Tools Used
Step 53
- Grab the point of your trusty spudger and gently pry up to disconnect the Wi-Fi antenna cable. Aim for the coaxial connector, and pry carefully right around it. A little precision goes a long way here!
Tools Used
Step 54
- Gently peel the Wi-Fi cable toward the right edge of your iPad, like you're sliding a bookmark into place.
Step 55
- Keep on peeling that cable down towards the bottom edge of the iPad to free it from the logic board. You've got this!
Step 56
- Grab your trusty spudger and gently pry up to disconnect the left microphone and Apple Pencil charger cable press connectors. Keep it smooth and steady!
Tools Used
Step 57
- Grab some high-concentration (over 90%) isopropyl alcohol and gently apply it to the right edge of the logic board. Take your time and make sure it's just enough to get the job done without overdoing it.
Step 58
- Gently lift the right side of the iPad, just enough to let that trusty isopropyl alcohol sneak underneath the logic board.
- Now, give it about a minute to let the alcohol work its magic and loosen up that adhesive.
Step 59
Now’s the time to pull out those battery blocker card strips—goodbye, little obstacles!
If the pick is being stubborn, try a drop of isopropyl alcohol along the top edge to help it slide in smoother.
- Gently slide an opening pick under the top edge of the logic board to break free the bottom adhesive. Be careful, it can be a little sticky!
- Leave that opening pick in place to keep the adhesive from sealing up again. You've got this!
Step 60
- Carefully slide an opening pick under the top right corner of the logic board.
- Gently move the pick along toward the battery connector to loosen the right side adhesive.
- Leave the pick in place next to the battery connector to keep that adhesive from sticking back together.
Step 61
By now, the logic board should be completely free from the frame. If it’s still playing hard to get, gently slide an opening pick around the edges to cut through any sticky adhesive still holding it down.
- Slip a fresh opening pick under the logic board, right across from the battery connector.
- Gently slide that pick down toward the bottom of the iPad to loosen the rest of the adhesive.
Step 62
- Time to put everything back together! Just follow the steps in reverse and you're golden.
- Got some old electronics lying around? Don't forget to send them to an R2 or e-Stewards certified recycler.
- Did things go a bit sideways? No worries, check out some basic troubleshooting or ask the community for tips on fixing your iPad 12.9" 3rd Generation.
- If you're still stuck, or want a pro to handle it, feel free to schedule a repair.


