
iPad Wi-Fi Ambient Light Sensor Replacement
Duration: 45 minutes
Steps: 11 Steps
Ready to bring back your device’s brightness sensor mojo? Follow these steps to swap out that busted ambient light sensor and let your screen shine at just the right level again!
Step 1


Pop on those safety glasses to keep your eyes happy, and take it easy around the LCD screen—no need to get rough and risk a crack!
This will help keep those pesky glass shards from flying around and ensure your display stays sturdy while you're prying and lifting it up.
- Cracked display glass? Let's keep those shards in check and your fingers safe.
- Cover the entire screen with overlapping strips of clear packing tape—think of it as a temporary shield.
- Follow the guide steps as best as you can. But heads up: once the glass is cracked, it might keep breaking while you work, so if needed, carefully use a metal prying tool to scoop out loose pieces.
Step 2


In this step, you'll carefully pry the iPad’s display assembly away from its aluminum body. Take your time, follow the instructions closely, and watch out for those delicate clips keeping everything snug—no cracks or surprises here!
If a clip snaps off, no worries—you can grab replacements right here and keep things rolling.
- There are 14 metal clips keeping the display assembly snug in place, shown at left. As you carefully pry in the next steps, try to work around these clips and avoid slicing through them with your opening tool.
Step 3


- Slide a trusty metal spudger between the top edge of the display assembly and the rear panel assembly with confidence.
- Gently twist the spudger away from you to pop those tabs loose along the top edge of the display—like a pro!
- Pop in a second metal spudger in the same spot to keep those tabs from springing back into place. You got this!
Tools Used

Step 4


Go slow and steady with that prying—if it feels stuck, just move to another spot and give it another try!
- Grab your trusty spudger and slide it along the right side of the iPad like you're parting the Red Sea.
- Heads up: The front panel is holding on tight with metal clips up top, down below, and along the left edge. The right side is just chilling with plastic tabs tucked into the backplate.
- Once you've freed those stubborn clips, gently lift the left side of the front panel and give it a smooth slide to the left to release those tabs from the aluminum back. Nice work!
Step 5

Hold off on removing the display just yet—it's still hanging out with the rear panel assembly!
- Gently lift the display assembly from the rear panel assembly by the bottom edge.
Step 6

- Alright, let's get those cables disconnected! In the upcoming steps, you'll be gently detaching the three cables that connect the display assembly to the logic board. These cables are for some essential components, including:
- Digitizer
- Ambient Light Sensor
- Display Data Cable
Step 7


Just a friendly reminder: make sure you're lifting the retaining flap and not the socket itself. You've got this!
- Gently slide the edge of a plastic opening tool under the retaining flaps that are holding the digitizer ribbon cables snug in their logic board sockets and flip them up.
- Carefully pull the digitizer ribbon cables straight out from their sockets without twisting or bending.
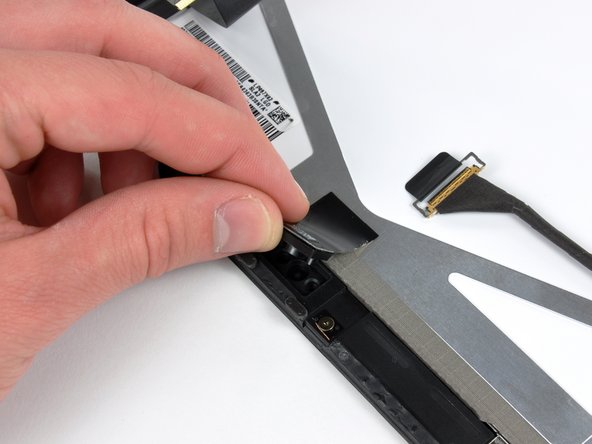
Step 8

- Grab a trusty plastic opening tool and gently nudge the ambient light sensor connector upward to pop it out of its cozy little socket. You've got this!
Step 9


Gently slide the connector out along the logic board's surface, keeping it parallel to the board itself.
- Unplug the display data cable from the main board by gently flipping up the metal retainer using its handy black plastic pull tab.
- Carefully slide the cable connector out of its socket.
Step 10

- Gently detach the display assembly from the back panel assembly. Let's keep it smooth and easy!
Step 11


Be careful not to bend the ambient light sensor near the top—there's adhesive on that section, and it could snap off if you're not gentle!
If you're keeping the LCD, there's no need to remove the ambient light sensor from the back. It's a simple step, no need to overcomplicate things!
- Ready to put things back together? Just walk through the steps in reverse. If anything feels tricky, no worries—if you ever need a hand, you can always schedule a repair!


