iPhone 11 Display Panel Replacement
Duration: 45 minutes
Steps: 47 Steps
Got a shiny new screen with a sleek metal LCD shield plate already attached? Awesome! Just skip ahead to the shorter guide for a breezy repair experience.
The earpiece speaker and sensor assembly is snugly attached to the back of your screen, perfectly matched to your iPhone from the get-go. It's like they were made for each other!
Got a cracked iPhone 11 screen, touch isn't responding, or it's showing a blank screen when you power it up? No worries, this guide will walk you through fixing your iPhone with a fresh new display assembly. If your replacement screen already has the thin metal LCD shield plate attached, you're in luck! Just follow the easier version of this guide. But if it’s not there, don’t sweat it—we’ll show you how to swap in the new screen and reuse your old LCD shield plate. The earpiece speaker + sensor assembly is attached to the back of the screen, and it’s paired with your iPhone straight from the factory. So, you’ll need to carefully transfer it from your old screen to the new one. This part includes the flood illuminator, which powers Face ID, so if anything goes wrong with it, Face ID will be out of commission. Handle it with care—if it’s damaged, only an Apple-approved technician can fix it. And by the way, don’t expect True Tone to work after a screen replacement, even if it’s with an original Apple screen. If you hit a tough spot, don’t hesitate to schedule a repair.
Step 1
Before diving in, make sure your iPhone’s battery is below 25% charge. A fully charged lithium-ion battery can be a bit spicy if poked—think fire or explosion, and nobody wants that!
Opening up your iPhone's display may let go of its waterproof seals, so be sure to have some fresh seals on hand before diving in! If you choose to reassemble your iPhone without replacing them, just be cautious to keep it away from liquids.
- Before you dive in, make sure your iPhone is powered off. Trust us, your phone will thank you.
- Flip your phone over and remove the two pentalobe screws at the bottom edge. They're 6.7 mm long—don't mix them up with the snack crumbs nearby!
Step 2
Pushing your opening pick in too deep can cause damage – so mark your pick to keep things safe and sound.
Feel free to mark the other corners of your pick with different lengths for extra control.
Or, stick a coin on your pick about 3 mm from the tip as a quick depth guide.
- Grab your trusty opening pick and measure out 3 mm from the tip. Give it a little mark with a permanent marker to guide your way.
Step 3
Pop on some safety glasses—your eyes deserve VIP treatment in case any glass decides to go wild during the fix.
Got a cracked screen? No worries! Help prevent any further breakage and keep your hands safe during the fix by sticking some tape over that glass. It'll hold it together while you work.
Stuck? If things aren't going as planned, grab some superglue and attach the suction cup to the screen. It's a little hack that can help make your repair smoother.
- Grab some clear packing tape and lay down overlapping strips over the iPhone's screen until it's completely covered. The more, the merrier!
- If the suction cup isn't cooperating, don't stress. Take a sturdy piece of tape (like duct tape), fold it into a handle, and use that to lift the screen instead. You've got this!
Step 4
The next three steps show you how to use the Anti-Clamp, a handy little tool we put together to make popping open your device a breeze. If you don’t have the Anti-Clamp, no worries—just skip ahead three steps for another way to get it done.
For the full scoop on using the Anti-Clamp, check out this guide.
If your iPhone’s surface feels too slick for the Anti-Clamp to grip, try adding some tape to give it a bit more hold.
- Give the blue handle a gentle pull to free the Anti-Clamp's arms. Nice and easy.
- Slide those arms over either the left or right side of your iPhone. You got this!
- Place the suction cups at the bottom edge of the iPhone—one on top and one at the bottom. Just like a pro.
- Now, squeeze the cups together to create a firm grip on the phone. Feel that suction? Perfect!
Step 5
- Give that blue handle a gentle pull forward to snugly lock those arms in place. You're doing great!
- Now, let's make things interesting! Spin that handle clockwise all the way around, a full 360 degrees, or until you see those suction cups starting to stretch. Almost there!
- Keep an eye on those suction cups—make sure they're still best buddies, perfectly aligned. If they start to drift apart, just loosen them a tad and guide those arms back into harmony.
Step 6
Take it easy – don’t tighten more than a quarter turn at a time, and give it a minute to chill between each turn. Let the Anti-Clamp and the magic of time work their thing.
Feel free to grab a hair dryer, heat gun, or hot plate to warm things up—but watch out! Too much heat can mess with the screen or battery, so take it easy.
If the Anti-Clamp isn’t opening enough, just heat the spot a bit more and twist the handle a quarter turn to get things moving.
- Heat up the iOpener and thread it through the arms of the Anti-Clamp.
- Fold the iOpener so it rests along the bottom edge of the iPhone.
- Give it about a minute to work its magic and loosen the adhesive, creating a small gap.
- Carefully slide an opening pick into the gap between the screen and the plastic bezel—avoid prying under the screen itself.
- Skip the next three steps.
Tools Used
Step 7
Gently warm up the lower edge of the iPhone to loosen up the adhesive holding the display in place. This will make it a whole lot easier to lift the screen and get to the fun stuff inside!
- Grab your trusty hairdryer or heat gun, or whip up an iOpener if you've got one handy. Now, let's give some warm love to the lower edge of your iPhone for about a minute. You're doing great!
Tools Used
Step 8
- If you're working with a single suction handle, place it on the bottom edge of your phone, but steer clear of the curved glass edges. We want a smooth lift, not a glass mishap!
Tools Used
Step 9
The adhesive keeping the display firmly in place is pretty tough—breaking that first little gap takes some serious effort. If the screen is being stubborn, try heating it up a bit more and gently rocking it up and down to soften the glue until you can slip your tool in. Keep at it—you’ve got this!
- Grab the suction cup and pull up with steady, confident pressure to gently nudge a small gap between the front panel and rear case.
- Slide an opening pick into the gap beneath the screen and plastic bezel—be sure to avoid the screen itself!
Step 10
Be careful not to push your pick in more than 3 mm, or you might accidentally tickle some delicate internal parts!
- Gently slide the opening pick around the lower left corner and up the left edge of the iPhone, carefully cutting through the adhesive that keeps the display snug and secure.
Step 11
Be careful along the right edge of your iPhone — there are some delicate cables hiding there. Avoid inserting your pick in this area to keep everything in one piece.
Step 12
Keep your pick shallow—no deeper than 3 mm—or you might give those display cables a bad day!
- Slide your pick back in at the bottom edge of the iPhone and gently glide it up the right side to keep breaking that adhesive apart. You're doing great!
Step 13
The top edge of the display is held in place by a mix of glue and clips, so get ready to gently work it free!
- Gently nudge the right edge of the display down, just a little—aim for that sweet spot near the Lightning port.
- Slide your pick into the top-right corner of the phone and let it do its thing.
Step 14
Keep your pick under 3mm to avoid any accidental damage to the Face ID sensor array. You got this!
- Keep gently pulling the display down toward the Lightning port until you've created a big enough gap for your pick to slide in.
- Slide your pick over to the top left corner and carefully slice through any leftover adhesive holding the display in place.
Step 15
- Give the little tab on the suction cup a gentle pull to pop it off the front panel.
Step 16
Hold off on fully separating the display for now! There are still some delicate ribbon cables linking it to the iPhone's logic board. Take it slow, and remember: if you get stuck, you can always schedule a repair.
- Flip open the iPhone by lifting the display from the left side, just like opening the back cover of a book.
- Lean the display against something solid to keep it steady.
- When putting it back together, place the display in position, line up the clips along the top edge, and gently press the top edge down before snapping the rest into place. If it doesn’t snap easily, check the clips all around the display to make sure none are bent or out of shape.
Step 17
Be extra gentle with those display cables—no pulling, no yanking! Treat them like they're made of gold, and you'll be just fine.
- To get to the screws in the next step, give the display a gentle nudge by lifting its lower edge just a bit. You got this!
Step 18
As you work through the repair, keep track of every screw. Make sure each one goes back to its original spot – we don't want any extra pieces hanging around!
- Grab your trusty Y000 driver and take out the three tiny 1.1 mm screws holding down the battery connector bracket. These screws are small, so don’t let them roll away!
- Before sealing your display, it’s a perfect moment to turn your iPhone on and make sure everything’s working. Once you’ve checked all the functions, make sure to power it off completely before moving on.
Step 19
- Take off the bracket with a steady hand.
Step 20
Watch out for the black silicone seal around this and other board connections—it’s like a mini superhero cape for your device, keeping out water and dust. Try your best not to mess it up!
- Grab a spudger or just use your trusty fingernail and gently pop the battery connector up from its spot on the logic board.
- Give the connector a little bend away from the board so it doesn’t sneak back and make contact while you work.
Tools Used
Step 21
- Grab your trusty Y000 driver and unscrew the five 1.1 mm screws holding down the logic board cover bracket. Keep track of those tiny screws!
Step 22
- Take off the bracket gently and set it aside.
Step 23
- Gently use a spudger or your fingernail to loosen and disconnect the LCD panel cable connector. Don't worry, it's easier than it sounds!
- Next, carefully unplug the digitizer connector that's hanging out right next to it. It's like a little two-step dance!
Tools Used
Step 24
- Gently use the point of a spudger or even your trusty fingernail to pop off that front panel sensor assembly connector. A little finesse here goes a long way!
Tools Used
Step 25
- Take out the display assembly.
- When putting it back together, feel free to pause here if you want to swap out the waterproof adhesive lining the edges of the display.
Step 26
- Let's kick things off by loosening four screws holding the speaker/sensor assembly in place:
- Three 1.6 mm Phillips screws
- One 1.3 mm Y000 screw
Step 27
Heads up! The speaker is connected with super thin ribbon cables—handle them gently to avoid any tears or stress.
- Grab your spudger and gently nudge the top edge of the speaker up—just enough to get it started.
- Now, carefully flip the speaker assembly over, letting it rest away from the top edge of the display. You've got this!
Tools Used
Step 28
- Grab a hairdryer or heat gun, or use an iOpener if you've got one handy. Gently warm up the top front of your display for about 1-2 minutes. This will help loosen up the adhesive that's holding your sensors in place, making the next steps a whole lot easier!
Tools Used
Step 29
- Gently slide your opening pick under the flex cable just below the microphone. Take it slow—you’ve got this!
- Twist it ever so slightly to detach the microphone, but keep an eye on that flex cable to avoid any accidental damage.
- If the microphone's still holding on tight, use the pointy end of the spudger to finish the job, and pop it free from its snug little spot in the front panel.
Tools Used
Step 30
- Grab your tweezers and gently lift the small bracket right off the ambient light sensor, like it's a little treasure you're uncovering. Easy does it!
Tools Used
Step 31
The sensor is still hanging out with the sensor assembly, connected by a super delicate flex cable. Handle with care – a little extra pressure could lead to a cable catastrophe!
If the sensor isn't budging after a few seconds, no worries! Just crank up the heat a bit more and give it another go.
- Grab your tweezers, gently wiggle the ambient light sensor free from its cozy notch in the display, and lift it out with care.
Tools Used
Step 32
Gently lift and hold the speaker aside to get a clear path. Just watch out for that delicate flex cable—it’s easy to tug accidentally!
- Start from the left and carefully slide an opening pick under the flex cable and right beneath the proximity sensor + flood illuminator module.
- With a gentle wiggle and a little lift, separate the module from its snug spot in the front panel.
Step 33
- First, carefully remove the earpiece speaker and front sensor assembly. It's an important step, so take your time.
- When you're putting everything back together, double-check the placement of the black plastic module that houses these key components.
- Make sure the module is aligned properly and that none of the components get blocked by adhesive. You want those sensors to work like a charm!
- Proximity sensor
- Flood illuminator
Step 34
Hold your screwdriver steady and give those screws a confident twist. If they’re being stubborn, use your spudger to support each screw from behind—this lets you crank up the pressure without warping the shield. Keep it smooth, keep it strong!
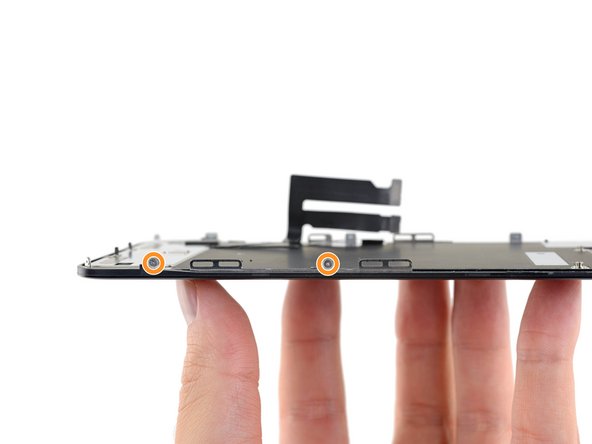
- Grab your trusty Y000 driver and unscrew those 1.1 mm screws holding the LCD shield in place:
- Three are hanging out on the side closest to the display cables.
- The other two are chilling on the opposite side.
Tools Used
Step 35
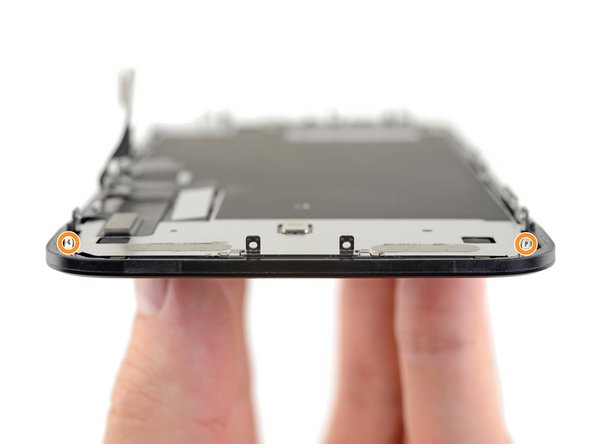
- Take out the last 1.1 mm Y000 screws hanging out on the top and bottom edges of the LCD shield:
- You'll find two screws chilling near the camera cutouts
- And another two screws guarding the bottom corners
Step 36
- Warm up the back of the display for a few moments using an iOpener, hair dryer, or heat gun—just enough to loosen up the adhesive that's holding those display cables onto the LCD shield. Easy does it!
Tools Used
Step 37
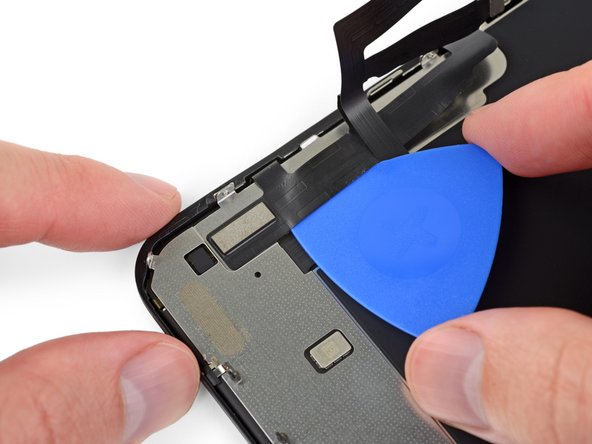
- Slip an opening pick between the display cables and the LCD shield—like sneaking a snack when no one’s looking.
- Gently slide it down toward the bottom edge of the display to start separating those cables. No need to rush; give them a graceful exit.
- Pause when you hit the end of that first cable. You’re halfway there—looking good!
Step 38
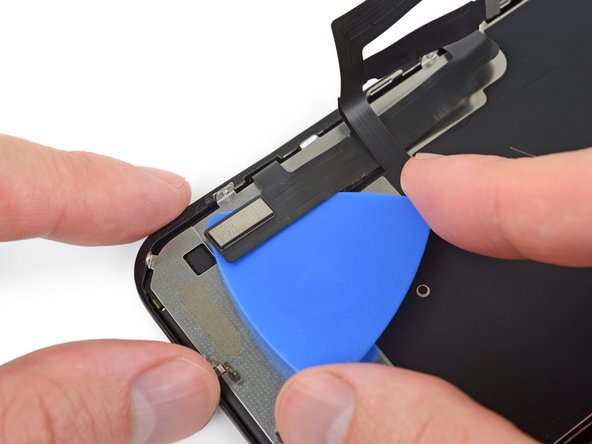
- Pop your opening pick back in, but this time wiggle it between those two cables like you're creating some space for a dance party.
- Gently slide that pick down to the bottom edge of the display to give those cables a little separation and let them groove apart.
Step 39
- Take hold of each cable right where it bends at a 90° angle, and gently pull them apart like you're splitting a grilled cheese—easy does it!
Step 40
- Gently peel the digitizer cable off the LCD shield and set it aside. Easy does it!
Step 41
- Slip an opening pick under the top edge of the LCD shield and give it a gentle twist to pop it free from the display.
Step 42
- Gently grab the LCD shield by its top edge and tilt it upward just a little bit.
- Using your trusty spudger, press lightly on the lower end of the display cable and nudge it through the cutout in the LCD shield.
Tools Used
Step 43
- Gently lift the top edge of the LCD shield, just a little, and carefully guide the rest of the display cable through the cutout in the shield.
Step 44
- Lift the LCD shield up at a steeper angle until you can spot the rest of the display cable still hanging onto the back.
- Now, gently slide a spudger between the LCD shield and the display cable, then carefully separate them.
Tools Used
Step 45
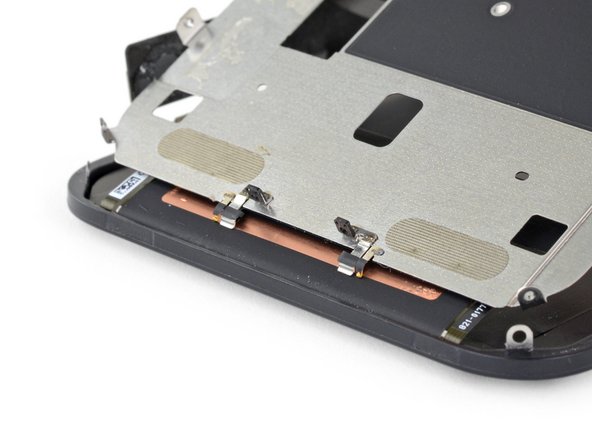
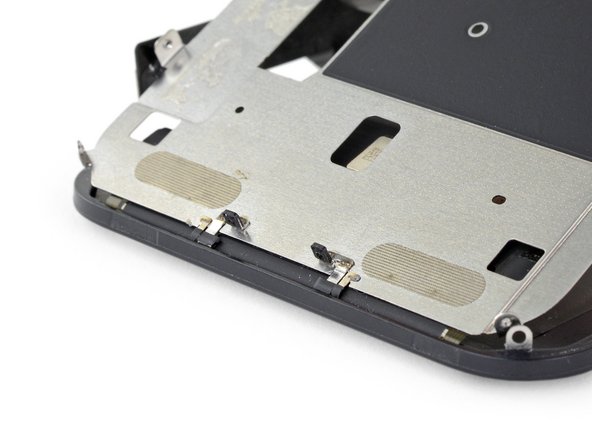
- As you lift the LCD shield, keep an eye on the metal prongs along the bottom edge—they’re pretty important!
- When putting things back together, be sure these prongs (also known as EMI fingers) slide neatly into the LCD frame just like in the picture.
Step 46
- Take off the LCD shield with care.
Step 47
- Before installing, double-check that your new replacement part matches the original one. You might need to move over some small pieces or peel off the adhesive from the new part.
- Reassemble your device by following the steps in reverse order. It’s like putting a puzzle back together—just in reverse!
- Got e-waste? Make sure to drop it off at an R2 or e-Stewards certified recycler. It’s a great way to make sure your old tech gets the best possible afterlife.
- Did things not go quite as planned? Don’t worry, you’ve got options! Check out our handy iPhone troubleshooting library, or head to the iPhone 11 won’t turn on page for more specific tips. If you're still stuck, our iPhone 11 Answers community is here to lend a hand.


