iPhone 11 Pro Max Battery Replacement
Duration: 45 minutes
Steps: 43 Steps
iPhone batteries are designed to keep about 80% of their juice for up to 500 charge cycles, which usually means around 18-24 months before they start showing their age. After that, you might notice your phone needing a lot more pit stops at the charger, and iOS could tell you performance is taking a hit (yep, things might get a bit sluggish). This guide will walk you through swapping out your battery, so your iPhone can get its groove back. If your battery is looking suspiciously puffy, handle it with care. Heads up: after the swap, your iPhone might pop up with a message about the battery not being 'genuine,' even if it is—if everything’s working fine, you can just ignore it. For best results, give your new battery a proper calibration: charge it to 100% and keep it plugged in for two more hours, then use your phone until it powers down. Finish up by recharging it straight to 100%—and you’re all set!
Step 1


Before you start, make sure your iPhone battery is below 25% charged. A fully charged lithium-ion battery can be a fire hazard if accidentally punctured, so better safe than sorry!
Cracking open your iPhone’s display breaks its waterproof mojo. If you want to keep it splash-proof, grab some new seals before you go any further—or just be extra careful around liquids when you put it back together without them.
- Alright, first things first—make sure your iPhone is powered off before diving in.
- Now, grab your screwdriver and carefully remove the two 6.7 mm-long pentalobe screws at the bottom edge of your iPhone. You're doing great!
Step 2


Watch out! If you shove that opening pick in too deep, you might end up hurting your device. So, let's mark it to avoid any mishaps!
Feel free to give those other corners a little measurement love too!
For a clever twist, tape a coin 3 mm from the tip of your pick. It's a handy trick!
- Take a moment to measure out 3 mm from the tip, then grab a permanent marker to put a little dot on your opening pick. You've got this!
Step 3


Pop on those safety glasses! You’ll thank yourself later when no pesky glass bits get in your eyes during the repair process.
Got a cracked iPhone screen? Keep those shards in check and avoid any accidental ouchies by taping over the glass before you get started.
If the suction cup just won’t stick, no worries—try carefully bonding it to the screen with a bit of superglue.
- Cover the iPhone’s screen with overlapping strips of clear packing tape until the entire front is protected.
- If the suction cup won’t stick in the next steps, no worries — just fold a sturdy piece of tape (like duct tape) into a little handle and use that to lift the screen instead.
Step 4


The following three steps walk you through using the Anti-Clamp, a handy tool we created to make opening your device a breeze. If you’re not using the Anti-Clamp, just skip ahead three steps for another way to open it.
For full details on how to handle the Anti-Clamp, check out this guide.
If your iPhone’s surface is a bit too slick for the Anti-Clamp to grip, try adding some tape to give it a better hold.
- Pull the blue handle back to release the Anti-Clamp's arms.
- Slide the arms over either the left or right side of your iPhone.
- Place the suction cups near the bottom edge of your iPhone—one on the front, the other on the back.
- Press the cups together to create suction where you need it.
Step 5


- Give that blue handle a little tug forward to secure those arms in place. You've got this!
- Now, twist that handle like a pro, turning it clockwise a full 360 degrees or until those suction cups start to stretch. Keep it steady!
- Check in on those suction cups to make sure they’re still in sync. If they start to drift apart, just loosen them up a tad and bring those arms back into alignment. Teamwork makes the dream work!
Step 6


Turn no more than a quarter turn at a time, then pause for a minute. Let the Anti-Clamp and a little patience do their magic!
You can also grab a hair dryer, heat gun, or hot plate, but just be mindful—too much heat can harm your display or internal battery, so go slow and steady.
If the Anti-Clamp isn't giving you enough space, no worries—just add a bit more heat and give the handle a little quarter turn to loosen things up.
- Warm up your iOpener and slide it carefully between the arms of the Anti-Clamp.
- Now, gently fold the iOpener so it rests comfortably along the bottom edge of your iPhone.
- Give it a moment (about a minute) to let the adhesive loosen up, creating just enough of a gap for you to work with.
- Once that’s done, grab an opening pick and carefully slide it into the gap—make sure it's under the screen and the plastic bezel, but not the screen itself.
- Feel free to skip the next three steps.
Tools Used

Step 7

Warming up the bottom edge of your iPhone helps loosen the sticky stuff holding the screen down, making it way easier to pop open.
- Grab your trusty hairdryer or heat gun, or whip up an iOpener! Now, let’s warm things up a bit by applying it to the lower edge of your iPhone for about a minute. This will help soften that pesky adhesive hiding underneath.
Tools Used
Step 8


- If you’re rocking a single suction handle, stick it right on the bottom edge of your phone—but steer clear of the curved glass part!
Tools Used

Step 9


The adhesive sealing the display is seriously tough—getting that first gap open might feel like arm wrestling a gorilla. If it’s not budging, hit it with a little more heat and gently wiggle the screen up and down. Soften up that glue until you’ve got enough space to slide your tool in.
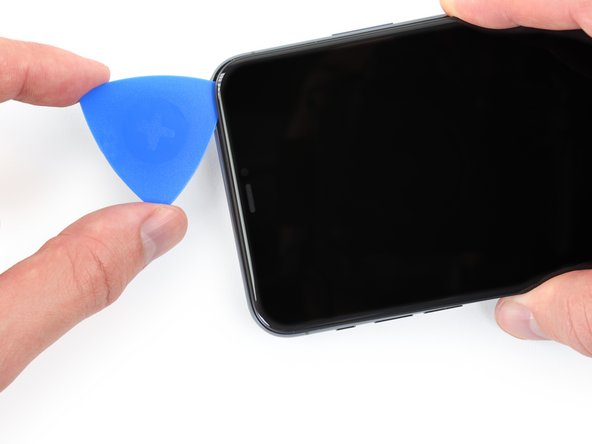
- Grab the suction cup and pull up steadily with some muscle to pop a tiny gap between the front panel and the back case.
- Slide an opening pick into that fresh little gap to get things started.
Step 10


Keep your pick to a maximum of 3 mm, or you might accidentally poke something you don't want to!
- Carefully slide the opening pick around the lower left corner and up the left edge of the iPhone, gently cutting through the adhesive that’s keeping the display stuck in place.
Step 11

Watch out for that delicate cable snaking along the right edge of your iPhone! It's best to keep your pick away from here to avoid any accidental damage. You've got this!
Step 12


Keep your pick shallow—no deeper than 3 mm—unless you want a surprise meeting with your display cables.
- Slide your pick back in at the bottom edge of the iPhone, then cruise it up along the right side to keep peeling that adhesive away.
Step 13


The top edge of the display is held in place by a combo of glue and clips, so take it slow and steady!
- Gently nudge the right side of the display down a bit, toward the Lightning port. It's like giving it a little push to get things started.
- Now, carefully slip your pick into the top-right corner of the phone. A little wiggle and you’re in!
Step 14

Keep your pick under 3mm deep—going too far might cause damage to the front panel sensor array.
- Keep gently pulling the display down toward the Lightning port until you've got enough space for your pick to squeeze in.
- Glide your pick over to the top left corner and slice through any leftover sticky adhesive holding the display in place.
Step 15

- Give the little tab on the suction cup a gentle tug, and it’ll pop right off the front panel. Easy does it!
Step 16


Hold up! Don’t pull the display all the way off just yet—there are still some delicate ribbon cables hooking it up to the iPhone’s logic board.
- Open the iPhone by swinging the display up from the left side, just like flipping open the back cover of a book.
- Prop the display up by leaning it against something sturdy while you work on the phone.
- When putting it all back together, position the display, line up the clips along the top edge, and gently press that top edge into place before snapping the rest down. If it doesn’t snap easily, double-check the clips around the edges to make sure none are bent or out of place.
Step 17


As you dive into this repair adventure, remember to keep an eye on every little screw! They all have their own special spot, so make sure to return them to their home sweet home to keep your iPhone happy and healthy.
- First things first, grab your trusty Y000 screwdriver and carefully remove the two 1.3 mm long screws that are holding the battery cover bracket in place. You've got this!
- Now, while you're at it, why not take a moment to power on your iPhone and give it a little test run? Make sure everything's working like a charm before you seal that display back up. Just remember to power down your iPhone completely before diving back into the repair!
Step 18

- Take off the bracket and set it aside like a pro.
Step 19


Be careful not to mess up that sleek black silicone seal around this and other board connections. These little heroes are your first line of defense against pesky water and dust sneaking in!
- Grab a spudger or just use your trusty fingernail to pop the battery connector up from its spot on the logic board.
- Give the connector a gentle bend away from the logic board—just enough to keep it from sneaking back and powering the phone while you work your magic.
Tools Used

Step 20


- Grab your Y000 driver and carefully unscrew the six tiny 1.3 mm screws holding down the logic board cover bracket.
Step 21

- Take off the bracket.
Step 22


- Use a spudger or your fingernail to gently disconnect the OLED panel cable connector. No need to rush, just a light touch will do the trick!
- When it's time to reconnect, here's the deal: carefully align the connectors, then press down one side until you hear that satisfying click. Move to the other side and do the same. Avoid pressing in the middle—if the connector’s off-center, you risk bending the pins, which could lead to permanent damage. Take your time, and you'll be good to go!
Tools Used
Step 23


- Grab your trusty spudger or use your fingernail to gently pop off the front sensor assembly cable connector. No need for wild wrestling moves—just a little finesse.
- Repeat the move with the digitizer cable connector. Slow and steady wins the connector game.
- If your screen suddenly starts ignoring your touch like a moody teenager, disconnect the battery, reseat the connector, and make sure it’s free of pesky dust or debris. Listen for that satisfying click—it's the sound of things lining up just right.
Tools Used
Step 24

- Gently take out the display assembly.
- If you’re reassembling and want to freshen up the waterproof adhesive around the display edges, now’s the perfect moment to pause and do that.
Step 25


- Grab your trusty Y000 driver and unscrew those four tiny 1.2 mm screws holding the lower battery connector cover in place. You've got this!
Step 26

- Pop off that lower battery connector cover—it's like opening the door to the next step.
Step 27


- Grab your trusty spudger and gently pry the lower battery flex cable straight up to disconnect it from its socket. Easy does it!
Tools Used
Step 28


- Grab a spudger and gently pry the Taptic Engine flex cable straight up from its connector to unplug it.
Tools Used
Step 29


If you’re reaching for a small flathead screwdriver, go slow and steady—those things love to slip and cause chaos!
Standoff screws come out smoothest with a standoff screwdriver or bit—makes the job a breeze!
- Unscrew the three screws holding down the Taptic Engine:
- One Y000 screw, 2.0 mm long
- One Y000 screw, 1.6 mm long
- One standoff screw, 4.0 mm long
Step 30

- Time to evict the Taptic Engine! Gently lift it out and set it aside like the VIP it is.
Step 31


- Grab your trusty Y000 driver and take out those three 1.3 mm screws holding the Lightning flex cable bracket in place. You've got this!
Step 32

- Let's get this party started by taking off the flex cable bracket!
Step 33


- Gently pry up to pop both Lightning flex cable connectors off the Logic Board.
Step 34


- Gently lift the Lightning flex cable and give it a little bend towards the bottom edge of the iPhone. This will help you get a better view of the battery hiding beneath!
Step 35


No need to stress if the strips give out on you! They can be a bit unpredictable sometimes. Just keep on reading for some helpful tips on how to tackle those pesky broken strips.
Three strips of stretchy adhesive hold the battery in place—one at the bottom, one at the top, and one on the right side. They're like the gymnasts of the glue world: strong, but ready to let go when stretched.
Coming up, you'll gently tug each tab to stretch out the adhesive underneath the battery. These command-strip adhesives lose their grip as they stretch, making battery removal way easier—no wrestling required.
- Each strip of adhesive comes with one or two black pull-tabs at the ends, lightly sticking to the battery’s side edges to keep things in place.
Step 36


Hey there! Let's keep things safe and sound—avoid poking the battery with sharp tools. A little poke could lead to some serious trouble, like leaks or even a fire. Let's stay safe and keep those batteries intact!
- Gently peel down the first battery adhesive pull-tab to free it from the bottom edge of the battery.
Step 37


If any of the adhesive strips decide to stay behind and won't budge, no worries! Just remove the others and follow the next steps to keep things moving.
- Alright, grab that pull tab with your fingers and gently tug it away from the battery, heading toward the bottom of your iPhone.
- In case the adhesive decides to put up a fight and breaks, try to snag it with your fingers or some blunt tweezers, then keep pulling—just avoid prying under the battery.
- Give it a good pull to keep some tension on that strip, but remember, no need to muscle it. Let it take its sweet time to stretch and separate from the battery.
- Make sure not to push down on the battery. Keep a steady grip on the iPhone by its sides.
- Maintain that strip nice and flat—wrinkles are a no-go! Focus on pulling evenly across the entire strip, rather than just yanking on one end like a champ.
- Aim to pull at a low angle so that strip doesn't catch on the battery's edge.
Tools Used

Step 38


Be careful around those top pull tabs—they're practically neighbors with the Face ID sensors! If they get damaged, you'll need Apple to swoop in for the rescue, so handle with care. And remember, keep your fingers away from those lenses!
- Gently tug down those battery adhesive tabs to loosen them from the battery’s top edge. It's like giving your battery a little stretch break!
Step 39


If the adhesive decides to take a break underneath the battery and you can't quite get it back, no worries—just move on to the next step.
- Grab both pull tabs at once and gently pull to stretch the adhesive away from the battery, guiding it toward the top of your iPhone.
- If the adhesive strip snaps, don’t panic! Use your fingers or some blunt tweezers to fish it out, then keep pulling—just avoid prying under the battery.
- Repeat the same smooth moves as before: avoid pressing down on the battery, keep the strip nice and flat without wrinkles, and pull at a low angle.
Tools Used
Step 40


- Gently lift those two stubborn battery adhesive pull-tabs and free them from the right edge of the battery. You've got this!
Step 41


Watch out! When that last adhesive strip pops out, keep the battery steady and don't let it go on a wild ride!
- Just like before, grab both tabs and give them a gentle tug at the same time to stretch and peel away the last stubborn adhesive strip that's keeping the battery snug. Remember, be careful not to catch the adhesive on the edge of your iPhone!
- If you've successfully liberated all the adhesive strips, you can skip ahead to the next step.
- If not, no worries! Just keep going with the next step below.
Step 42


Don't go all Hulk on that battery! If it's being stubborn, try adding a bit more alcohol to loosen things up. And remember, your pry tool is for gentle persuasion only—no poking or prodding the battery.
- If the battery is being stubborn, drip a few drops of strong (90% or higher) isopropyl alcohol under the battery edge where the sticky adhesive gave up.
- Give it about a minute to let the alcohol do its magic and soften the adhesive.
- Use the flat end of a spudger to carefully pry the battery up without rushing it.
Tools Used

Step 43

- Check out your new part next to the old one—sometimes you’ll need to move over bits and pieces, or peel off protective stickers before popping it in.
- Ready to put it all back together? Just work your way through the steps in reverse.
- When you’re done, recycle your old parts at an R2 or e-Stewards certified spot. Earth will thank you.
- Not everything went according to plan? Try some quick troubleshooting, or if you’re still stuck, you can always schedule a repair.